|
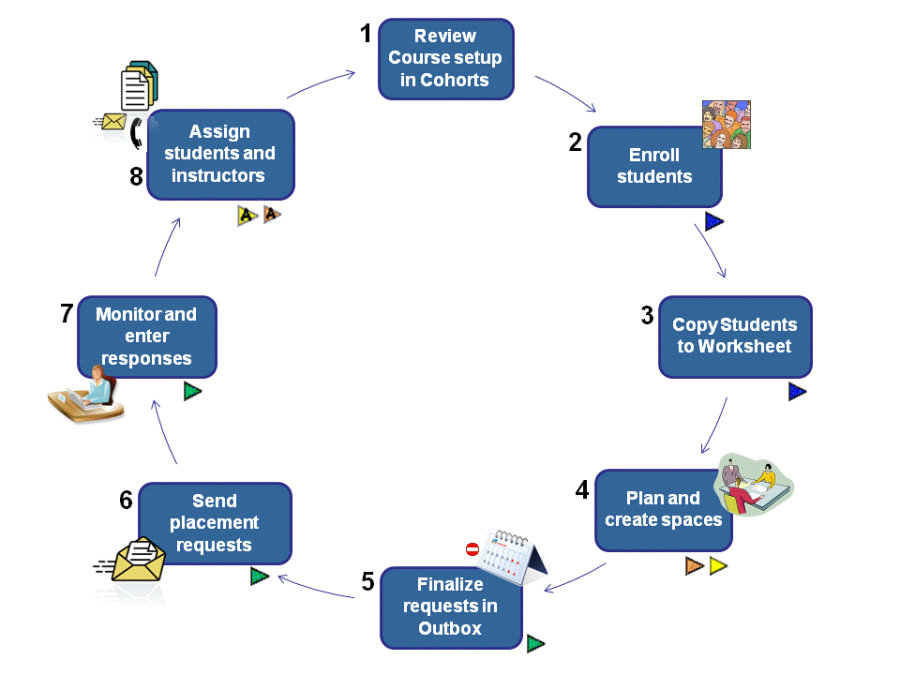
Life Cycle of A Placement Request in HSPnet (overview).
Pre-placement Cycle: (For Placing Coordinators)
-
Cohort set up and review (check dates, schedules, etc).
-
Start the Placement Request creation process for a specific course:
- enter the enrollment worksheet through the icon:

- On either of the
 Group or Group or  Individual Worksheets find and enter locations where you can request practicums for the students. Individual Worksheets find and enter locations where you can request practicums for the students.
-
Create a new student placement request(s): Copy the locations and students entered on the Group or Individual Worksheets to the Outbox which will create New requests.
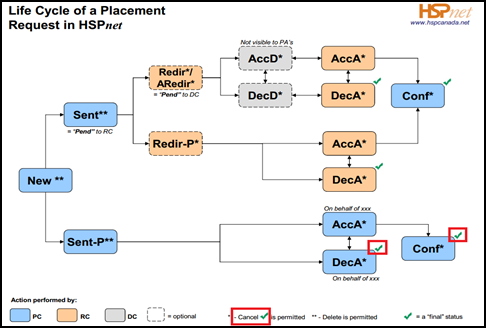
Placement Request Life Cycle: PC Actions are highlighted in blue at various stages in which they have an action role in the diagram on the right. The action steps of the RC are shown in orange.
- New - only the Placing Coordinator creator (and team with the same access) can view this request.
- Sent - The Placement request(s) have been sent online to the Receiving Coordinator at the Receiving Agency. The Placing Coordinator now awaits a response from the Receiving Agency... allow time.... it may not be immediately!
- Sent - P - Action Required: this is going to an Agency or a Site that has never heard of HSPnet (which means they don't look at your online requests, so you need to send them the request by e-mail from your print queue).
- Redirect: The schematic on the right is a bit out of date on this step. A Placing Coordinator only needs to be aware of one orange box at this stage: Redirect. This means the Receiving Coordinator has forwarded your request to a Destination Coordinator. If there is a Redirect-P it means the Receiving Coordinator has e-mailed the request to the Destination Coordinator, because this is going to a destination that has never heard of HSPnet (which means they don't look online at the requests and therefore, the Receiving Coordinator [not the Placing Coordinator] needs to e-mail the requests to the destination at the site)!
- Accepted Request/Declines: This Status is what the waiting period was for. The grey boxes retain the destination's decision whether to accept or decline the request at the destination. That status is considered internal to the Receiving Agency where it is possible local destinations are asked to reverse a decision due to the Agency's current operational circumstances. When a final decision is reached you will see the status: AccA = Accepted by the Agency, or hopefully not: DecA = Declined by Agency. A decline can happen for many reasons and is not necessarily going to happen to your future requests. For non user sites, you will need to enter these statuses on behalf of the non user Receiving Agency.
- Confirmed. This is a status you enter to confirm you are going to send students on this request. This status can only be entered on requests that have the status AccA. This will include assigning students and instructors (faculty supervising students on site) to placement requests and confirming they have met all site requirements. When you are responding on behalf of a non user agency, you need to enter the Accept Agency step yourself, before you can enter Confirm.
- Cancel. It's not on the diagram, but it happens. You may need to cancel because of attrition, or students not meeting the requirements. The Receiving Agency may need to cancel for some unforeseeable reason.
|
|
|
Placement Cycle Overview for Placing Coordinators:
- Review the cohort and courses to ensure they are set up correctly.
- Enroll the students on the enrollment worksheet(s) in the cohort. You normally need to proceed planning the placements long before the student names are known and entered. All steps below except #8 can proceed prior to this step if needed.
- Create a worksheet(s) for each course in the cohort. Most course request types will determine whether you need to create group or Individual worksheets. Some request types will give you options to create both group and individual worksheets for the same course. If both options are available in the same course, from the beginning care must be taken to enter the group destination requests on the group worksheet and the individual placement destination requests must be entered on the individual worksheet.
- Use the group or individual worksheet to search for and enter potential spaces/destinations to send the placement requests to.
- New (Placement Status): Copy the draft list of spaces/destinations from the group or individual worksheet to the Outbox, where they will appear as New Requests. You can finalize the requests if they need any splits, links or fine tuning of the service and the destination, dates, and schedules. As long as they have the status: new, you can delete them too.
- Sent and Sent-P: Send the placement requests from your outbox to the receiving agencies. The status when sent to a user receiving agency is Sent; requests sent to a non user receiving agency status is Sent-P. (PDFs have been created in your report queue for e-mailing to a non user agency - You can e-mail the requests straight from your print queue).
- Monitor Responses from other users in your outbox on HSPnet, and enter responses from non users that you receive in phone calls, faxes or e-mails outside of HSPnet. Potential responses from user Receiving Agencies are: 1. AccA = Accepted at the Agency 1. DecA = Declined at the Agency 1. Please meet our conditions before we can accept the request.
-
- Enter AccA or DecA responses from non users. (Or see if you can meet conditions which may be to change the dates or shifts, reduce group size, provide an unnamed resume first, etc).
- Confirm (Conf) - for all accepted requests that you will be using.
- Assign students and instructors.
|
|
|
At Each New Intake of Students In A Cohort:
A Cohort is defined on HSPnet as a group of students who start their program at the same time and finish their program at the same time. At each new intake of a student cohort, you will need to create a new cohort. You can create an empty cohort and add courses from course maintenance, or copy a previous cohort and update it.
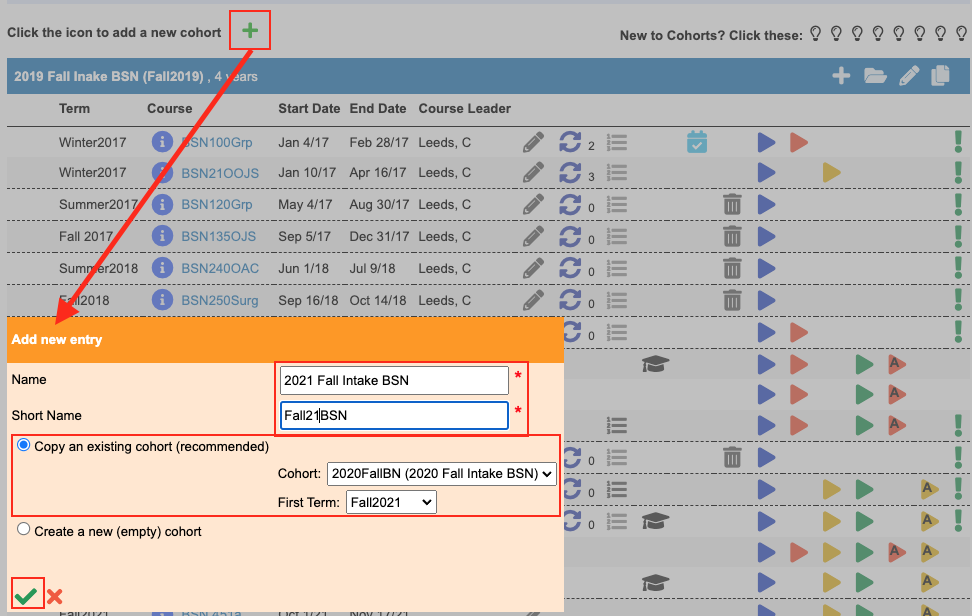
Add a New cohort copied from another:
-
Click the add icon at the top of the cohort page (not the blue bar).
-
Create a long name and short name for the cohort. Each of these MUST be unique. We recommend you use a naming convention that either includes the intake or the graduation dates, such as 2021 Fall Intake BSN, or 2025 BSN Graduation.
-
If you are copying a cohort:
- Select the name of the cohort you are copying from from the Cohort drop down list.
- Select the first term that will have a practicum placement.
- Save the changes by clicking the green check mark icon.
|
|
|
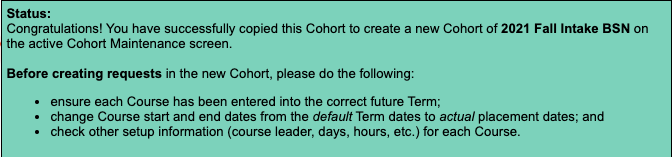
When you have set up a cohort, a green back ground message will advise you and remind you of step one in the placement cycle: Review each course in the cohort to ensure it is set up correctly. When you copy a previous cohort, it will update the year base on the first term you have selected, but it will not update the start and end dates, this must be done manually (directions below).
|
|
|
Structured or Unstructured Cohort?
A Structured Cohort means all students will attend the same program in the same order; this means that all students can be enrolled in all courses in the cohort with only one upload - the students uploaded to the enrollment worksheet for one course in the cohort will be uploaded to all of the enrollment worksheets for all of the courses in the cohort.
An Unstructured Cohort means some students in 3rd year may attend 2nd year courses, while the 2nd year students may complete 3rd year courses, etc. Although the students start the program and finish the program at the same time, in between they may attend the program in a different order. (For example, to ease the demand for a particular type of destination, such as Maternity, it may be one group will do that placement in the Fall, while the other group may do it in the Winter, so there are enough placements to go around). In an unstructured cohort, students are only uploaded to the enrollment worksheet for the course selected, and each course will need to have each enrollment worksheet populated separately.
To Change a Structured Cohort to an Unstructured Cohort:
- Click the pencil icon in the blue bar above the cohort.
- Click to place a check mark in the the Unstructured box.
- Save the change by clicking on the green check mark icon.
If you need to change an unstructured cohort to a structured cohort, you may want to consult e-mail help before proceeding as it is not as easy to move from unstructured to structured..
|

|
|
Placement Cycle Guide:
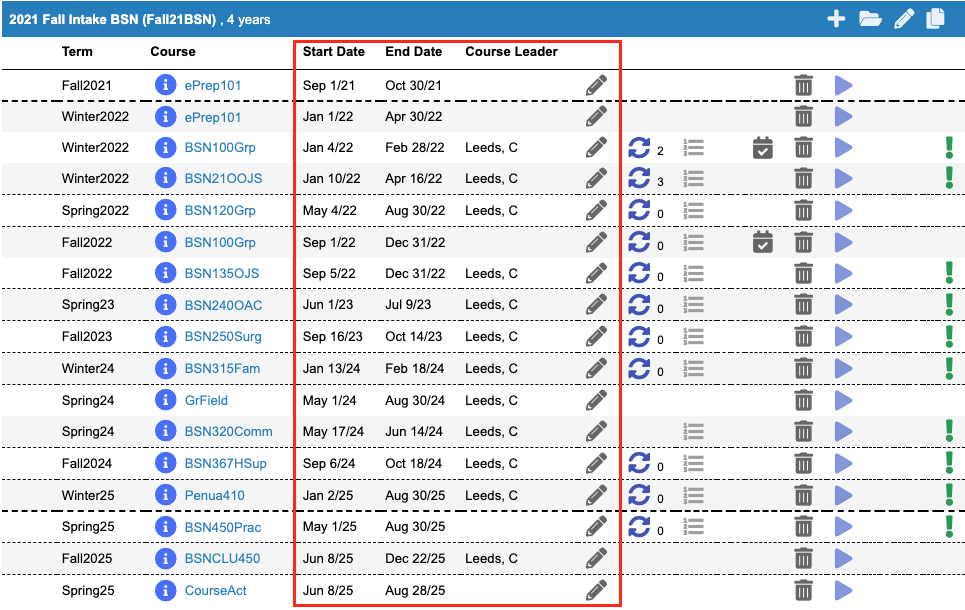
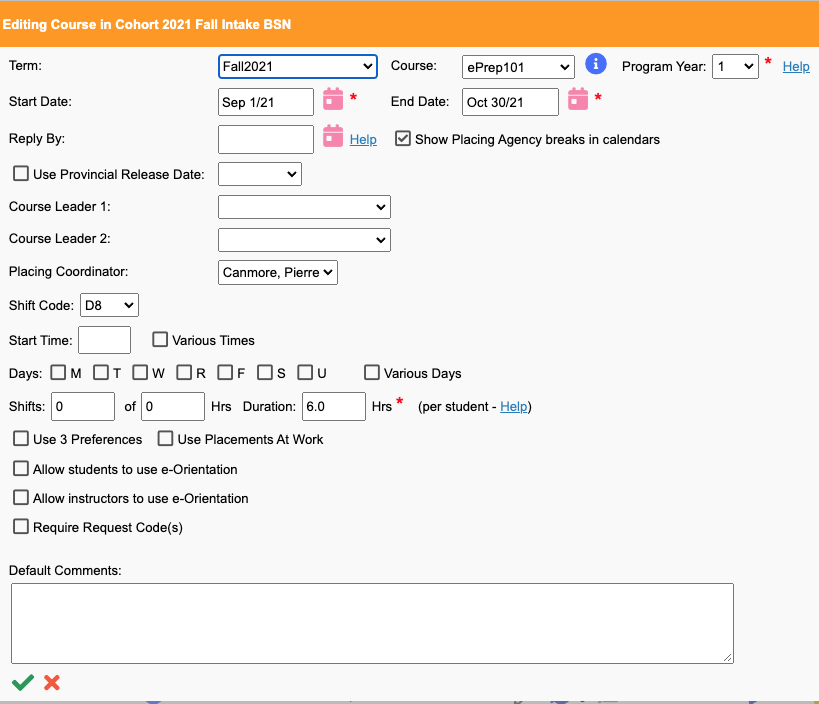
Step 1 – Review Course Setup
In the Cohorts screen, review the course setup to ensure the correct information:
-
Are all of the courses required by the cohort included in the cohort?
-
Use the pencil icon to update each course as needed. Depending what is turned on for your program, you may have more or less options:
-
Update the term, course, program year.
-
update the start, end and reply by dates - PLEASE NOTE to double check these dates are accurate before sending the requests, as once sent this date cannot be changed easily and may require assistance from HSPnet Support.
-
assign the course leaders and the placing coordinator.
-
adjust the schedule:
- shift code and start time.
- days of the week if a group placement, and specific or various days and various times for individual placements.
- Shifts and shift hours
- Use Placements at work (if that feature is turned on and this student is an employee where they are being placed).
- Allowing Students and or Instructors to use e-orientation (available in Ontario and Nova Scotia only as of this writing).
- Request codes if this feature is being used.
-
Default comment (to appear in each placement request unless modified later). When a default comment is entered, a green Exclamation mark icon  appears on the far right side of the course on the Cohort screen. appears on the far right side of the course on the Cohort screen.
-
Save the changes by clicking on the green check mark.
Detailed Guides: (All of these guides can be accessed directly from the Cohort screen when click: online help.
These are guides are in the knowledge base but not linked to the Cohorts Page online help).
|
|
|
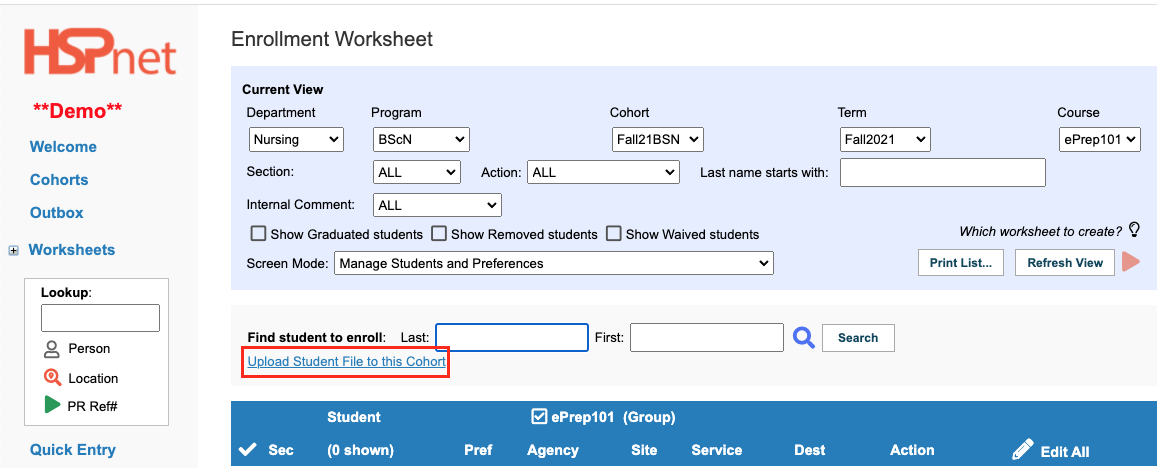
Step 2 – Enroll Students
Although this is step two, this step may be completed later in the process and you can go on to step 3 even without any students enrolled in the course.
- Click the Enrollment screen's GoTo icon/button or
 to open the Enrollment worksheet for the selected Course and Term. to open the Enrollment worksheet for the selected Course and Term.
- If you are not ready to enroll students at this time, proceed to Step 3.
- When you have a large enrollment, you will find it easier to use the automated student upload feature to upload your students from a spreadsheet by clicking the link: Upload Student File To This Cohort.
- To add students that already exist in the HSPnet database, (students that may have been in the system from previous programs, or were added after the upload above) enter a first or last name in the Find Students To Enroll window. When you are not sure of the spelling, only enter 2 or 3 letters of a student's last and/or first name and click the Search icon
 to find the matching student(s). to find the matching student(s).
|
|
|
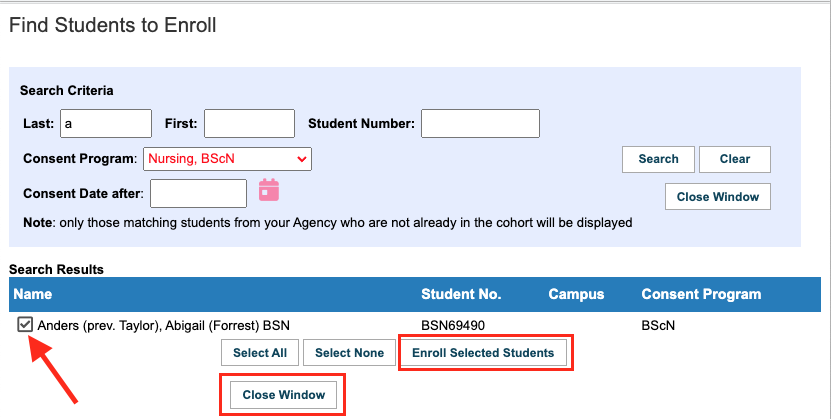
Step 2 – Enroll Students - continued.
- The Find Students to Enroll window will open.
- From the list of matching Students, click the checkbox for one or more student(s) to be enrolled and then click
 . .
- When finished enrolling students, click
 to return to the Enrollment screen. to return to the Enrollment screen.
When the Enrollment screen refreshes, the selected student(s) will be enrolled.
Detailed Guides:
|
|
|
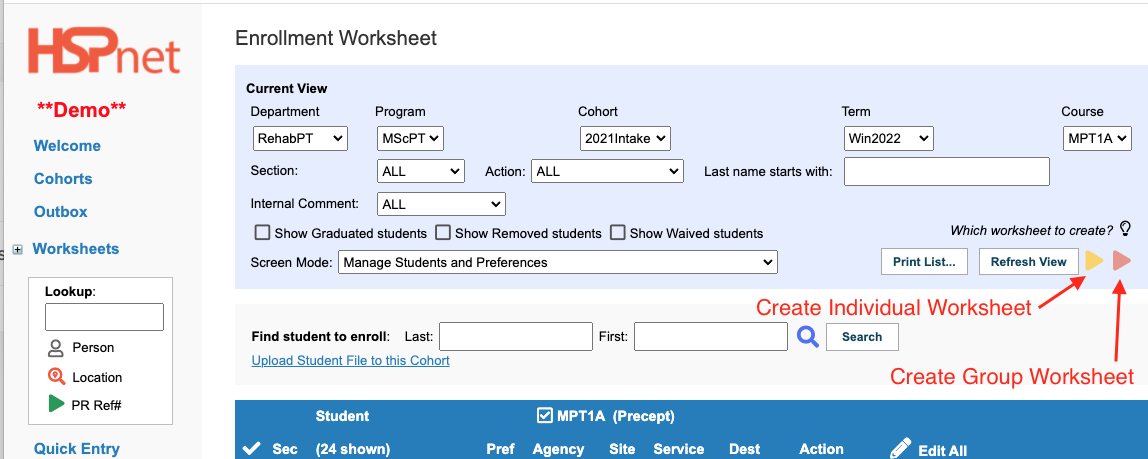
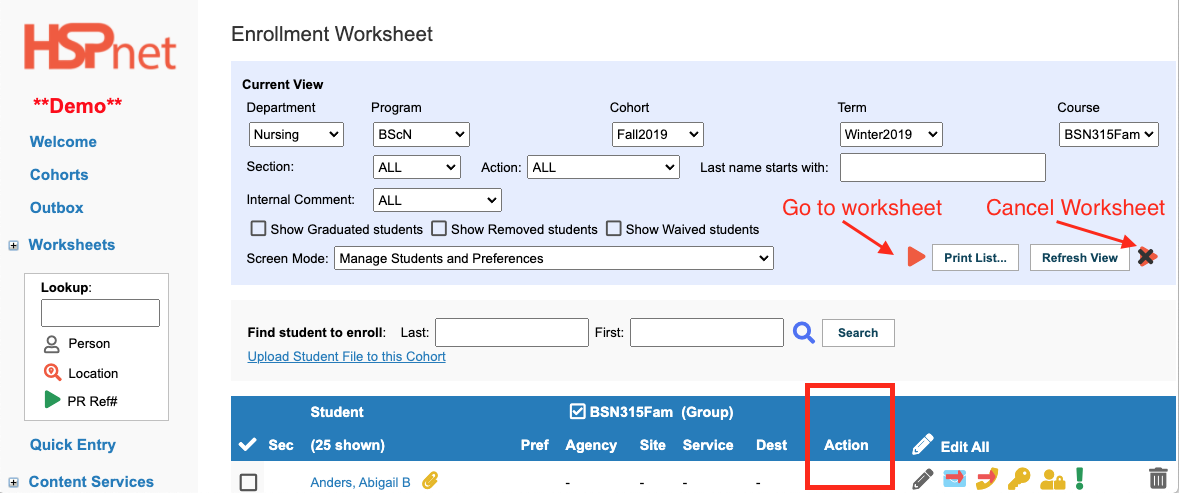
Step 3 – Create a Worksheet (Group or Individual).
1. If no students are enrolled or you are not ready to copy students to a worksheet, you can start a worksheet by clicking a "Create Worksheet" icon next to the Refresh button:
- For an instructor-led Group, only one icon is provided for Create Group Worksheet

- For Individual Placements: only one icon is provided for creating an individual worksheet:
- For courses with request types (for example: fieldwork) that can be either individual or group placements, both icons are provided.
- The create worksheet icon colours are lighter shades than the go to icons they will become once a worksheet is created.
If students are enrolled: Click: select all (students) and at the action drop down list at the bottom of the page select: copy students to group (or individual) worksheet, and click the  to create the worksheet. to create the worksheet.
|
Action Drop down list selections:
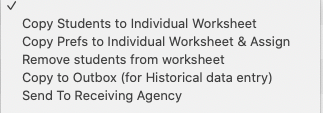
|
|
Step 3 – Create a Worksheet - Continued
When the Enrollment screen refreshes:
- The Action column for each student will display: group or Indiv if the students were copied to the Group or Individual Worksheet or it will be blank if the student is not copied to a Worksheet
If no students are copied to the worksheet, you will see one of these two icons:
- Go to Worksheet (click the icon) Group: Individual:
 (these icons are more solid colours than the create worksheet icons). Click on one of them to open the worksheet. (these icons are more solid colours than the create worksheet icons). Click on one of them to open the worksheet.
- Cancel the Worksheet (click the icon). If you selected group and meant to select individual you would click this icon to remove an empty worksheet.
|

|
|
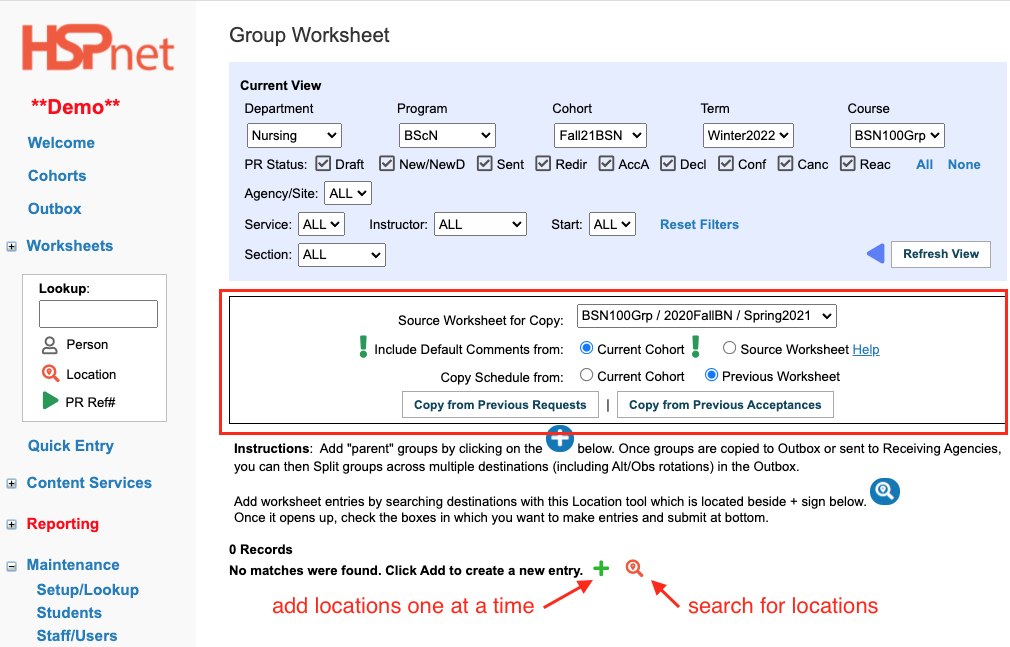
Step 4 – Create Spaces in the Worksheet
In a Worksheet you need to assemble a list of potential locations/destinations to send student on their practicums. You can return here at any time to add or search for additional locations - you may need to do this if some of your initial requests get declined.
- Copy Locations/Destinations from a worksheet in another Course (the "Source" worksheet) to the current empty worksheet (the Target). This option is only available when you first create the worksheet; when you add new locations that option will no longer be available, so if you wish to use it, use it before any other action on the worksheet.
- Choose the Source Worksheet from another course selected from the drop down list.
- Choose options for comments and schedules.**
- Click either one of: Copy from Previous requests (this copies even those that went on to be declined last time); or Copy from Previous Acceptances (this excludes requests that were declined last time this list of placement requests was used).
** When copying, you can choose which default Comment and Schedule information to use:
- Current Cohort - uses the default Comment or Schedule (example: Monday, Tuesday, Wednesday days) as entered for the Target course in the Cohorts screen;
- Source Worksheet - copies the Comments and Schedule from each request in the Source worksheet, regardless of the defaults entered in Cohorts for the Target worksheet.
Detailed Guide:
|
|
|
Step 4 – Create Spaces in the Worksheet - continued
-
- Create new locations/destinations/spaces "from scratch". There are two more ways to proceed:
- Use the Add Icon
 to add one destination at a time. A screen will open and let you select the Agency, Site, Service and Destination from drop down list. Save the location to the worksheet by clicking the green check mark icon. to add one destination at a time. A screen will open and let you select the Agency, Site, Service and Destination from drop down list. Save the location to the worksheet by clicking the green check mark icon.
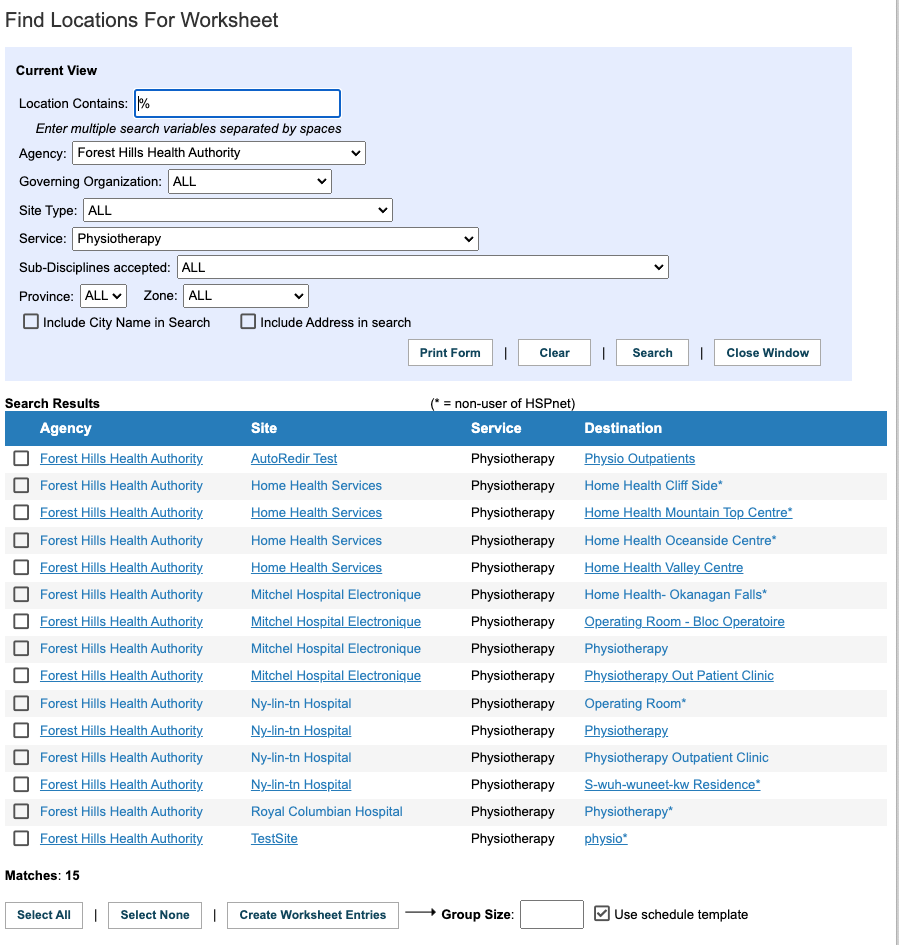
- Use the Location Look Up
 to find locations/destinations. to find locations/destinations.
-
In the location contains field, enter a key word search or the character % which means show me everything.
-
You can filter by agency or leave that drop down on All.
-
Most programs can search for their placements broadly by service (Nursing has a lot of services so All service may be a better search unless looking for a specific nursing service).
-
Click the Search button when you are ready.
-
You can click Print Form to generate a PDF List of all of the locations the search reveals.
-
You can click to place a check mark to select certain locations, or select all at the bottom. If you are going to create group requests you must enter the group size. Click the button: Create Worksheet entries, and after you click the Close Window button, the worksheet will have these draft requests entered.
-
If you don't find what you are looking for, scroll down as a form will appear at the bottom of the search where you can request the addition of a destination. When you are ready to send the form:
- It is addressed in an e-mail message to HSPnet support - this team will add destination that are in non-user agencies only. Requests to add destinations or services at user sites may be sent directly to the Receiving Coordinator/Service contact at that site to make those additions. If you aren't sure, leave it addressed to the HSPnet team for further advice.
|

|
|
Step 4 – Create Spaces in the Worksheet - continued
No matter which of the above 3 options or combination of options you use, you need to create enough spaces for current or projected student enrollments.
A tally is provided at the bottom of each Worksheet to monitor your progress. For example, if you have 25 students going on individual placements, you need at least 25 destinations. If you have 25 students going out in groups of five, you need at least 5 destinations (25 divided by 5=5 groups required = 5 destinations required). In the example to the right, students are not yet uploaded to the enrollment worksheet so it is indicating 0 students at this stage. Later, if a request is declined or cancelled, its spaces are no longer available for students and will display in gray font in the Worksheet as "0" spaces.
Once a Draft entry is created on the group or individual worksheet, you can:
 Copy it to create a new request, and Edit Copy it to create a new request, and Edit  if needed to change location or schedule; or if needed to change location or schedule; or
  Mark it as Use This Schedule as a template, so its schedule information (start/end dates, shifts, days) is applied when creating subsequent requests when adding or using "Find and Create." Mark it as Use This Schedule as a template, so its schedule information (start/end dates, shifts, days) is applied when creating subsequent requests when adding or using "Find and Create."
Detailed Guides:
|

|
|
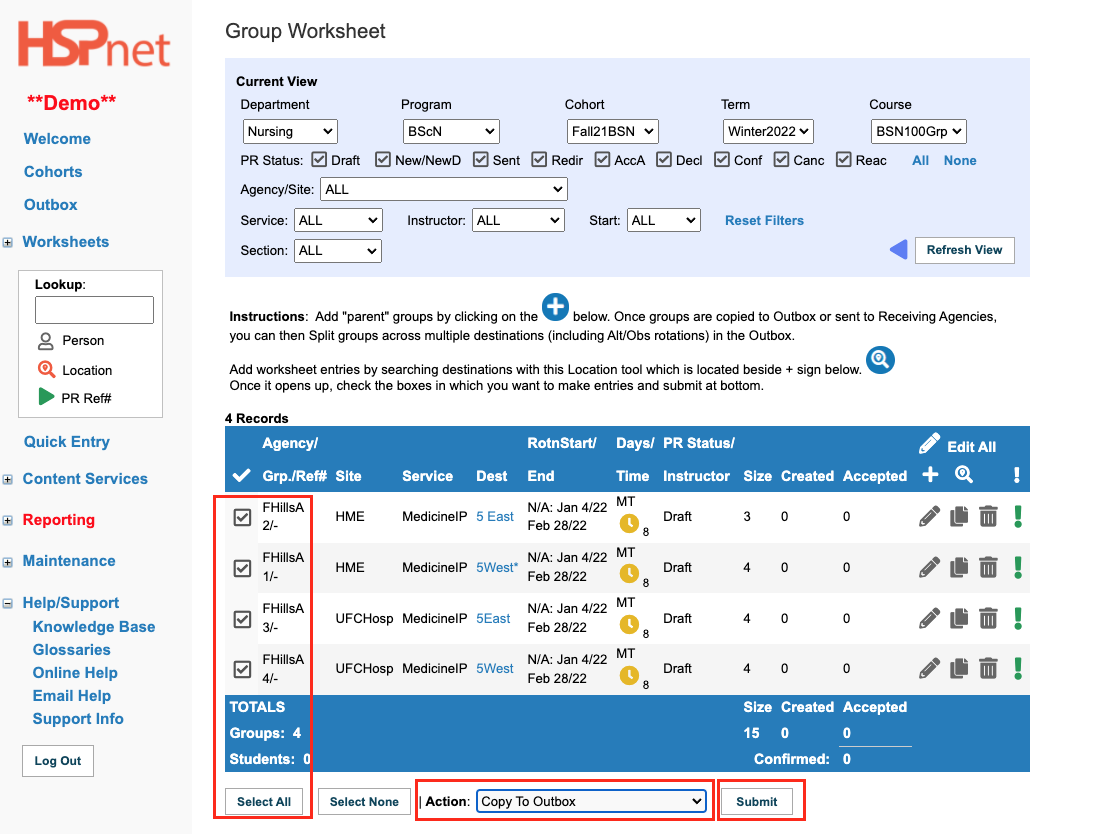
Step 5 – Finalize Requests in the Outbox
First, you need to create an outbox: this will occur when you copy your drafts from the group or individual worksheet to the outbox, using the action drop down feature.
- When ready to create new student placement requests from Worksheet spaces:
- select requests: click to place a check mark in the box next to one or more records or click the Select All button.
- select: Copy to Outbox from the Action drop down list.
- Click: the button..
The Group and Individual worksheets are intended for planning spaces before sending, and for monitoring spaces against student enrollments as requests are accepted or declined. Worksheet entries will be updated to reflect some changes that are made in the Outbox (e.g. date changes), however changes made in worksheets will usually NOT update requests if they are already in the Outbox. This is to ensure that initial spaces and schedules created in the worksheet are preserved as a plan or "blueprint" for copying in future. Therefore, after spaces are created in the Outbox, make all subsequent location and schedule changes in the Outbox instead of the worksheet.
|
|
|
Step 5 – Finalize Requests in the Outbox - continued
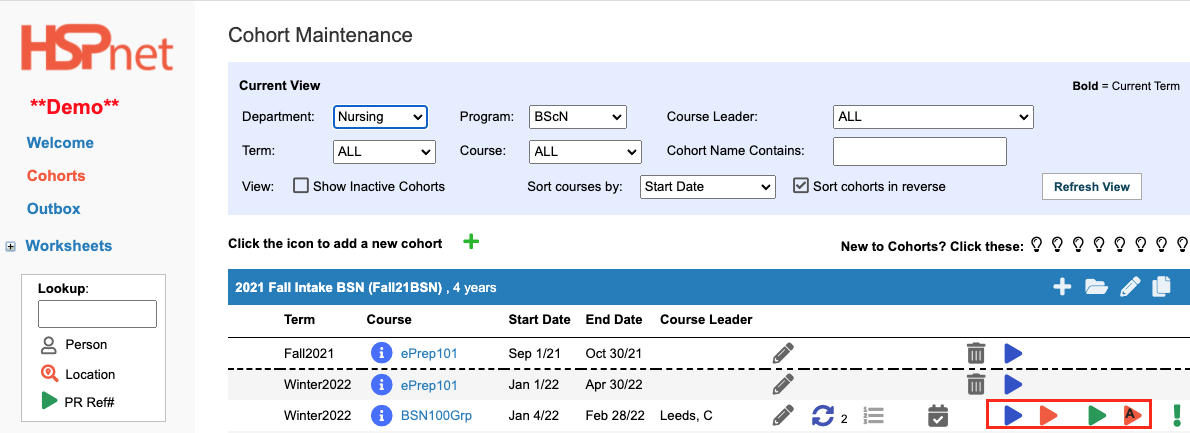
When you copy these drafts from the Group or Individual Worksheet to the Outbox, an outbox is created for this course for the first time. A green outbox icon is added in the current view on your worksheets:
- The worksheet also changes: there are now placement request reference numbers for each draft that correspond to the new placement requests in the outbox.
- The Draft Status changes to New.
- Click the Outbox icon:
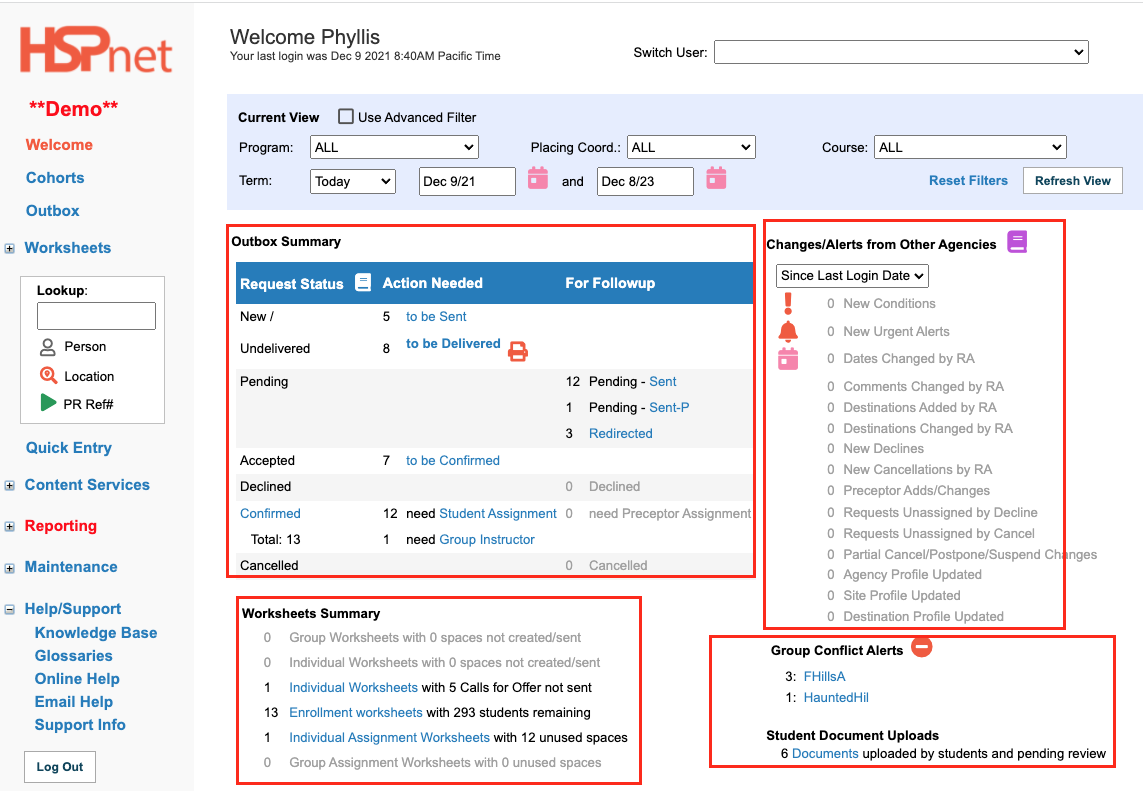
 to open and view your new outbox. (You also have a link on the left hand side of your Welcome screen called Outbox.(See the screen capture above, two lines below the world welcome). The difference is the green icons in the cohorts screen, or on the worksheets will go to the outbox specific to the course selected, the one on the welcome screen will only display the last outbox you visited unless you change the filters. to open and view your new outbox. (You also have a link on the left hand side of your Welcome screen called Outbox.(See the screen capture above, two lines below the world welcome). The difference is the green icons in the cohorts screen, or on the worksheets will go to the outbox specific to the course selected, the one on the welcome screen will only display the last outbox you visited unless you change the filters.
|

|
|
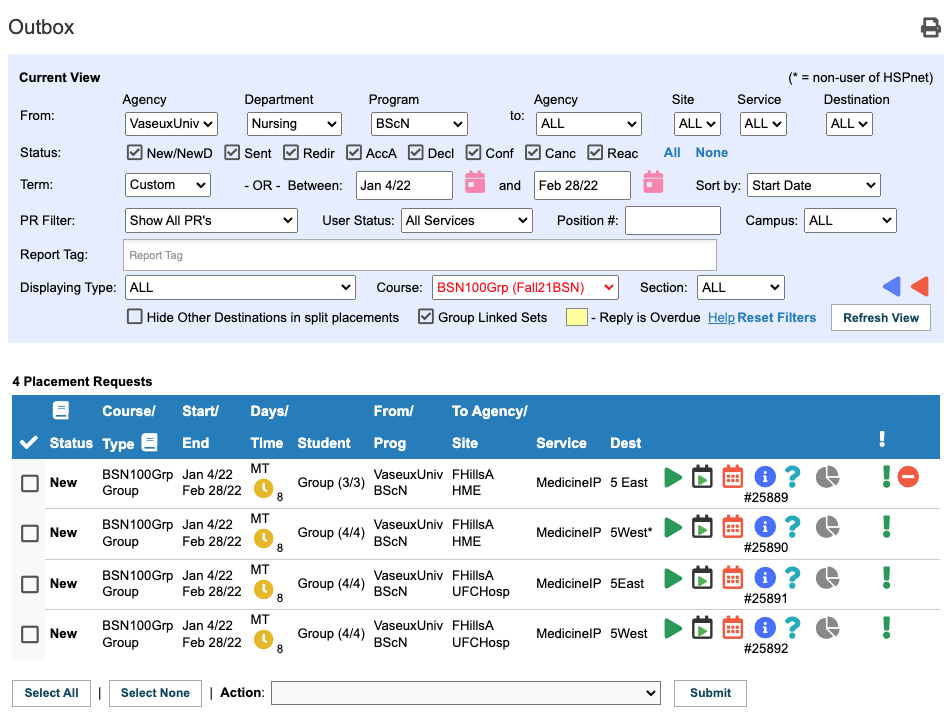
Step 5 – Finalize Requests in the Outbox - continued
New Requests in the outbox can be adjusted before sending them to the receiving agency for consideration:
- Conflicts: these must be resolved before you can send a request flagged with the conflict icon

- You may need to add or revise comments , or add an urgent alert

- You may need to update a group
 or individual shift schedule: or individual shift schedule: 
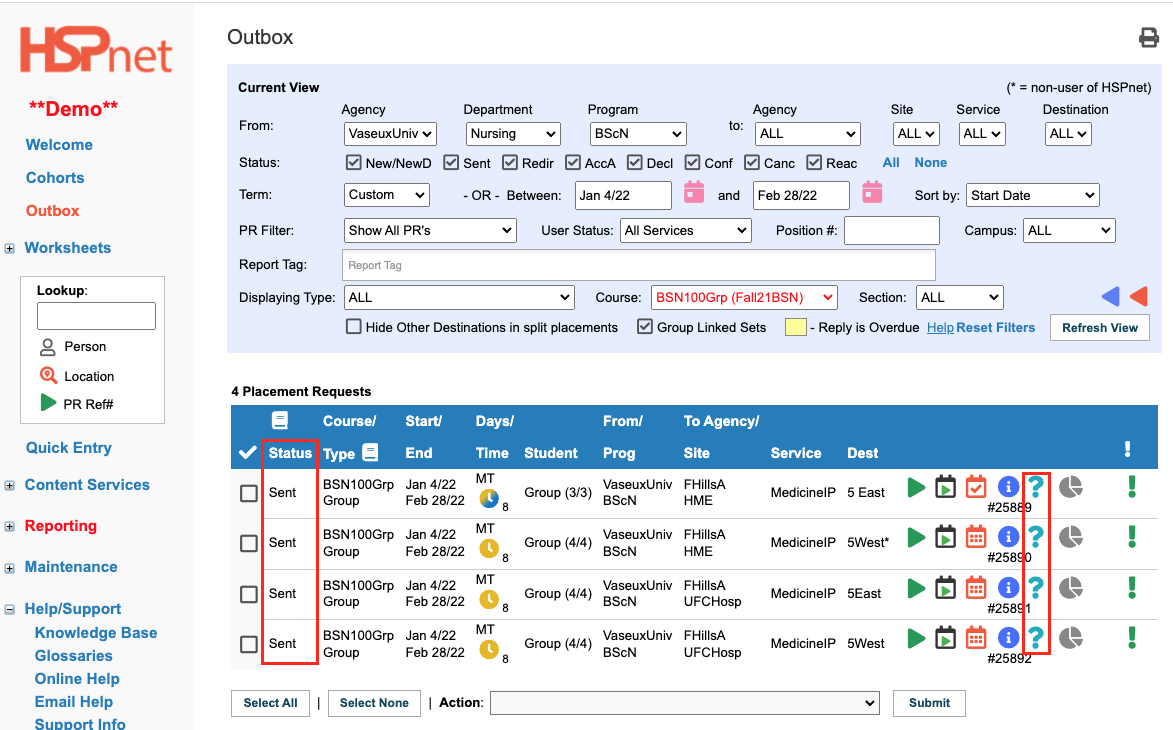
- You may need to split a request: 25889 would need an additional destination to accommodate a group of 4, as the 5 East destination warned us on the worksheet (3 screen captures back before the group size was reduced from 4 to 3) that the maximum group size is 3. To create a split, the advanced schedule icon
 is used. is used.
- Requests can also be linked: for example if you set up two rotations, you can link them which indicates you would like them considered together.
Detailed Guides:
|
|
|
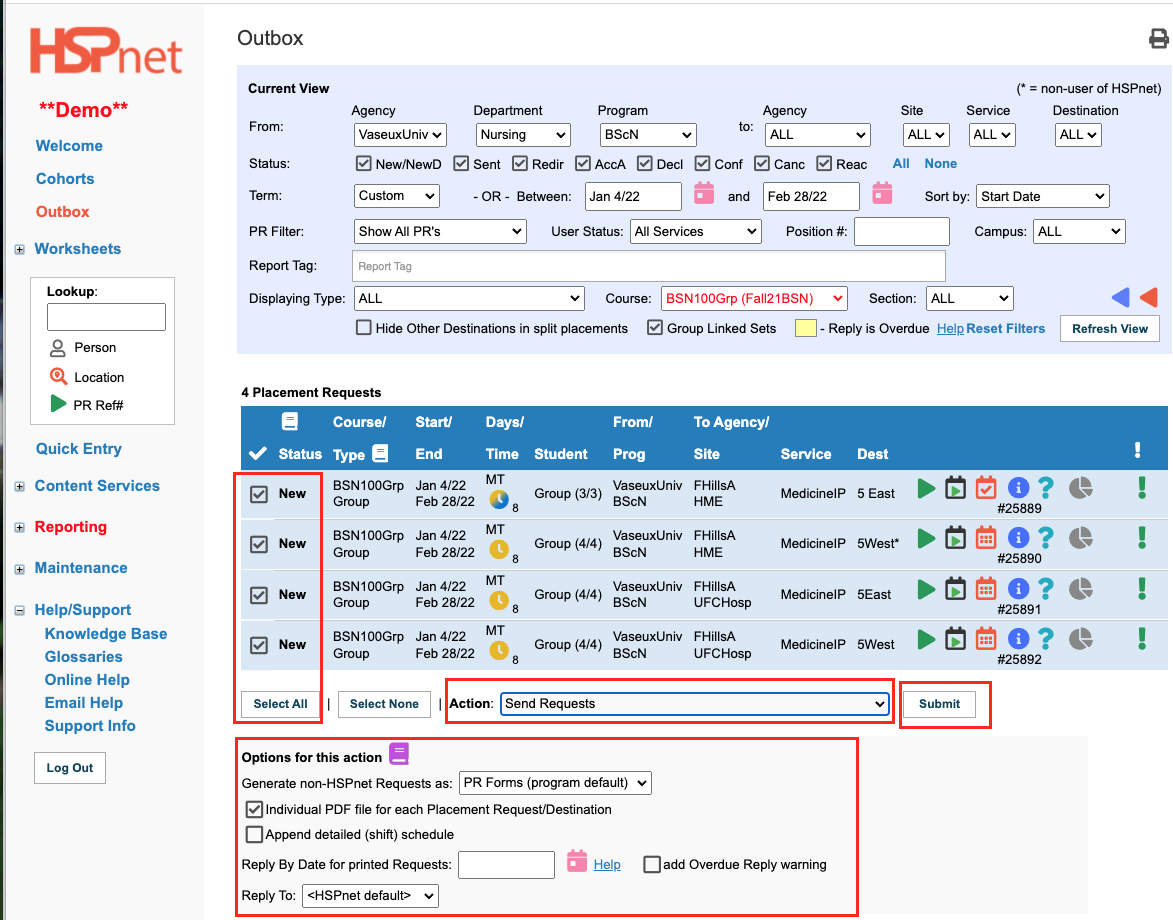
Step 6 – Send Requests to Receiving Agencies
To send Placement Requests from the Outbox:
- Select the requests by clicking to place a check mark in the adjacent box, or click the button: Select All.
- At the Action Drop down list, select: Send Requests. At this time the Options For This Action screen opens. This is where (if desired) you change the PDF template that will be generated in your report queue to send to HSPnet non user Agencies. The Reply To field defaults to HSPnet default - that is you! If other Placing Coordinators are on the drop down list, you can choose one of their names instead (if you will be away, or that is the process at your agency, etc).
- Click the Submit button.
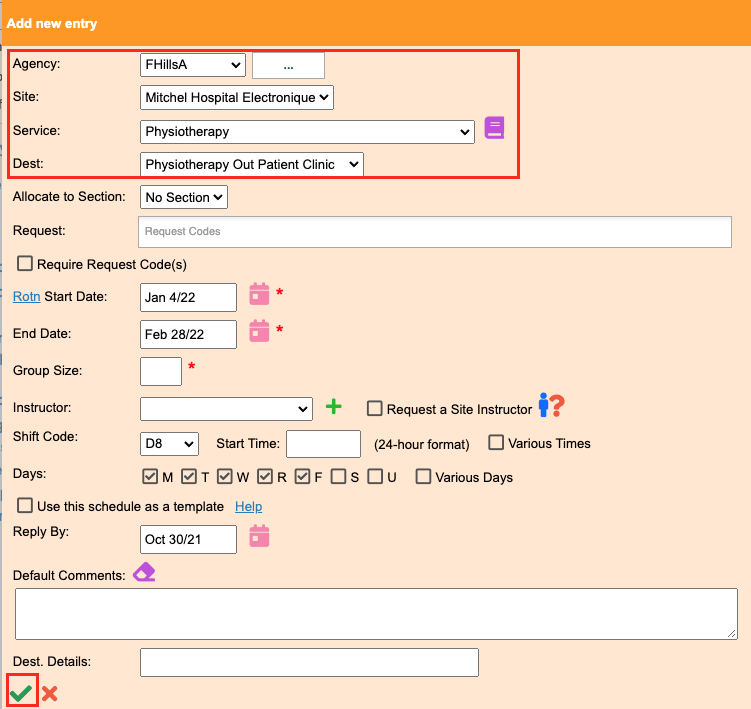
The Site and Service must be entered before a request can be Sent. The destination can be left blank if the Receiving Coordinator normally determines the destination for you, or if you wish to enter it later. In most cases the Destination should be specified before sending the request.
After sending, the request status will display as "Sent" if the receiving site/service is using HSPnet, or "Sent-P" if not.
|
|
|
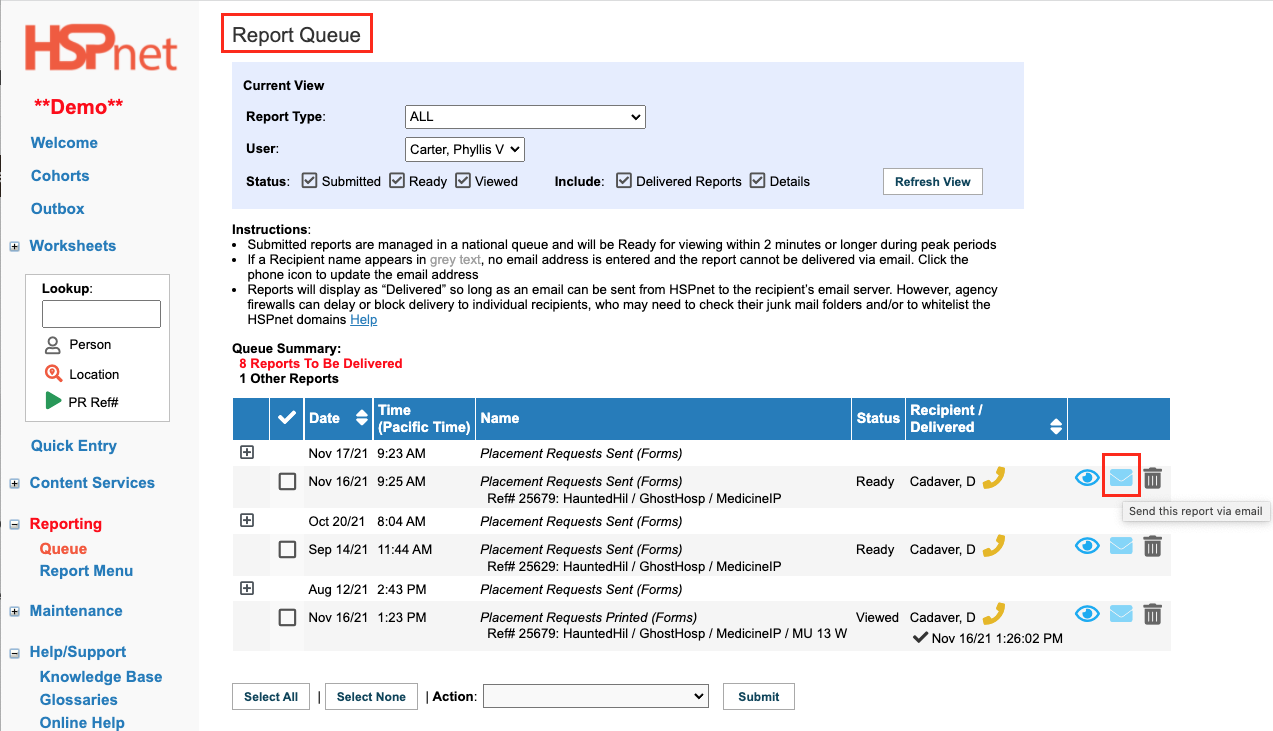
Step 6 – Send Requests to Receiving Agencies: Sent-P
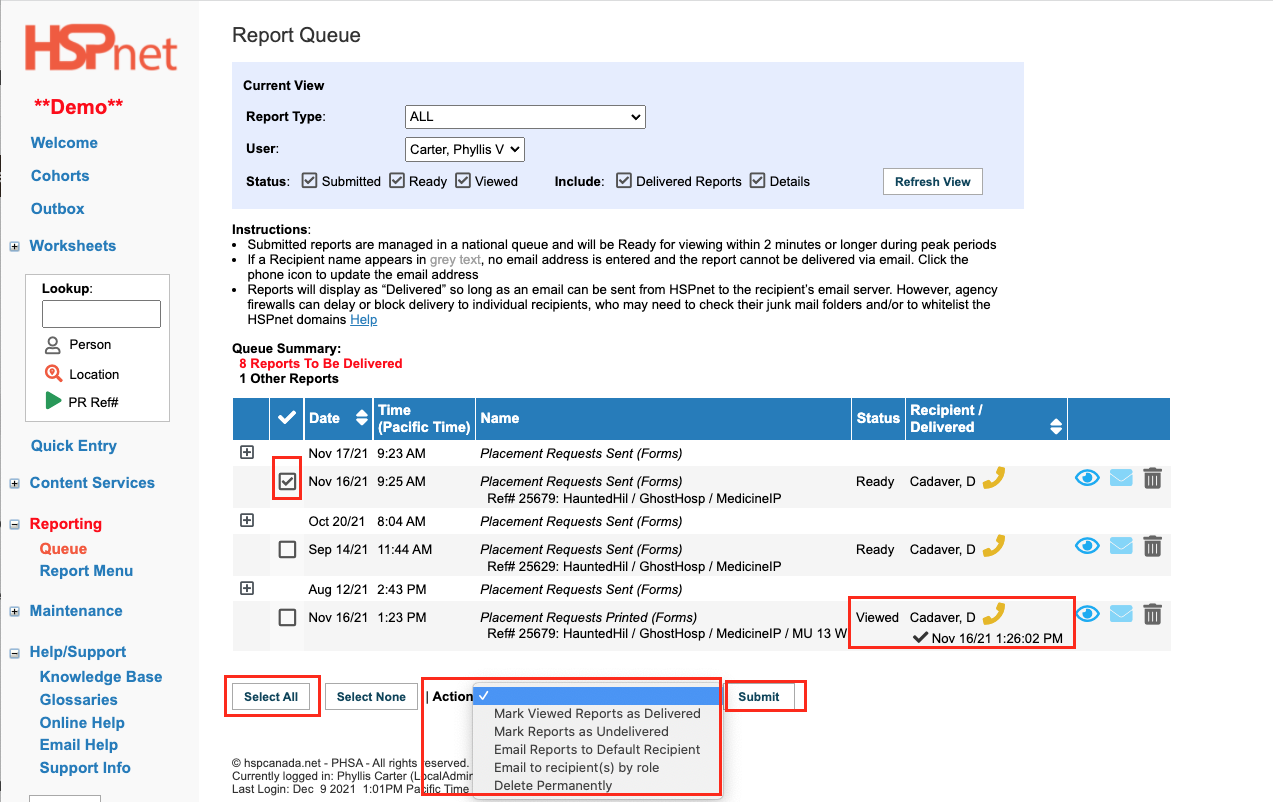
A PDF file will be generated automatically and added to your Report Queue for any Sent-P request needing delivery via fax or email to a non-user agency.
Access the Report Queue:
- Click Reporting/Report Queue.
Reports can take up to two minutes to generate. If the status column says: submitted, you need to keep clicking refresh view to see when the report displays Ready (Ready will not automatically show on this page if the status says submitted when you arrive).
Icons:
 Preview The report (see what it looks like/open it). Preview The report (see what it looks like/open it).
 e-mail the report - if a Recipient is identified, just click the envelope icon to launch the e-mail with the PDF of the request attached to it. The Send an e-mail screen will open. e-mail the report - if a Recipient is identified, just click the envelope icon to launch the e-mail with the PDF of the request attached to it. The Send an e-mail screen will open.
- Alternately: select specific placements on the left by clicking to create a check mark in the adjacent box, or select all. At the action drop down list you can select e-mail reports to default recipient and click Submit. The latter action will work for multiple requests, provided there is a default recipient; you can also select to send these out by role, and you can delete reports from the action drop down or use the icon below.
 Delete the report Delete the report
After a report has been sent a small black check mark with a date will appear under the recipient name. 
Some users prefer to keep this information for follow up, while others always copy themselves with the e-mails sent, and then delete the reports to clean up their screen.
Detailed Guides:
|

|
|
Step 7 – Monitor and enter replies
The Outbox now shows these requests have been sent. Click the Who Can View this PR icon  to see who else can now view this request: it should identify at least one Receiving Coordinator at the agency; when the Receiving Coordinator has redirected the request to a destination coordinator user, it will also list the destination coordinator(s) who can view the request. to see who else can now view this request: it should identify at least one Receiving Coordinator at the agency; when the Receiving Coordinator has redirected the request to a destination coordinator user, it will also list the destination coordinator(s) who can view the request.
The Status here will change when the Receiving Agency updates it; or you can update this screen when you hear back from non users, with their responses. You may have conditions added to some of your requests and need to respond whether those conditions can be met or not. (EG: reduce group size; change dates).
Detailed Guides:
|
|
|
Step 7 – Monitor and enter replies - continued
The Welcome screen (your dashboard) is the most effective place to monitor replies from sites who use HSPnet, and to enter replies from non-user sites.
- When a non-user site replies to a request, find the request in the appropriate Preview link such as "xx Pending – Sent-P".
- When replying on behalf of a non-user, choose the appropriate Action (Accept or Decline by Agency) or Cancel with a reason "No response from the destination" if the site did not reply.
You can monitor many other items from the Welcome screen, including:
- Outbox Summary
- Worksheets Summary
- Changes/Alerts from Other Agencies
- Group Conflict Alerts
- Call For Offers Summary
- Student Document uploads (when the feature is turned on)
|
|
|
Step 8 – Assigning Instructors and Students
When students are uploaded to the enrollment worksheet and the outbox is established, the Assignment Worksheet go to button(s) will appear on the Cohorts screen and in the current view of the worksheet.  or or or both if individual and group placements are taking place in the same course. or both if individual and group placements are taking place in the same course.
Instructors can be assigned: - At the time of creating requests in the Worksheet; - In the Assignment screen - accessed from the worksheet GoTo Assignment buttons or ; - In Outbox by editing Details for an individual request.
Detailed Guides:
|

|