|
Prepare your Excel Spreadsheet.
Tips:
-
- Do not use a title
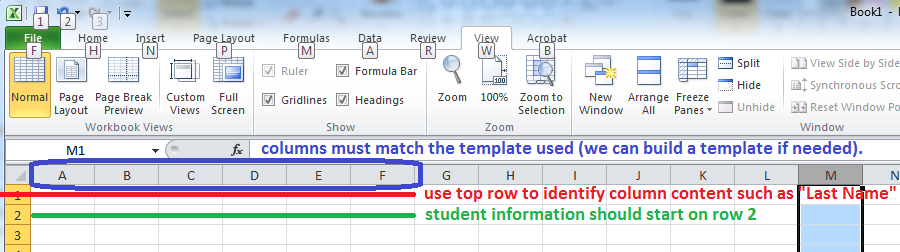
- Place the Header Row on line one of the Excel spreadsheet (this identifies the information that will be in each column directly below, such as "Last Name, Birth Month"). Do not have blank lines above or below the header row
- For Birth Month, you can use either two number or three letters of the month or the full name of the month, e.g. 04 or Apr or April
- For Birth Day, enter a numeric value, e.g. 09
|
|
|
You can use the Standard HSPnet Template with DOB now available in your school's drop-down menu.
You can download a sample of the template by clicking the blue link on the right.
As you are updating existing student information into HSPnet, you must ensure the information entered on the spreadsheet completely and exactly matches all fields filled currently entered on the student record (e.g. last name, first name, student number).
Columns A, B, C are mandatory for the system to verify the student record if your are doing an update of record for that student.
|

|
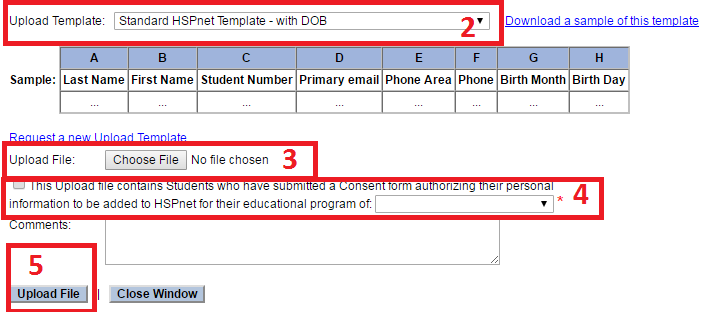
- Click the Upload Student File link in the Student Maintenance screen
- Select a template from the Upload Template drop-down list
- The top line of the Excel spreadsheet should match the template you choose
- In this sample the Excel spreadsheet needs to have the "header row" in row 1 (Last Name, First Name, etc.) and student data starting in row 2
- Column A on the Excel spreadsheet is Last Name. Column B is first name; Column C is Student Number, etc.
- Click Choose File to select the Excel file from your computer
- Mark the This upload Files contains Students who have submitted a Consent form authorizing their personal information to be added to HSPnet for their education program of xxxx check-box
- Click Upload file
|
|
|
If the data file matches the selected Upload Template, a success message will appear and the Upload Validation screen will open in a new browser tab.
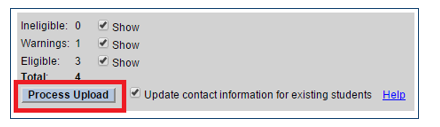
The Upload Validation Screen opens. If all is well, and you see the button: click "Process Upload."
The student records will be uploaded with DOB information.
|
|
|
If the button does not appear the upload cannot proceed until corrections are made.
- We HIGHLY recommend all users review the 9 minute video: "Student Admin - Automated Student Uploads Video," prior to working with the validation screen. This video can be accessed from your welcome screen: Click "Help/Support" Resources/Training Videos.
- If any records appear Red/Ineligible, the upload cannot proceed until the Excel list has been corrected.
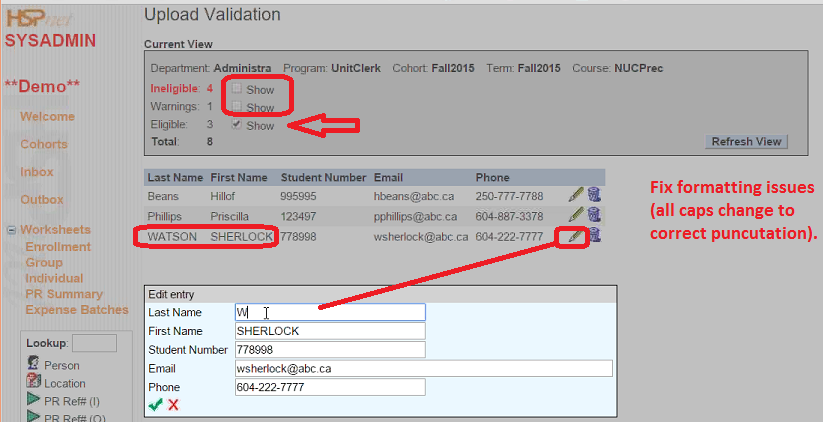
- Click to remove the check mark in front of "show." Ineligible and warnings.
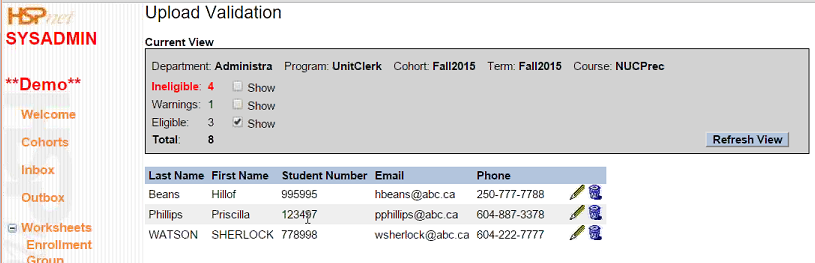
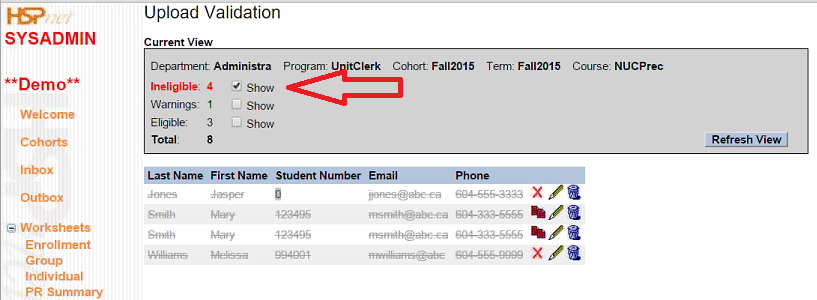
The validation screen after uploading our sample Excel file of 8 records has:
- 4 Ineligible records (due to errors that must be resolved)
- 1 Warning, and
- 3 Eligible record (no errors or warnings).
It is showing 3 as only the Eligible show has been checked.
|
|
- To work on the eligible records first to correct them. Use the edit icon

- In this example we are editing the name that is all CAPS
- Save Changes with the green check mark
 
|
|
- Click to place a check mark in front of "Show" to bring back the ineligible records.
- Ineligible records appear as
strikethrough to signal that they cannot be processed as is.
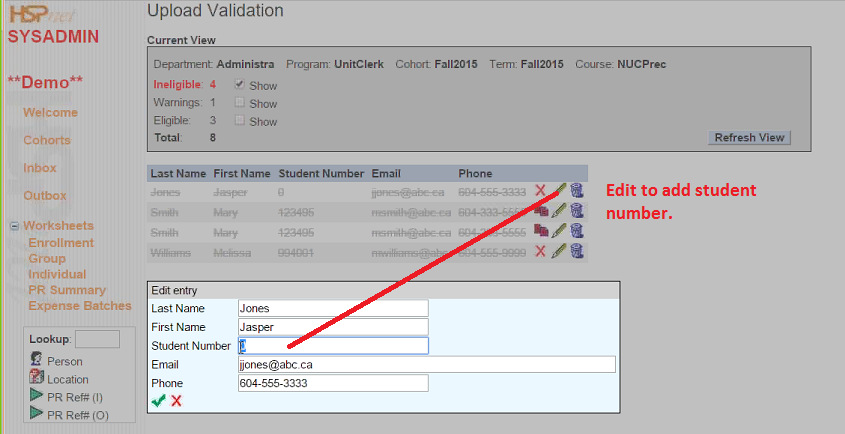
- Place you mouse over red X or other red icon to view the error messages examples below:
 (Warning) - a student with the same name already exists in the database, but with a different student number. This is a warning only and can be ignored if appropriate (e.g. duplicate students may exist with a common name like John Smith). However this may be an error to be corrected – e.g. if the student in the upload file has an incorrect student number and is in fact the same student as the one already entered in the database. (Warning) - a student with the same name already exists in the database, but with a different student number. This is a warning only and can be ignored if appropriate (e.g. duplicate students may exist with a common name like John Smith). However this may be an error to be corrected – e.g. if the student in the upload file has an incorrect student number and is in fact the same student as the one already entered in the database.
|
|
|
 (Error) - a student with the same student number but a different name already exists, and this number cannot be used again. (Error) - a student with the same student number but a different name already exists, and this number cannot be used again.
Solution: If the upload file has an incorrect student number, click Edit  to correct the student number before continuing. to correct the student number before continuing.
----
 (Error) - the student email address is incorrect (e.g. missing ".ca" at the end) or the phone number is incorrect (missing or extra digits). (Error) - the student email address is incorrect (e.g. missing ".ca" at the end) or the phone number is incorrect (missing or extra digits).
Solution: Click Edit to correct the contact information and save your changes. NOTE - this would also be a good time to fix the problems with upper/lower case in the student name and number.
----
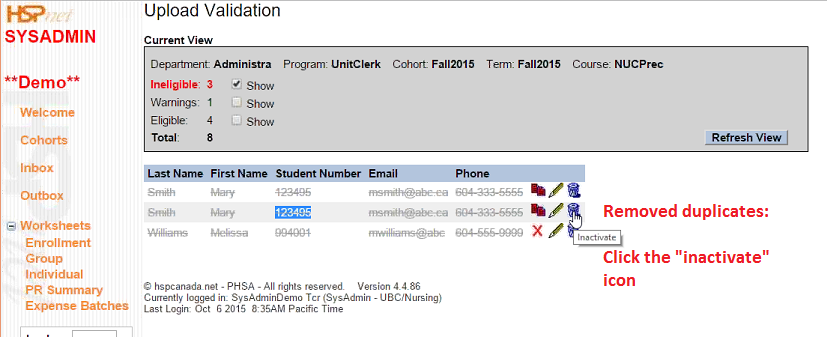
 (Error – not shown in the above example) – a student appears more than once in the upload file. (Error – not shown in the above example) – a student appears more than once in the upload file.
Solution: Delete the duplicate records so that one of the records can proceed.
----
 (Warning – not shown in this example) – the student is already enrolled in the Cohort and will be skipped when processing the upload. However their contact information will be updated if you mark the checkbox to "Update contact information for existing students" (Warning – not shown in this example) – the student is already enrolled in the Cohort and will be skipped when processing the upload. However their contact information will be updated if you mark the checkbox to "Update contact information for existing students"
- Save the changes with the green check mark.

- After saving the correction, the warning/error icon will disappear and the record would be eligible for upload:
|
|
|
- Correct all ineligible records.
- Correct any warnings. You will get the button "Process upload" if your Excel file can be uploaded.
|
|
|
If the upload file contains any students that were previously entered in HSPnet, mark the checkbox if you want to "Update contact information for existing students".
The student records will be uploaded with DOB information.
|
|

