Student Admin - Student User Accounts Overview
Placing Agency Related Guide (PARG)
Detailed Contents:
Summary:
Placing Coordinators and Student Administrators are able to enable HSPnet access for students via the Enrollment screen. Student Access provides the student with read-only access to view their assigned placement information, schedules, and to communicate with key contacts. This page outlines the steps for providing a student with access.
To enable Advanced Student Access and features, please see the Advanced Student Access How To Guide.
We also have a 75 minute webinar video recording called: Student User Accounts - Student Access Webinar.
Associated Icons:

 Create User ID (not active User)

 Active User - Regular Access Rights

 Account to be inactivated

 Account disabled

 Monitor user account (view only)
Benefits and Features of Student Access
A basic student account provides read-only access to:
- Supported streamlined communication between students, Placing and Receiving Agencies.
- Information for current/upcoming placements, including schedules, key contacts, and links to online profiles.
- A summary of placement history, including past and future placement courses (per their Program curriculum).
- The status of their HSPnet consent form.
- Allows students to consent to the release their email addresses or phone numbers to Site contacts.
- Educational Programs may also allow students to update their compliance with Site Prerequisites (i.e. language fluency, access to vehicle, access to laptop etc…)
|
Enable Student Access for your Program: Cohort Users:
Contact HSPnet Support to enable Student Access for your program. Click e-mail help or support@hspcanada.net
Please let HSPnet know which features you want turned on?
- Allow Student Access is the most basic level. Students can view but cannot do anything. This often a good place to start and then slowly expand.
- Allow Students to select PRs - enables use of the Site Selector Feature where students can rate their first choices for placement by reference number.
- Allow Students to edit Site Prerequisites - this allows students to select information from a drop down list such as: have own car, have own laptop, & Language Fluency
- Display the student's unique HSPnet number - we recommend turning this on even with basic access. This allows the student to see their HSPnet number which can be used in lieu of an employee ID to access or set up accounts at their practicum placement site, such as register on a local learning system.
- Allow Students to use e-orientation - this should be turned on in Nova Scotia and Ontario, where the health authorities are requiring third party orientation (Prerequisites required by the health facilities or government bodies such as Worker Compensation).
- Allow Students to Track Activities - for information on this please see our guide to the student activity tracker.
We also have Advanced Student Access available - this will allow students to upload their own shared documents such as resumes, cover letters, etc. The PC has the ability to block the receiving sites from seeing these or to release them.
|
|
Customize Student Access on the Program Profile:
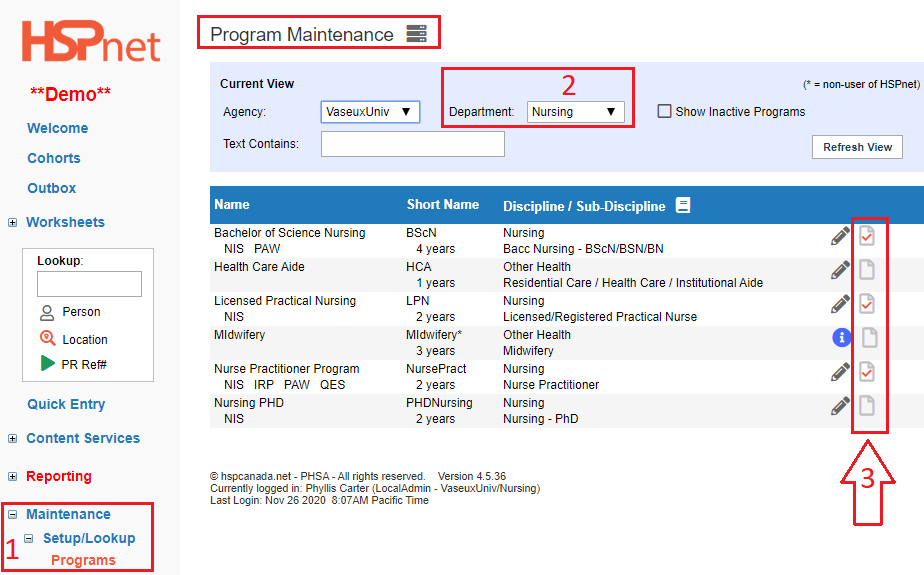
- Click Maintenance/Setup/Lookup/Programs
- If you have access to more than one department, select the department you wish to work on from the drop down list.
- Click the Program Profile icon.
 or or 
|
|
|
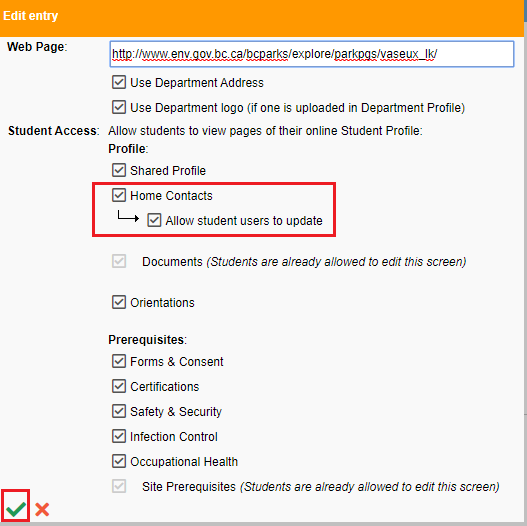
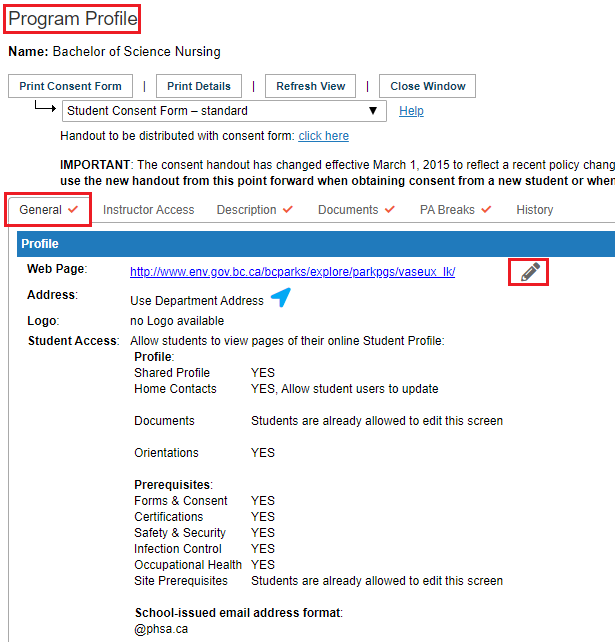
On the Program profile, click the edit/pencil icon to edit any of the information there.
For example, if you want students to be able to enter their own home number:
- On the general tab, click the pencil icon.
- Click the box: Home contacts.
- Another box opens below: Click: Allow student users to update
- Save the changes with the green check mark.
|

|
|
Prepare Student records for user access activation via the Enrollment screen:
- From the Cohort Maintenance screen, click the Go To Enrollment
  icon for the Cohort/Term/Course with students needing access to enter into the Enrollment screen. icon for the Cohort/Term/Course with students needing access to enter into the Enrollment screen.
- Remove or waive any students who are not active in the Cohort or Course.
- Ensure that each student has a valid school-issued email address entered into the system. If a student does not have an email address entered into HSPnet, they cannot be setup for Student Access. You will know if an email address has been entered into the system by the Send Email
  icon; if one does not appear beside your student’s name, you will need to add the information in via the Student Maintenance screen. icon; if one does not appear beside your student’s name, you will need to add the information in via the Student Maintenance screen.
- Distribute the invitational Student Guide - Account Overview How-To Guide to students. You may wish to include a brief explanation of the purpose of their HSPnet access. You can print this as a PDF landscape mode.
|

|
|
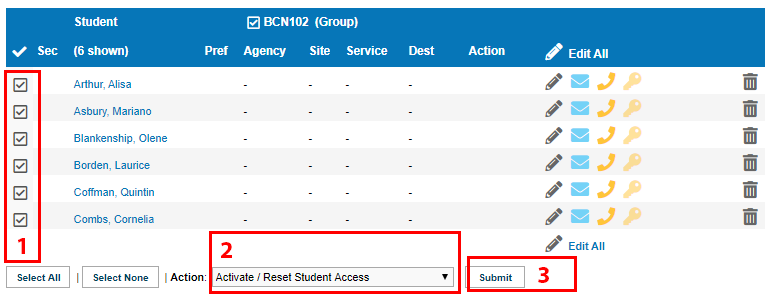
Enable Student Access:
- In the Enrollment screen, mark the check boxes for students requiring access (1). From the Action dropdown menu, click on Activate/Reset Student Access (2) and click Submit (3).
Students must have an email address entered into HSPnet before activating Student Access. If the email icon isn't visible, then no email address is entered. Click the Student Name hyperlink to update their contact information in the Student profile.
Test Student Access with real students or create a Demo Student:
Activate access for 2-3 students (see Activating Student Access, below) to ensure there are no firewall issues preventing delivery of automated emails from HSPnet.
-
- Ask the “test” students to notify you immediately upon receipt of their “Welcome to HSPnet” email message (please have the students check their Spam/Junk or Deleted folders for the email as well).
- If the “test students” do not receive the email, contact your internal IT Department for assistance before proceeding.
|
|
|
Student Password Reset: (re-enable student access).
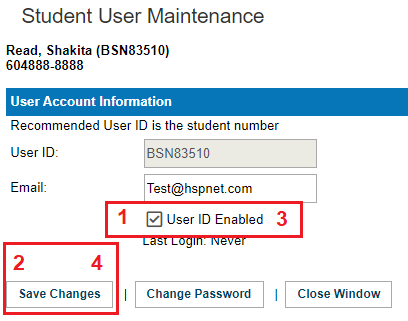
To assist a student who needs a password reset, click their Access icon to view their Student User Maintenance screen.
- Un-check the User ID Enabled (1). Click Save Changes (2). Re-check User ID Enabled (3). Save Changes again (4).
A new temporary password has now been emailed to the student.
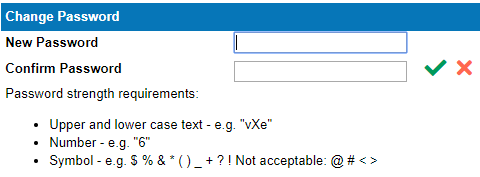
- If the student is not receiving the password email it is possible to create a manual password by clicking the
  button. Enter a new password within the password strength requirements and then click the button. Enter a new password within the password strength requirements and then click the   to save. The new temporary password has now been emailed to the student and you can also tell them the password verbally if needed. to save. The new temporary password has now been emailed to the student and you can also tell them the password verbally if needed.
Having trouble thinking up a password? Here is a formula you could use to create your passwords:
- Month (3 letters - First Letter Capital)
- Day (2 numbers)
- Year (4 Numbers) Exclamation mark ( ! )
Sep042019!
|

|
|
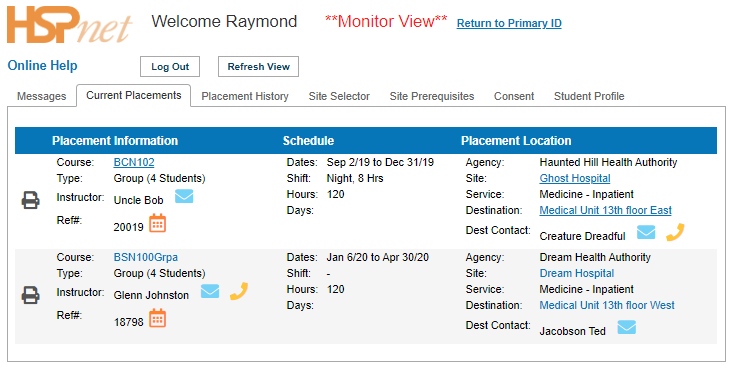
Monitor View:
- A Placing Coordinator can enter into a student’s account (view only) via the Student Maintenance screen. Use the Monitor View icon to access their screens in order to ensure their setup is correct, or to troubleshoot and assist the student.
|

|
When in Monitor View, the Student Welcome screen defaults to display all upcoming confirmed and ongoing placements. From their Welcome screen, students are able to:
- View their Placement History
- View the status of their active HSPnet consent form, and agree to release their school email address to placement contacts (i.e. Site/Unit Manager, Preceptor)
- Change their HSPnet password
- View Online Help and access the Quick Reference Guides and training videos that are available for students
|

|
- You may click Return to Primary ID to return to your own account at any time.
|

|
|
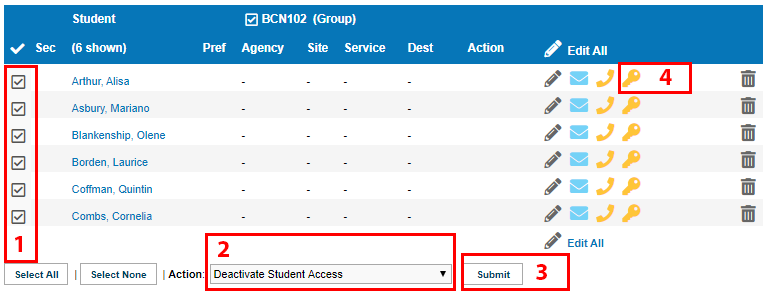
Deactivate Student Access: (Cohorts).
- Once the student has completed the Course/Program, you will need to disable Student Access. This can be done via the Enrollment screen for any Course in the student’s Cohort.
- Mark the checkbox for one or more students whose access is to be disabled (1). From the Action drop down menu, click on Deactivate Student Access (2) and click Submit (3). You may also enable or disable Student Access by clicking on the Manage Student User Account icon, and un-checking the User ID Enabled checkbox (4).
- Student accounts will automatically be disabled after 6 months of inactivity. At the 5 month mark, their icon will be outlined in red as a warning that action may need to be taken. If the account is still required, choose the Action to Activate/Reset Student Access to reset the inactivity period and deliver a new temporary password via email. If the account is no longer required, please follow the instructions in Deactivate Student Access to disable the account.
|

|
|
Student Ability to View Placement Requests:
- A Placement will become visible to the student only after the student has been assigned in the Assignment Worksheet and Confirmed, or if the placement was created specifically for a pre-assigned student from the Enrollment screen.
|
|
Sample Script
Below is a sample email script to send to students (the theme is granting consent to release their phone number for the purpose of contact tracing). Please modify the script to reflect your specific Program information. You may also use your own script(s) if desired:
The ABC Nursing Program uses a province-wide placement system, HSPnet, to coordinate clinical placements for students. We use the system to manage placement requests and to share placement schedules and contact information with students, instructors and supervisors / preceptors.
On [date xxxxxx] you will be given access to HSPnet for your upcoming placement in course XYZ. An automatic email will provide you with a user ID (your ABC student number) and a temporary password.
If you do not see the message by the end of the day, please check your SPAM/Junk e-mail folder.
When you log in:
- Click the consent tab.
- Click the pencil icon in the blue bar.
- Click to place a check mark in the box in front of: Allow site contacts to use my phone number for contact tracing.
- Click the green check mark to save the changes.
Here is a 3 min first login video that you can send to your students prior to granting access: Student Guide - First Login/Password Video
Student Access for Quick Entry Users:
|
To Enable Student Access for your Program: Quick Entry users:
Contact HSPnet Support to enable Student Access for your program. Help Desk can be reached at support@hspcanada.net
|
|
|
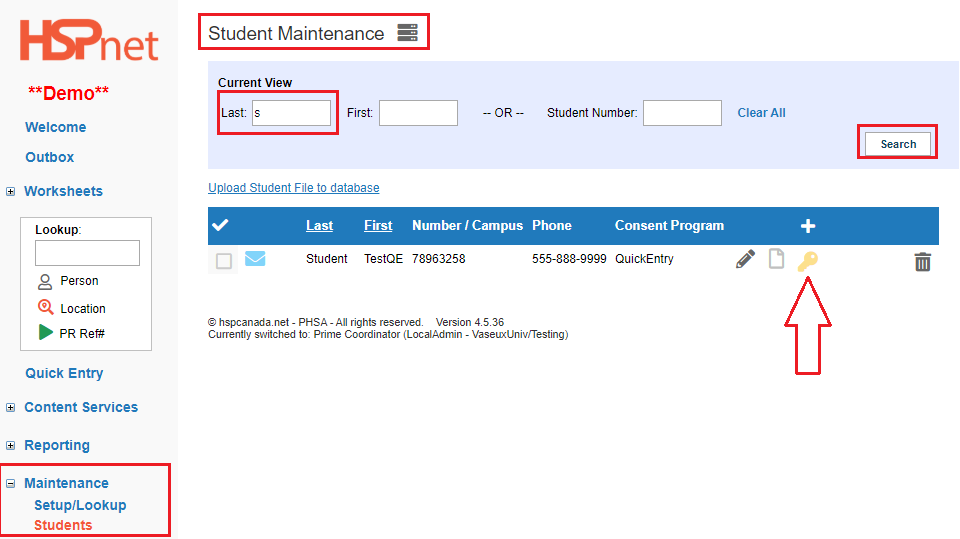
Student Access for Quick Entry Users.
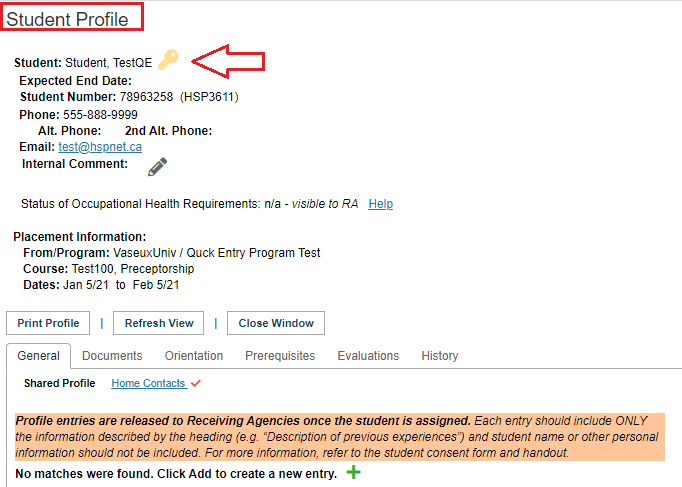
Each student has a light yellow key (user key) icon.
- The student user key can be located in: Maintenance/Students — search for a student.
|
|
|
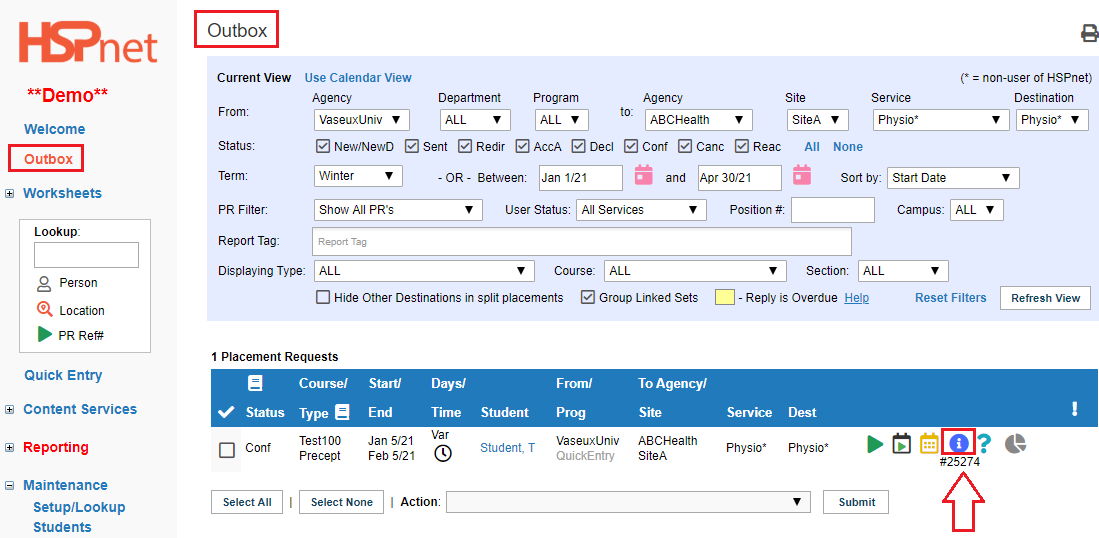
Student User Keys may also be located on Student Placement Requests.
The Student User Key can also be found in the outbox when the students are confirmed to a placement - on the students tab.
- Open the details icon of a Placement Request.

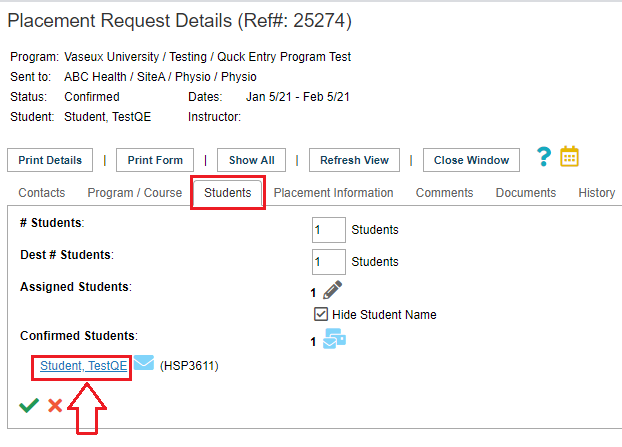
- Select the Students tab.
- Click on the student name to open their profile.
- Their user key will appear at the top of the student profile.
|
|
|
When you hover your cursor over the key it will say create user account.
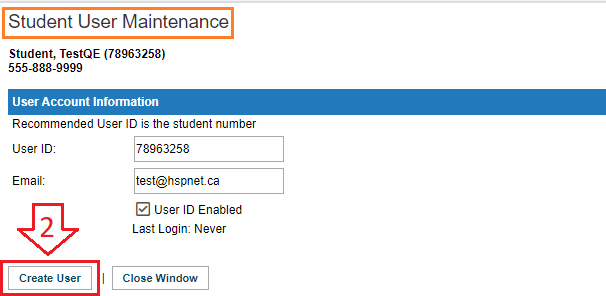
- Click the user key.
- User Maintenance screen opens. Click the button: create user.
|
|
|
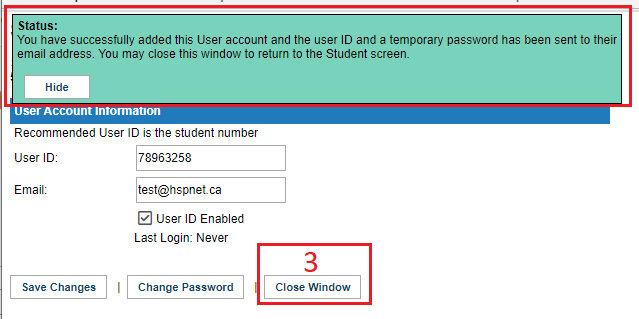
You should see a green background message indicating students will receive their temporary password by e-mail.
- Click: Close Window (Close Window refreshes your page so you can see the user key turns dark yellow when the account is activated).
Best practice would be to e-mail the students first and explain what to expect and what to do.
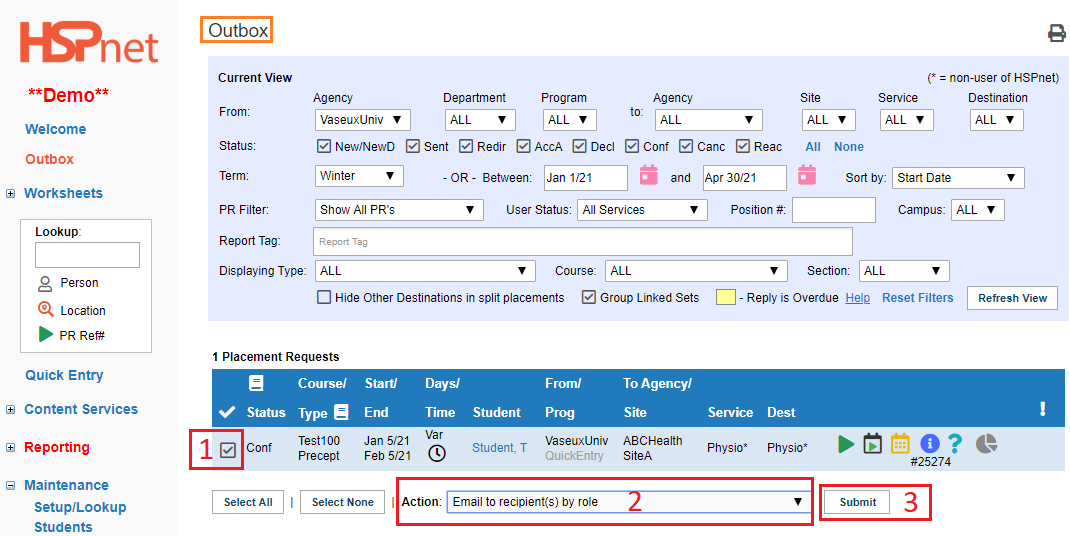
You can mass e-mail from the outbox:
- Click to place a check mark beside each request where you want to message the student.
- At the Action drop down at the bottom select: e-mail to recipients by role.
- Click: Submit.
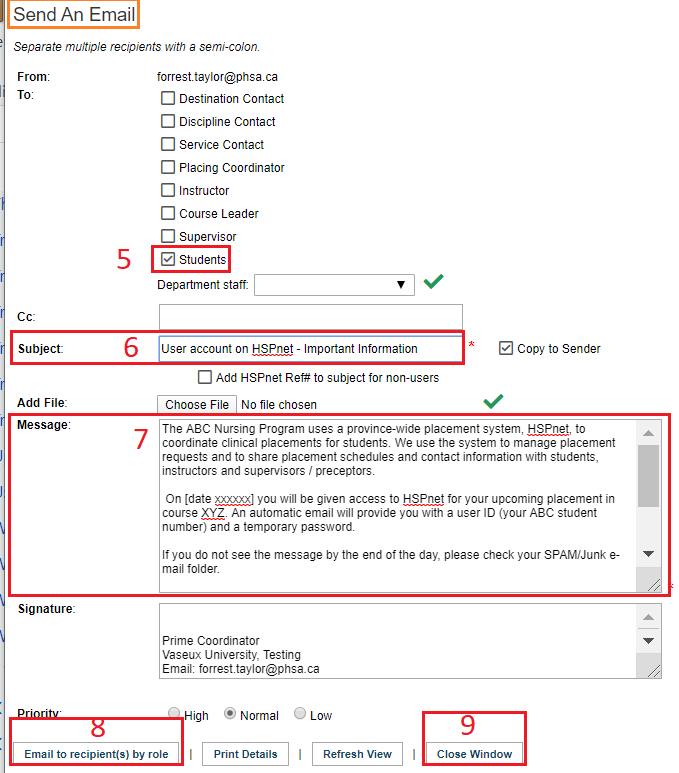
- The Send an E-mail screen should open. (If it does not, check your pop up blocker is turned on for HSPnet as a site and try again).
- Click the box beside students.
- Enter a subject line and message — a sample script is above.
Disable Student Access:
- Click to remove the check mark in front of: User ID Enabled.
- Click: Save Changes.
|
|
|
Best practice: e-mail the students in advance and explain to them what to expect and what to do.
You can mass e-mail from the outbox:
- Click to place a check mark beside each request where you want to message the student.
- At the Action drop down at the bottom select: e-mail to recipients by role.
- Click: Submit.
|
|
-
The Send an E-mail screen should open. (If it does not, check your pop up blocker is turned on for HSPnet as a site and try again).
-
Click to place a check mark in the box beside students.
-
Enter a subject line.
-
Enter a message — a sample script is above.
-
Click the button: Email to recipient(s) by role.
-
Click: Close Window.
|
|

 Create User ID (not active User)
 Account to be inactivated
 Monitor user account (view only)