
Student Admin - Student Activity Tracker (SAT)

Placing Agency Related Guide (PARG)

Summary:
The Student Activity Tracker allows students to track their placement activities and hours, and to categorize them according to Activity Type codes, and Clinical Practice codes by making selections from drop down lists that are created by their educational program. Summary reports can be printed by students for approval by their supervisor(s), and to support reporting requirements for their educational program or discipline.

Contents:

  1. Activate Student Activity Tracker at the Program level (Contact HSPnet).
  2. Set up Activity Codes (Optional).
  3. Set up Clinical Practice Codes (Optional).
  4. Set up each course where you want to use the student activity tracker.
  5. How the student records activities.
  6. Monitor Student Activities.


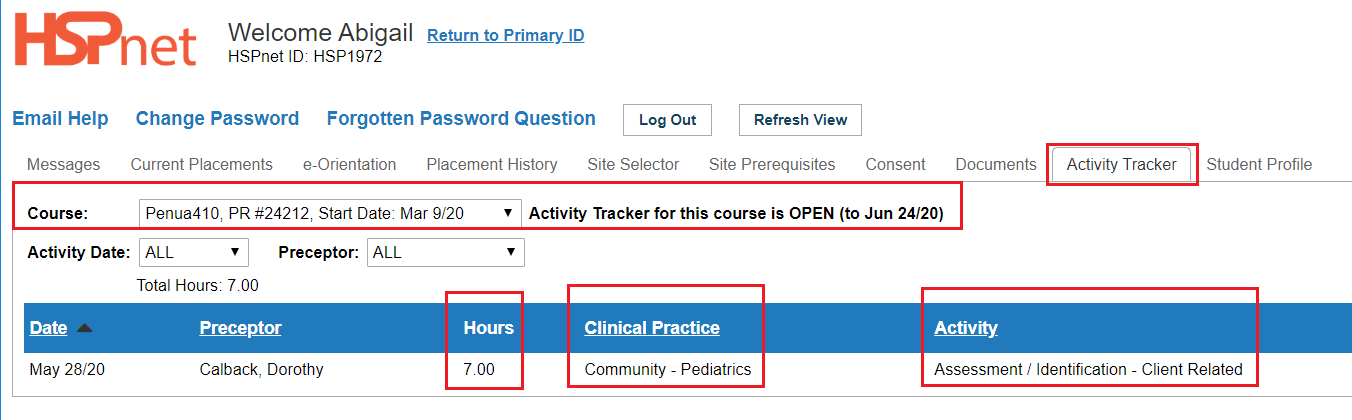
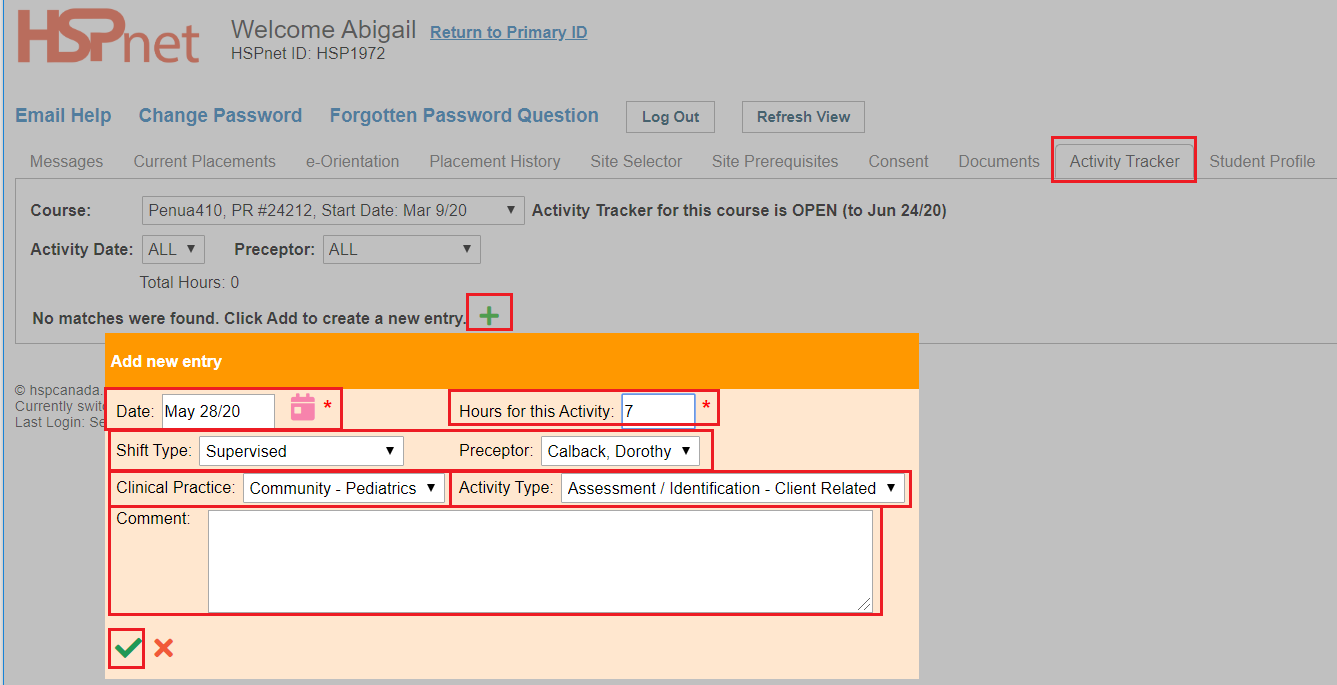
A student's view below:

The educational program must be setup to allow student HSPnet access before the Student Activity Tracker feature can be turned on.  Please refer to Activating Student Access to HSPnet for detailed instructions regarding student access.

To Activate the Student Activity Tracker for your Educational Program:

  • Click: Help/Support/e-mail help to request that this feature be enabled for your educational Program(s).

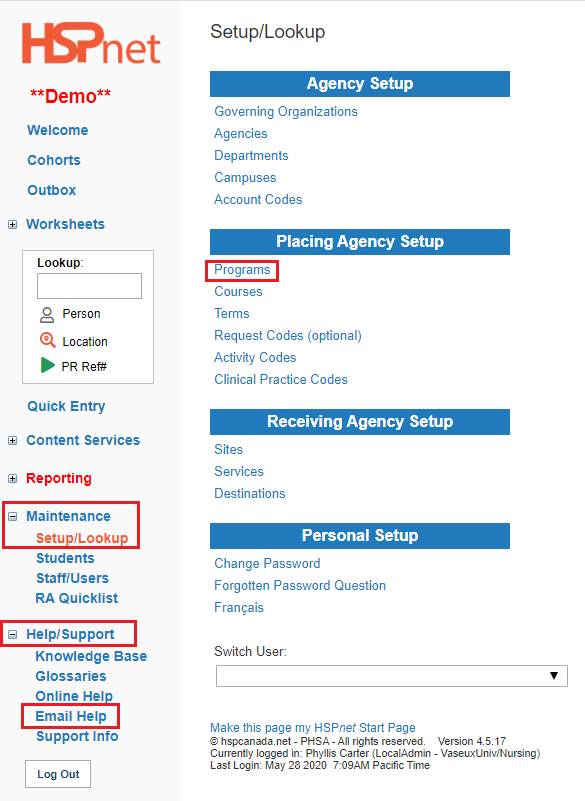
Please specify the Programs the Student Activity Tracker is to be activated for (examples of Programs: BSN, LPN, PT, OT, HCA, BSW, MSW, SLP, etc). If you are unsure of the program name you can look up the names: Click Maintenance/Setup/Lookup/Programs. Select your department from the drop down list and you will see a list of all of the programs in your department. When requesting activation from HSPnet support: please do not send us names of course or cohorts, only the Programs where you would like to turn on the student activity tracker.


Setup Activity Codes (optional) 


The purpose of setting up these codes is for a student to be able to select their activities from a drop down list that you have entered. This field will be adjacent to the Clinical Practice codes you set up. Show me what this will look like in the student view when done.


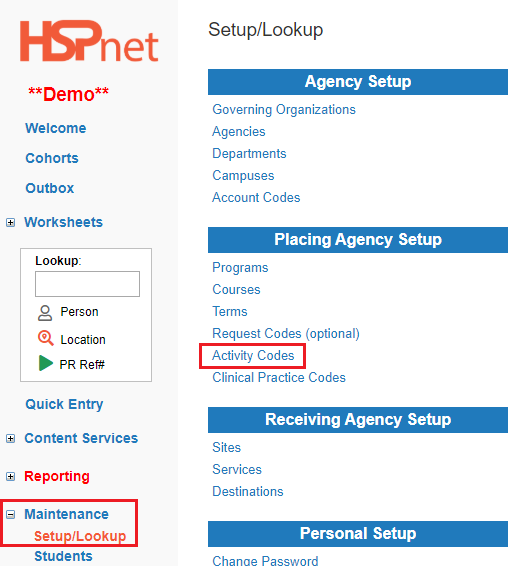
How To Setup Activity Codes:

  • Click: Maintenance/Setup/Lookup / Activity Codes. 

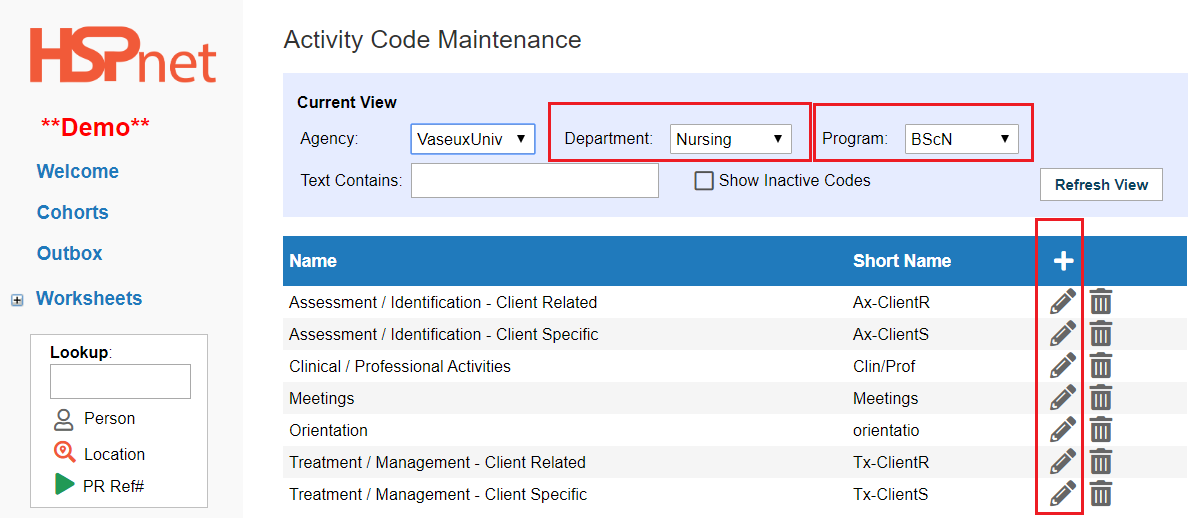
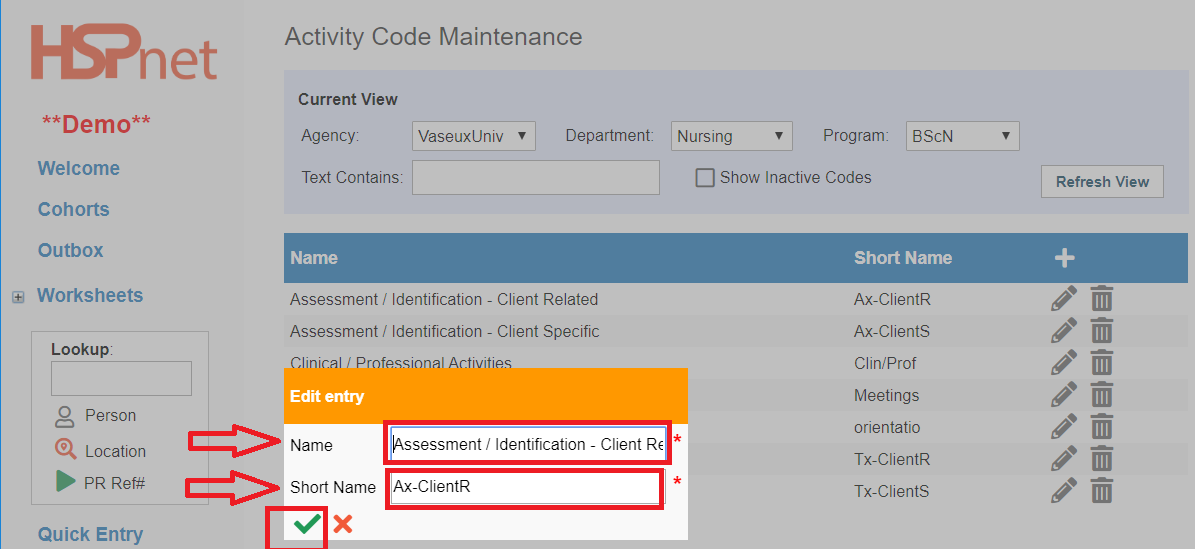
On the Activity Code Maintenance Screen: 

  • Filter to the correct Department and Program.
  • Click the Add add green.png icon to create a new code.
  • Click the Edit image.png icon to revise an existing code.
  • Click the Inactivate trash.pngicon to inactivate an obsolete entry. 
  • To see or reactivate old codes:
    • Click to place a check mark students assigned - group.png in the box in front of Show Inactive Codes and then click Refresh View.
    • click the reactivate icon image2020-5-20_8-38-48.png.


Activity Codes can be used to categorize a student's activities such as:

  • Patient/client contact.
  • Chart review.
  • Meetings.
  • Orientation.

Activity Codes will appear in the right column next to Clinical Practice Codes.

Enter the code on the edit entry Screen:


Activity Code entries will appear in the right hand column adjacent to the Clinical Practice codes in the left hand column on the student activity tab.

  • Enter a full Name for the code (to be displayed in reports or correspondence).
  • Enter a Short Name to be displayed on screens (Maximum 10 characters).
  • Click the green check mark to save image.png.


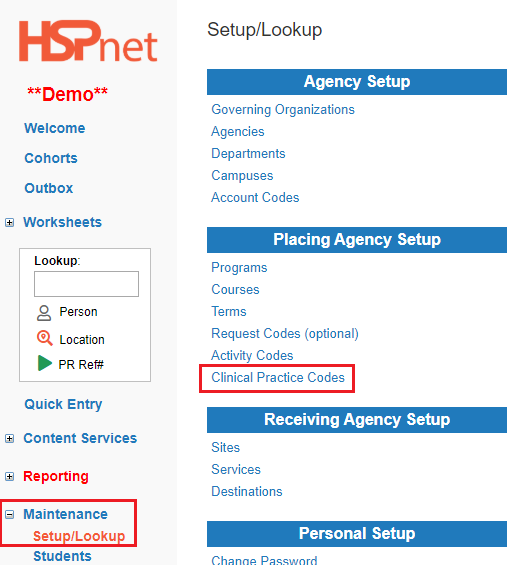
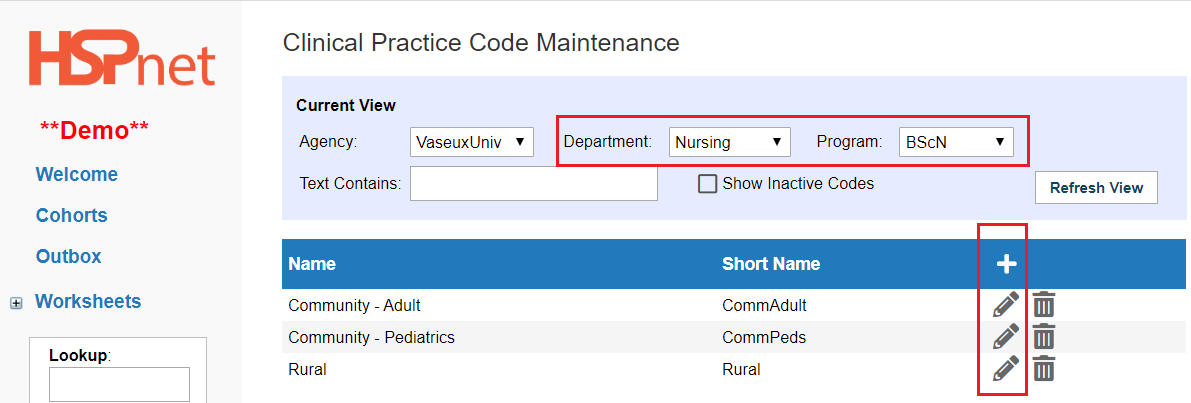
Setup Clinical Practice Codes (optional) 


Click: Maintenance/Setup/Lookup/Clinical Practice Codes.


Clinical Practice (ClinPrac) Codes can be used to categorize a student's experience during their placement, for example:

  • a given area of practice;
  • a specific patient/client population;
  • a skill or competency area.

In this example, the program is tracking an area of practice (e.g. Community), and this practice area is entered twice to track activities with two client populations (Adult and Child):

  • Select the correct Department and Program from the drop down lists.

  • Click the Add icon add green.pngto create a new code.
  • Click the edit image.pngicon to revise an existing code
  • Click the inactivate trash.png icon to remove an obsolete code. (To see or reactivate old codes: Click to place a check mark in front of Show Inactive Codes; click the reactivate icon image2020-5-20_8-38-48.png).

The directions are the same as for adding an Activity Code (see above)

  • Enter a full Name for the code (to be displayed in reports or correspondence).
  • Enter a Short Name to be displayed on screens (Maximum 10 characters).
  • Click the green check mark to save image.png and continue.


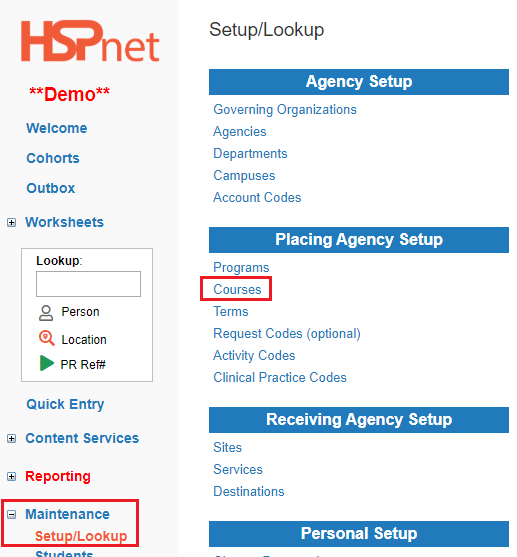
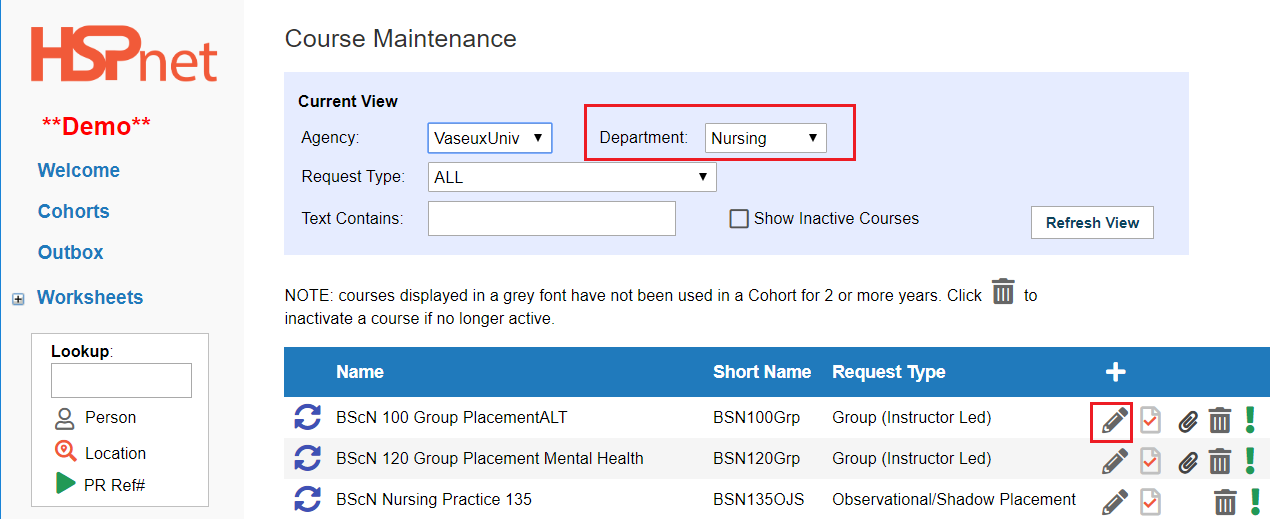
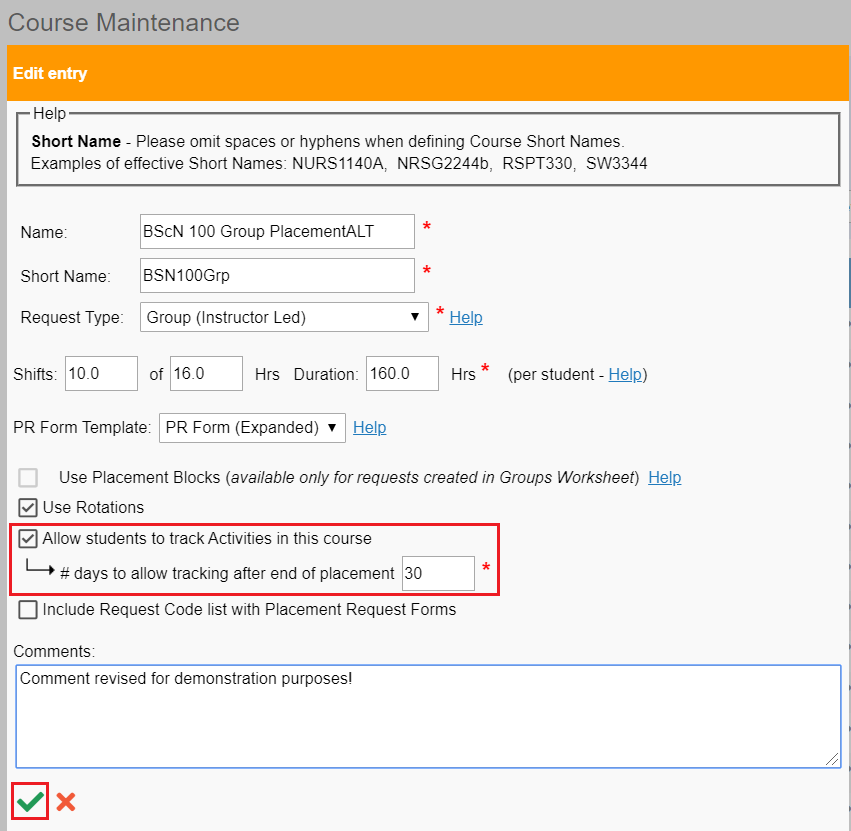
Set up each Course where you want to use the Student Activity Tracker:

  1. Click: Maintenance/Setup/Lookup / Courses.  


  • Select your Department from the drop down list to view a list of courses in your department. Click the refresh button if needed.

  • Click Edit image.pngfor the course you intend to enable.


For complete instructions on How to Create a New Course, please click the link.


  • Click to place a check mark in the box in front of: Allow students to track Activities in this course.

  • Enter the number of days after the placement end date when students may continue to update activities (the "tracking period"). In this example, students may add or update course activities while their placement is underway, and for up to 30 days after the placement ends. The Student Activity Tracker will open on the first day of the placement request.
  • Save this addition by clicking the green check mark image.png.
  • You can return at any time to edit the course with the edit image.pngicon: for instance you may want to extend the period to 40 days after the placement ends if a number of students missed the deadline.
    • Placing Coordinators can add/edit the student's activity tracker at any time: even after the end date for students when the Student Activity Tracker is closed.


How the student records activities: 

  • While logged in, the student selects the Activity Tracker tab (which only appears when students are assigned to courses with this active feature).
  • Today's date is the default, but the calendar calendar.pngicon can be used to select a different date.
  • The fields with red stars are mandatory for the student to enter or the entry will not save. Entering the Hours and Date are the only two Mandatory fields.
  • Shift Type and Preceptor will auto-populate, however when a drop down list appears the student can make a selection. For example, a student may be assigned to two preceptors: Dorothy Callback, and Donald Duck. Dorothy appears on the drop down list first as this drop down list sorts alphabetically on surname (please don't tell Donald or he might want to change his last name). 
  • The next two fields will provide drop down lists the student can select from, provided you have filled in Activity Codes and Clinical Practice Codes as outlined earlier in this document.
  • The student can enter a text field and must save the entry by clicking the green check mark image.png icon.


Monitor Student Activities: 


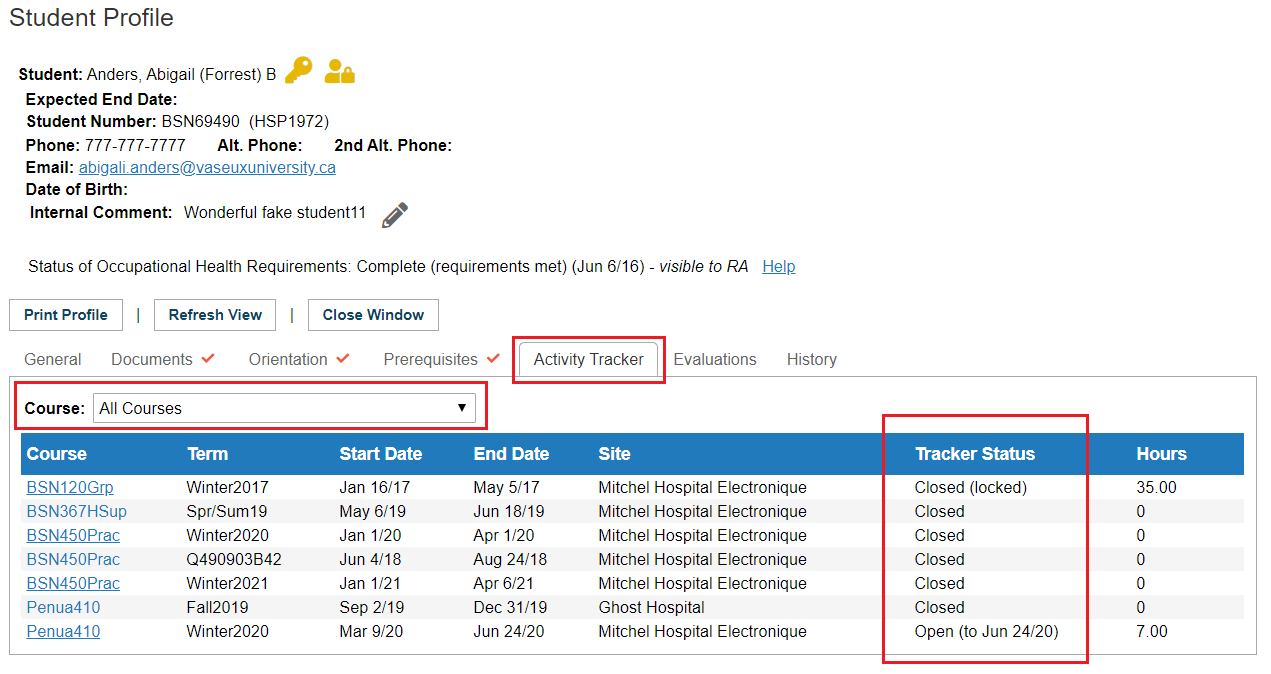
When a student is assigned to a placement, that course will be displayed in the Activity Tracker tab of the student's Welcome Screen. These are the same tabs visible to the educational Program (Placing Coordinator), by clicking to open the Student Profile.


Different Options for monitoring: 

  • Monitor View (link to document - this enables you to see the same screens as the student does/student view)
  • Student Profile: Double click on the student name on the enrolment worksheet to open the student profile.
  • Student Profile: Access through Student Maintenance (4 steps directly below):

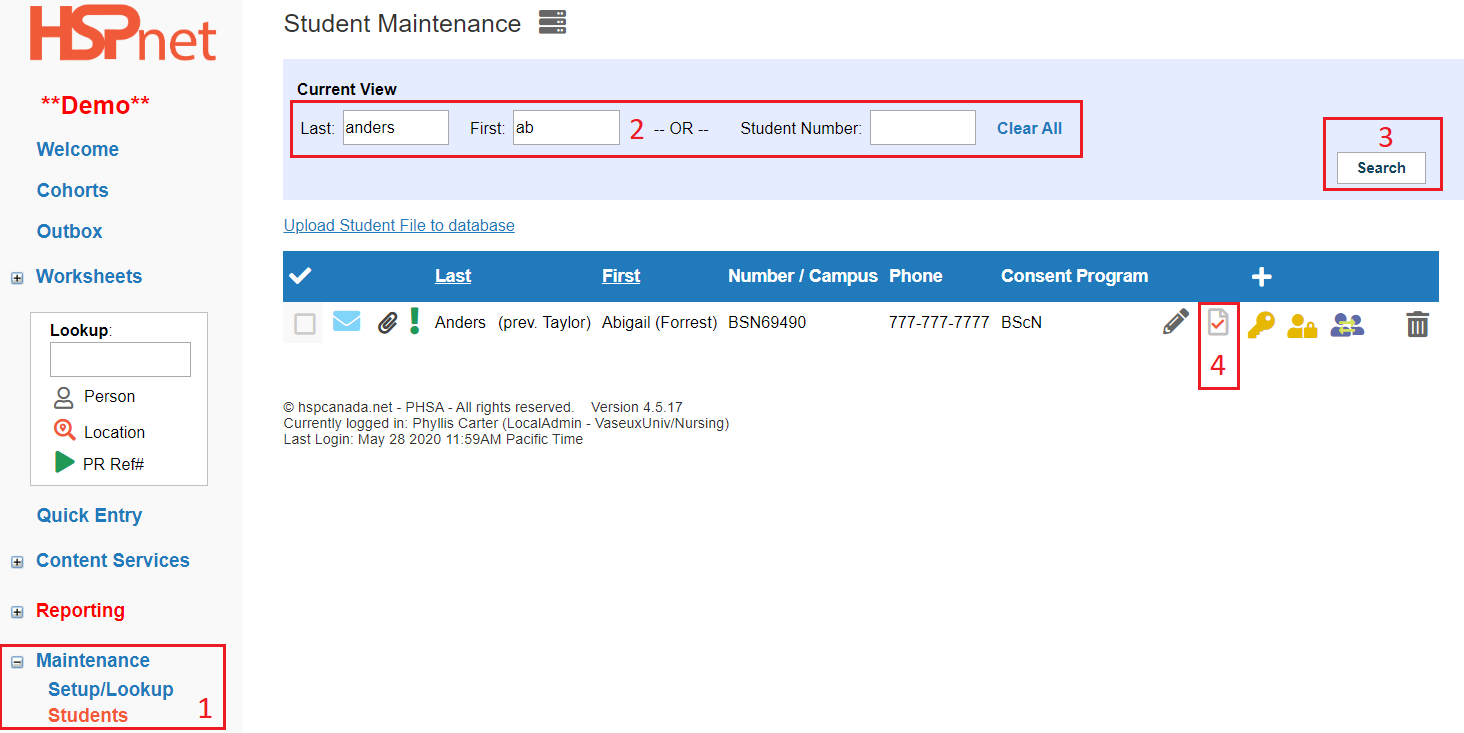
Access via Student Maintenance:

  1. Click Maintenance/Students.
  2. Enter a student last name, first name or student number.
  3. Click: Search
  4. Click the profile icon. profile - checked.png


image.png

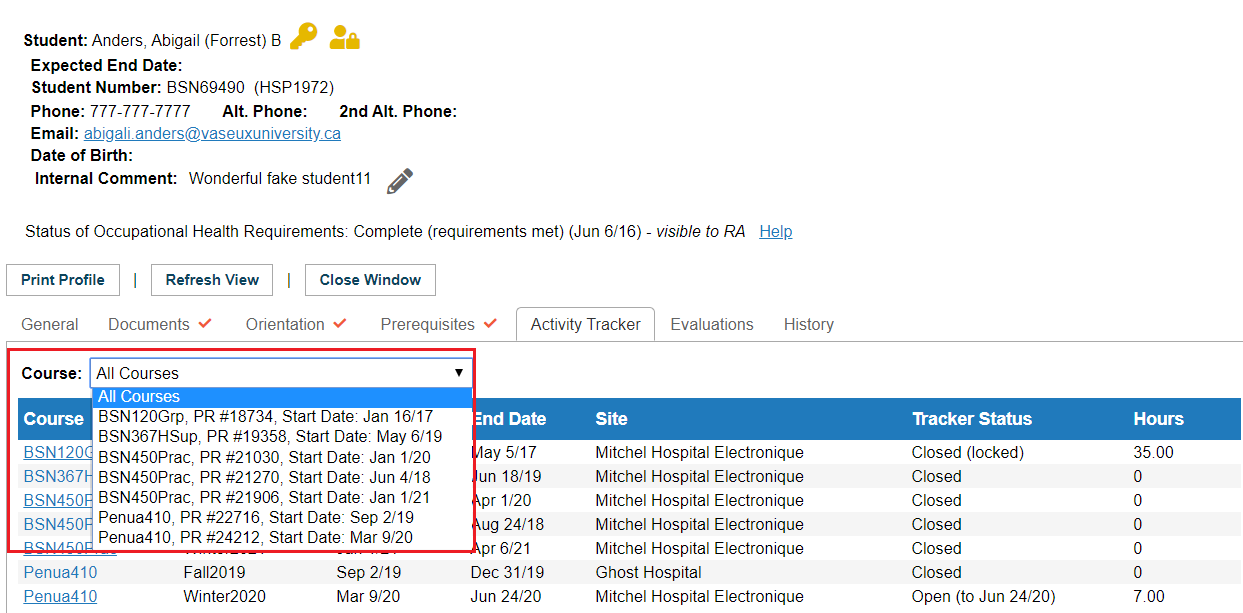
On the student profile, the default display on the Activity Tracker tab is for all Courses. There is a drop down list of all assigned courses and the status of open or closed will display beside each course.

  • Select a single course from the drop down list or:
  • Click the link in the course column and it has the same effect as selecting that course from the drop down list.

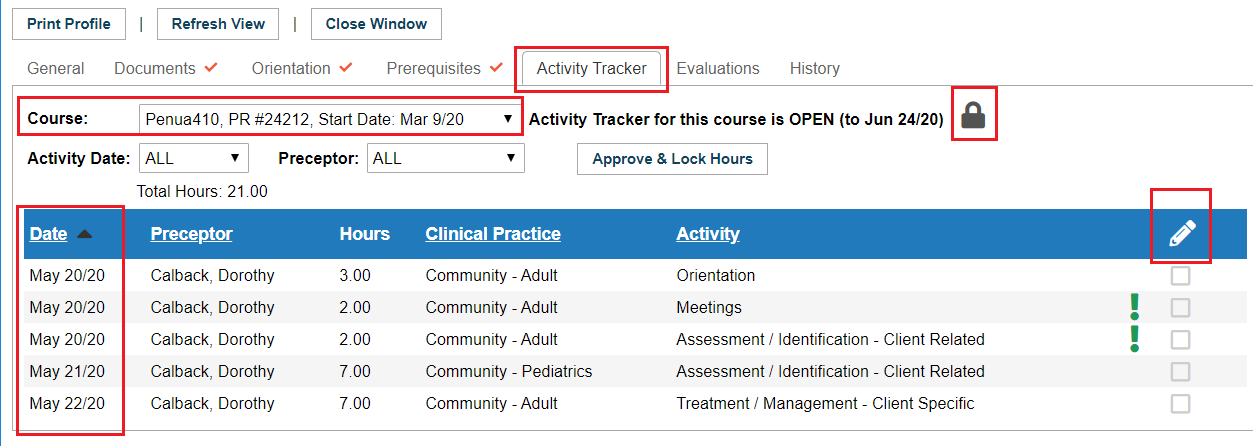
When a single course is selected from the drop down list or by clicking the link in the left hand column (screen captures above):

  • a read-only list of activities entered to date is displayed for that course.
  • Click on the appropriate column heading (Date, supervisor name, or a Code) to change sorting. The column you are currently sorting on will show a small black triangle in the blue bar beside the white lettering.
  • Hover your cursor on the green exclamation mark icons in order comment - green.png to read the comment entered; this icon only appears when there is a comment entered.


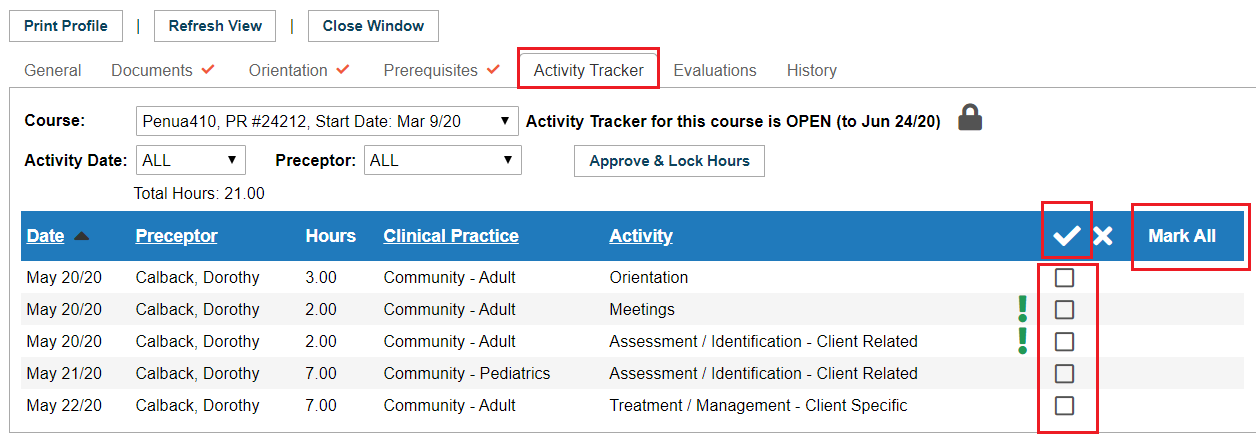
The optional validation status of activities can be changed whether the Student Activity Tracker is open or closed without unlocking the record (as would be required to change a student's tracked activities). The check marks entered shows the students the activity has been reviewed and approved.

  • In the blue bar, click the white pencil image.pngicon (Screen shot above this one) to validate/approve each tracked activity. Click individually to put a check mark in selected boxes, or click: mark all.
  • Click the white check mark icon in the blue bar, to save the changes.


  • Click the Unlock unlock.pngicon if you need to edit a student's activities (2 screen shots above this one); for example to correct an error or to enter missing activities on behalf of a student after the Student Activity Tracker is closed.

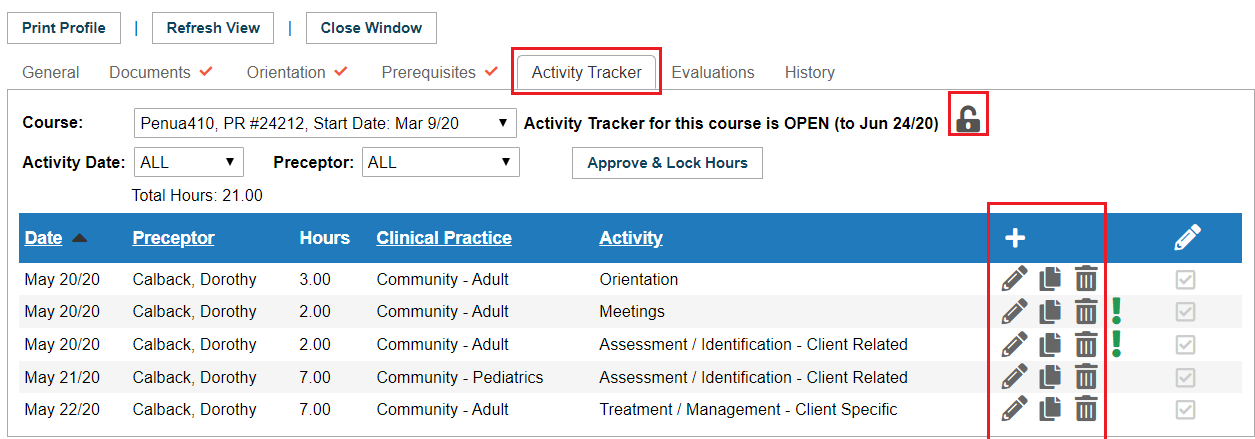
When the Student Activity Tracker is unlocked, the placing coordinator may edit a student's activities:

  • Click the addadd green.pngicon to add a new activity.
  • Click the pencil/edit  image.png icon for an existing activity to edit its hours, supervisors, or codes.
  • Click the copy copy.pngicon to duplicate an entry. For example the same activity may be completed on different dates. You can edit the date on duplicated entries to show when else they took place.
  • Click trash.pngto delete or cancel an activity.
  • Click the open lock (choices unlocked) lock.pngicon to lock the activity again.

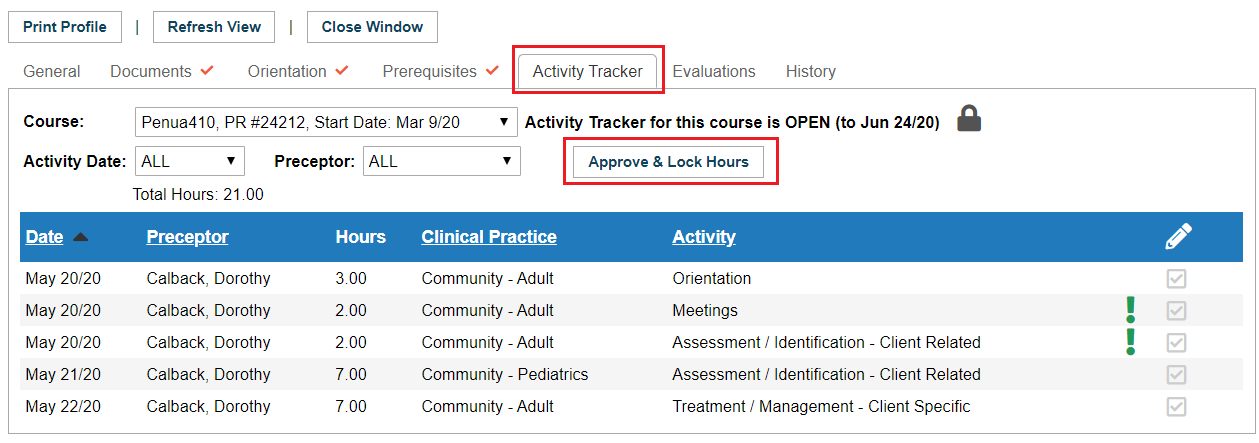
After the Student Activity Tracker is closed and the entries are validated, the Placing Coordinator can flag all hours as Approved (check marks), and lock the Student Activity Tracker for that course to prevent further edits.


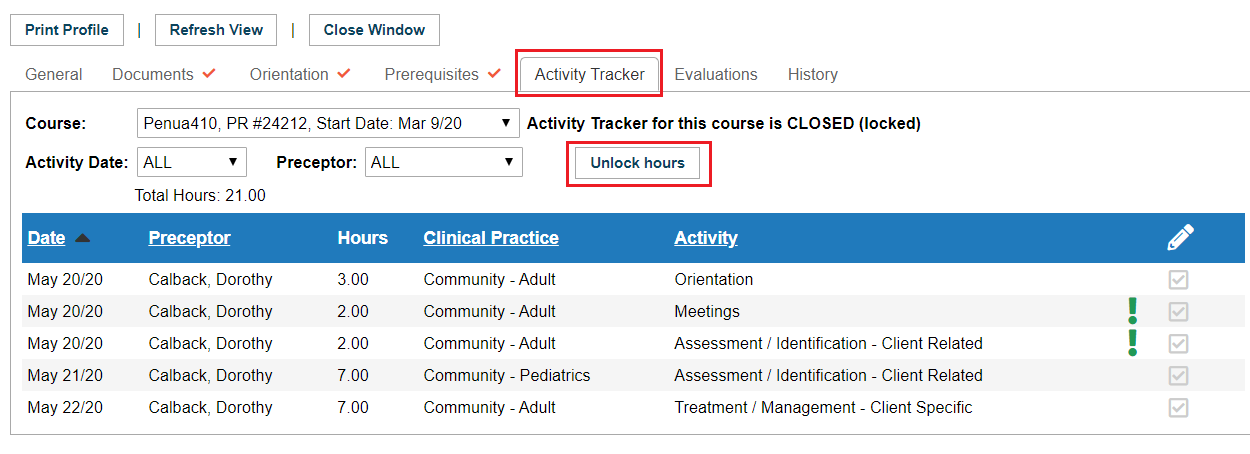
The Placing Coordinator  can Unlock the Student Activity Tracker for a course at any later time.

Students will be be permitted to add/update Activities only when:

  • they are assigned to a Confirmed placement in the course, and
  • the Student Activity Tracker status is Open for the course.
  • The HSPnet database maintains an audit record of additions, deletions, and edits to a student's Activity Tracker entries that are made by someone other than the student (e.g. by the Placing Coordinator).
  • Please contact Help/Support /e-mail help if you need access to the audit data in the event of a challenge or to verify the activities that were added/changed by a non-student user.