|
Default Login Screen
When you log into HSPnet, the opening screen defaults to Student Maintenance.
The left side of your screen is a navigation bar.
The main links have other links beneath them when clicked. The main links are:
- Cohorts
- Worksheets
- Content Services
- Reporting
- Maintenance
- Help/Support.
|
|
|
Return to Contents
|
|
|
Screen Navigation
If you click the link: Maintenance, three other links appear below. As we are already on the Student Maintenance screen, the word students shows up in red. In HSPnet, we always recommend clicking on the links when you wish to change screens: if you use your internet browser back arrows, you may be looking at a cache memory version of the page! If you click directly on the link, that will cause the page to reload with any changes you made while editing. HSpnet also has a button that appears frequently, called: Close Window. Clicking that button (versus the X in your upper right hand corner) also forces the other screens to update and show any changes you made on one screen to show up on other screens.
|
|
|
Return to Contents
|
|
|
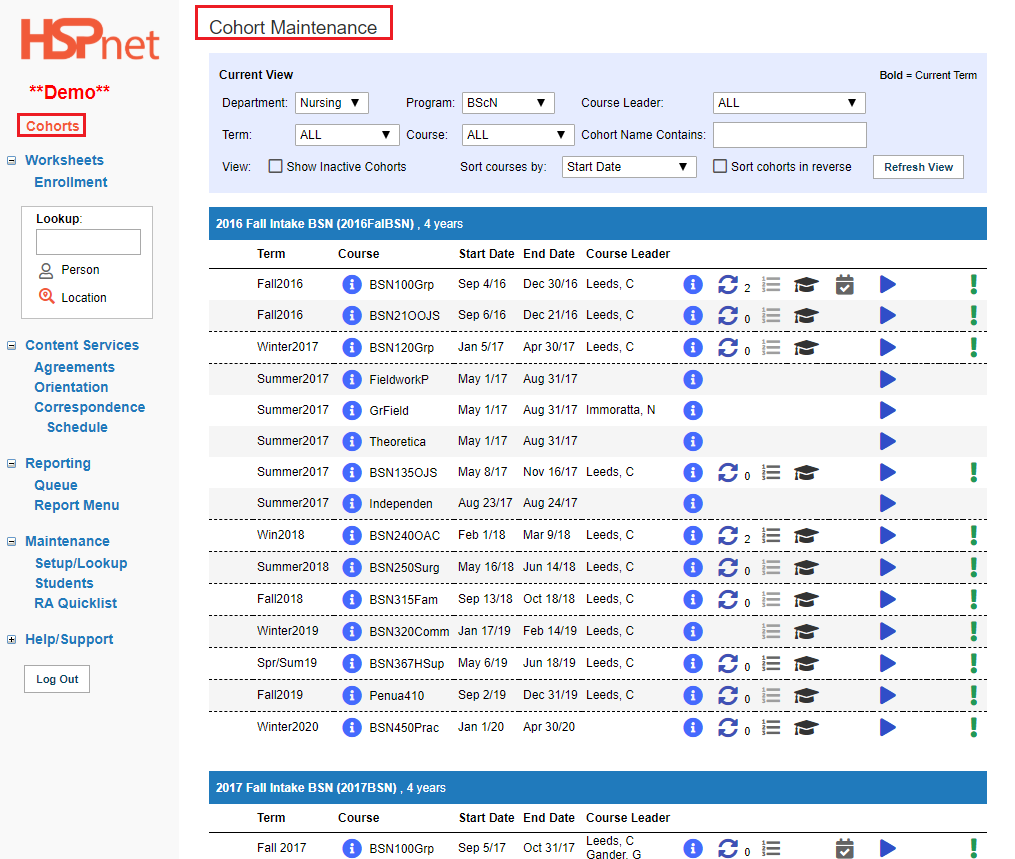
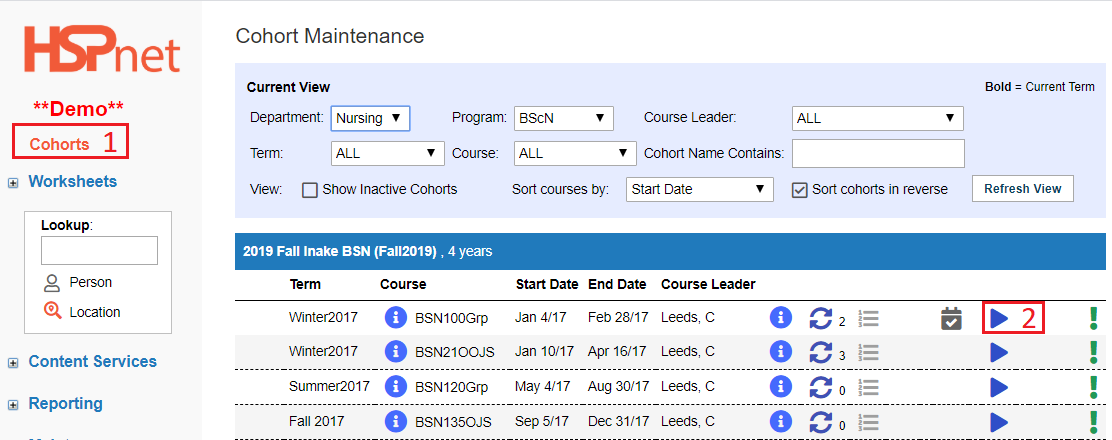
Cohorts Screen
In HSPnet a cohort is a group of students that all start and graduate together at the same time. HSPnet only tracks practical (not theoretical) courses, so typically a cohort will list every course placement the student will attend during the duration of their program. In the adjacent sample screen capture a Bachelor of Science Nursing Program is displayed, showing the courses from the Fall of their first year to the final term of their 4th year. At the very bottom of this screen capture we can see just the top of the blue header for the 2017 Fall Intake.
There are two types of Cohort on HSPnet:
- Structured: all students take the same courses at the same time. When you enroll or upload students to one enrollment worksheet in a structured course, that same student list will upload to ALL of the courses in that cohort.
- Unstructured: some third year students may take second year courses in the third year, or second year students my take 3rd courses, so the students are NOT all doing the same courses at the same time. In an unstructured cohort, each enrollment worksheet will have a unique list of students, so those uploads/enrollments must be done separately for each course.
There is also a Quick Entry feature on HSPnet that may be used to place small groups of students without a cohort, or to place some students in one-off placements outside of a cohort.
|
|
|
Return to Contents
|
|
|
Cohorts Screen - continued - Current View
The light blue rectangle at the top of the Cohort Maintenance Screen is called the Current View. In this area you have drop down lists that will filter the view you can see.
-
Department (you may have access to only one, or as many as you have you been given access to. Typical Departments are: Nursing; Rehab Sciences or Physiotherapy, Occupational Therapy, Speech Language Pathology, Pharmacy, Social Work, Health Sciences, etc.
-
Program: examples: BSN (Bachelor of Science in Nursing), LPN (Licensed Practical Nurses, Physiotherapy, Health Care Aid, Personal Support Worker, etc: any program leading to a degree, certificate, or "graduation."
-
Course Leader: If there is more than one course leader, this enables you to view only the assignments made to a specific course leader, or to show all.
-
Term: your local Placing Coordinator may create custom terms, but the three stock terms on HSPnet are:
- Fall: September 1 to December 31.
- Winter: January 1 to April 30.
- Spring/Summer: May 1 to August 31.
-
Course: so you can view only one course at a time and have a less busy screen.
-
Cohort contains: is a text field, but if you were to enter 2018, it would turn the text red in that field to indicate to you that you are only viewing cohorts that have 2018 in their name.
-
View: there are 3 options here: Click to place a check mark in the box in front of Show Inactive Cohorts, and this will reveal all of the cohorts that have been archived. (They can also be unarchived if further work is required on them). Sort courses by is a drop down that let you view them by date or by name. Click to place a check mark in front of Sort Cohorts in Reverse, if you want to view the most recent cohort first: this would put 2016 at the bottom and 2020 or 2021 at the top (depending on what has been entered).
-
Click Refresh view if the screen does not reload by itself after you change a filter in Current View.
Icons:
There are many icons displayed in the adjacent sample screen capture. The details icon is a constant you will see in any cohort, as is the enrollment worksheet icon. Many of the others, and some not shown here, will depend on the features being used by that course.
Details Icon:
 You can click to open any details icon to see further information about a course. The information is read only. The left column is information about the course, the right column is information about that course in this particular cohort (if you open the latter: what is enabled is checked and what is not enabled is not checked (Example: Allow students to use e-orientation). Enrollment Worksheet goto button Icons.
You can click these buttons/icons to open the Enrollment Worksheet:
 - 0 students are enrolled so far! Click this icon to open the Enrollment Worksheet. - 0 students are enrolled so far! Click this icon to open the Enrollment Worksheet.
 - hover your cursor over the icon to see how many students are enrolled or click this icon to open the Enrollment Worksheet. - hover your cursor over the icon to see how many students are enrolled or click this icon to open the Enrollment Worksheet.
The other icons are all optional and in your role may not be important:
 - indicates course rotations are being used. - indicates course rotations are being used.
 indicates the Site Selector feature is available for that course, but the light grey indicates it is not set up for the course in this cohort. Coloured versions of the same icon will indicate whether it is enabled and whether the students have chosen their selections yet. indicates the Site Selector feature is available for that course, but the light grey indicates it is not set up for the course in this cohort. Coloured versions of the same icon will indicate whether it is enabled and whether the students have chosen their selections yet.
 - indicates e-orientation is set up for this course (currently used only in Ontario and Nova Scotia). - indicates e-orientation is set up for this course (currently used only in Ontario and Nova Scotia).
 - Correspondence Modules can be activated. - Correspondence Modules can be activated.
|
|
|
Return to Contents
|
|
|
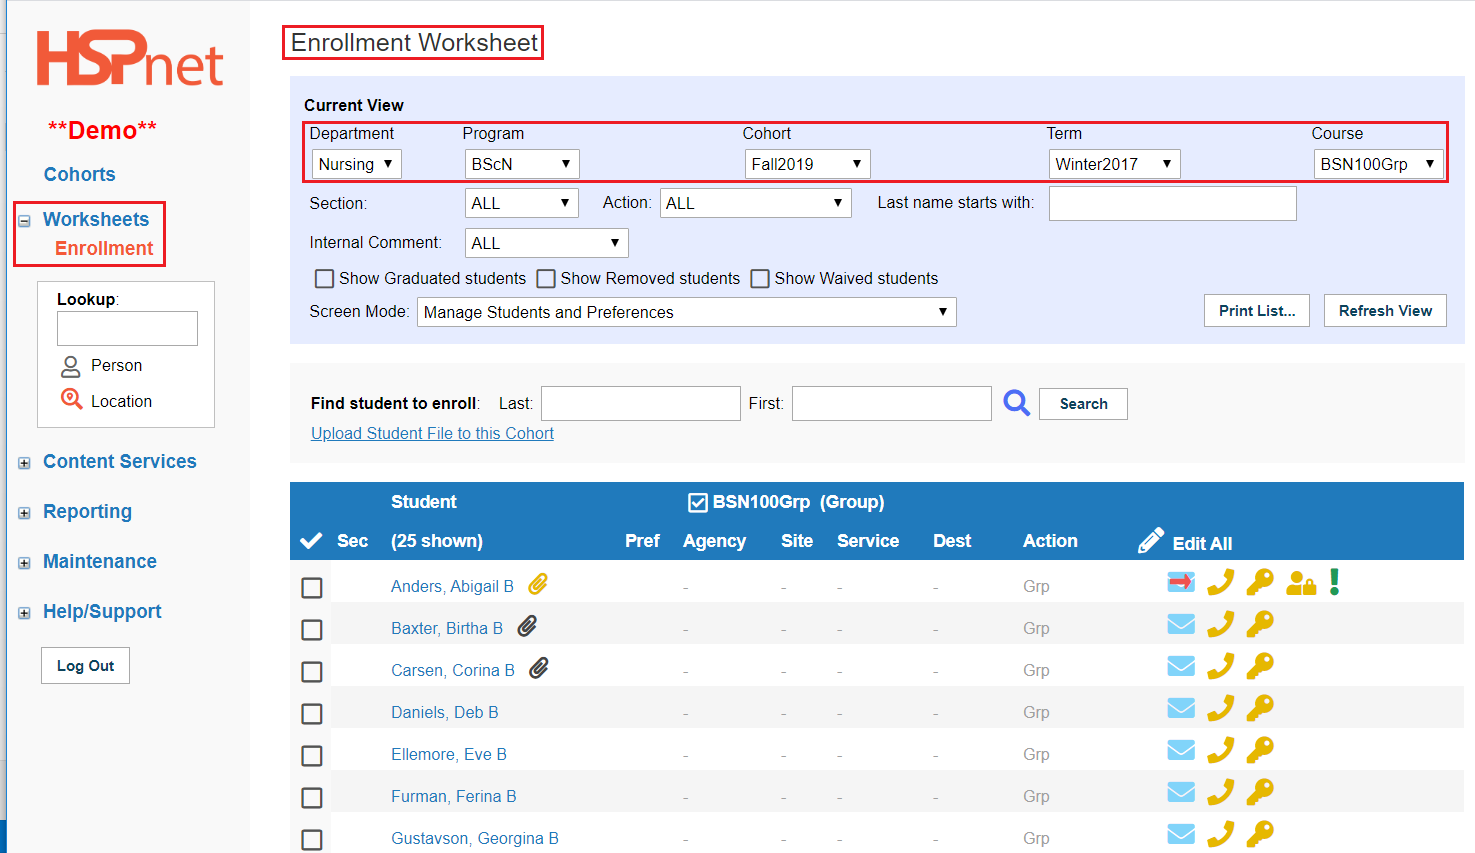
Worksheets
The only worksheet student administrators can access is the Enrollment Worksheet, so it is the only option that appears when you click the Worksheets link. Visually it may be easier to use the blue goto buttons (shown in the frame above) from the cohort screen, but an alternate way to navigate to a specific Enrollment Worksheet sheet is to:
- Click Worksheets.
- Click: Enrollment Worksheet.
- Select the Department, Program, Cohort, Term and Course from the drop down lists.
- Click refresh view to get the new screen to load with your choices.
Icons:
 There is an attachment (document) uploaded to this student's file. There is an attachment (document) uploaded to this student's file.
 The student has uploaded a document to their file (students with advanced access only) that still needs to be verified/checked by the Placing Coordinator or student administrator in order to be released to the receiving agency. Other related guides (separate documents) on this subject: Student Resume - Cohorts; Student Resume in Quick Entry. The student has uploaded a document to their file (students with advanced access only) that still needs to be verified/checked by the Placing Coordinator or student administrator in order to be released to the receiving agency. Other related guides (separate documents) on this subject: Student Resume - Cohorts; Student Resume in Quick Entry.
 Edit. Edit.
 Delete. Delete.
 Email address is entered; click the envelope icon to send an e-mail message. Email address is entered; click the envelope icon to send an e-mail message.
 The student has released their e-mail address so the receiving agency can view it (optional and can only be done when a student has access to HSPnet). The student has released their e-mail address so the receiving agency can view it (optional and can only be done when a student has access to HSPnet).
 No phone number has been entered. Click the icon to enter a phone number. No phone number has been entered. Click the icon to enter a phone number.
 Phone number and other contact info is entered. Open the icon to read the number or hover your cursor over the icon. Phone number and other contact info is entered. Open the icon to read the number or hover your cursor over the icon.
 Light Yellow user key: Student access is turned on but this student has not yet been given a user account. Light Yellow user key: Student access is turned on but this student has not yet been given a user account.
 Dark Yellow user key: Student currently has access to HSPnet. Hover your cursor over the key to see when the student last logged in. Dark Yellow user key: Student currently has access to HSPnet. Hover your cursor over the key to see when the student last logged in.
 Dark Yellow user key with a red X through it: is a current user account that disabled. Dark Yellow user key with a red X through it: is a current user account that disabled.
 Student has Advanced HSPnet Access. Student has Advanced HSPnet Access.
 Internal comment exists on Student Profile Internal comment exists on Student Profile
|
|
|
Return to Contents
|
|
|
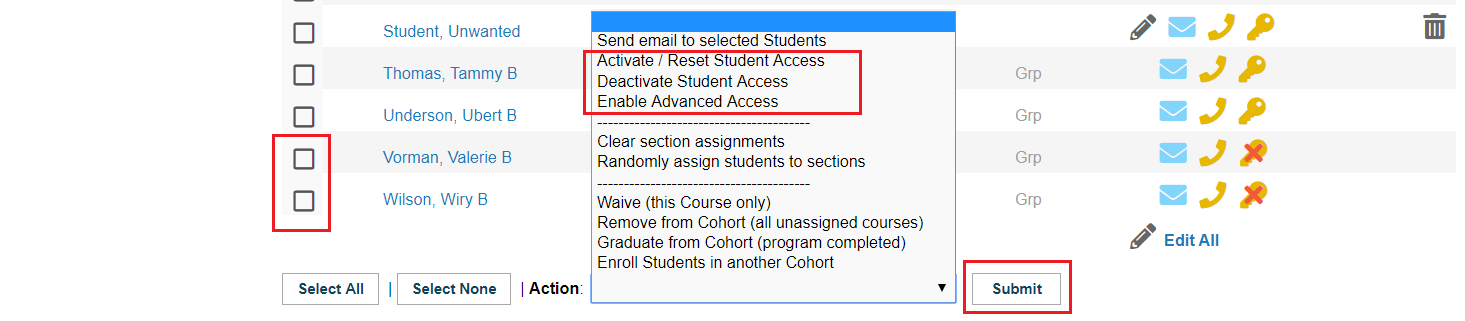
Student access can be activated, deactivated, reset, or advanced access may be enabled.
-
Click to place a check mark in the box to select the student or click the Select All button.
-
Select the Action you wish to take from the Action drop down list. (If all the options are not there you need to change your *screen mode -*see the instructions below about the Enrollment Worksheet). Options pertaining to student access:
- Activate/Reset Student Access - for initial activation or reactivation.
- Deactivate Student Access.
- Enable Advanced student access.
-
Click: Submit.
Other related Guides/Documents:
|
|
|
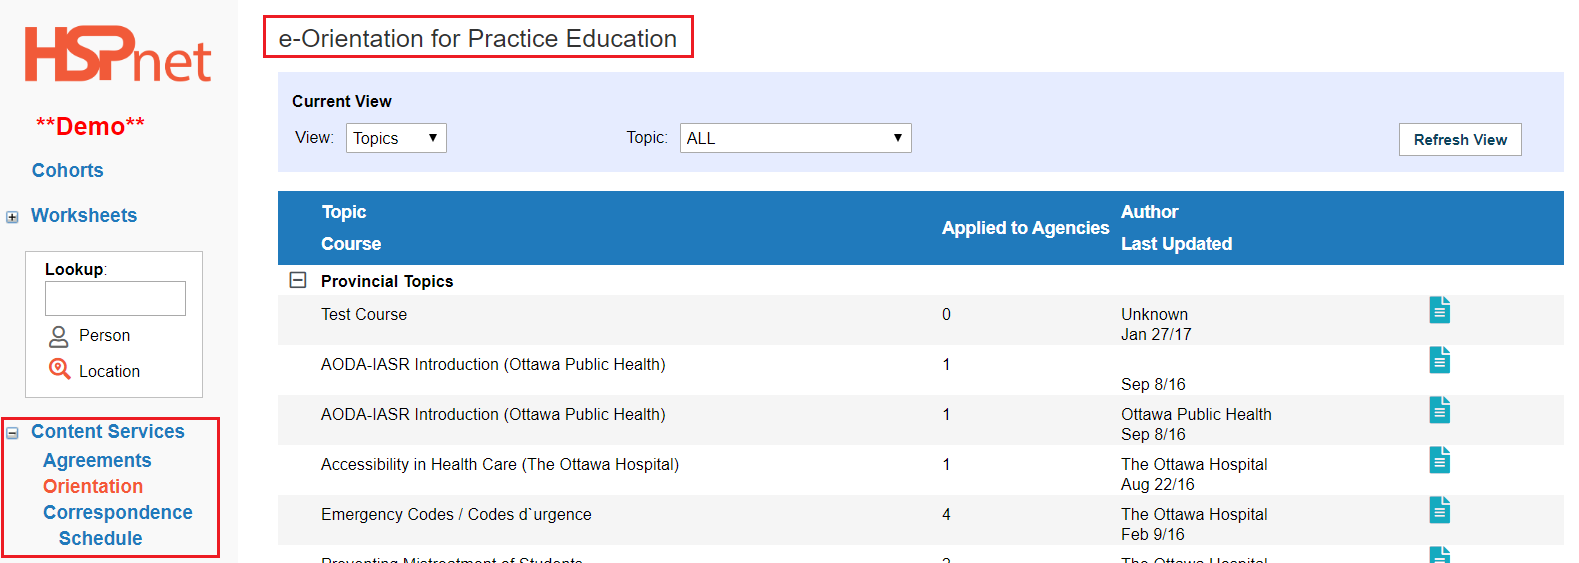
Content Services
This is an area you may not need to access, depending on your role and what your organization uses. These features need to be turned on/requested from e-mail Help/HSPnet Support
The features In Content Services:
- Agreements - this goes to the affiliation agreement manager. An affiliation agreement is a legal document outlining who will pay if the student is injured during a practicum, or the student is involved in any malpractice. This feature allows tracking of agreements, expiry dates, etc.
- Orientation - you need to have the role of EOM or E Orientation Manager to use this feature. It enables e-orientation modules to be adopted for inclusion into student requirements.
- Correspondence and Schedule - if the correspondence module and its scheduling features are turned on these links will work.
|
|
|
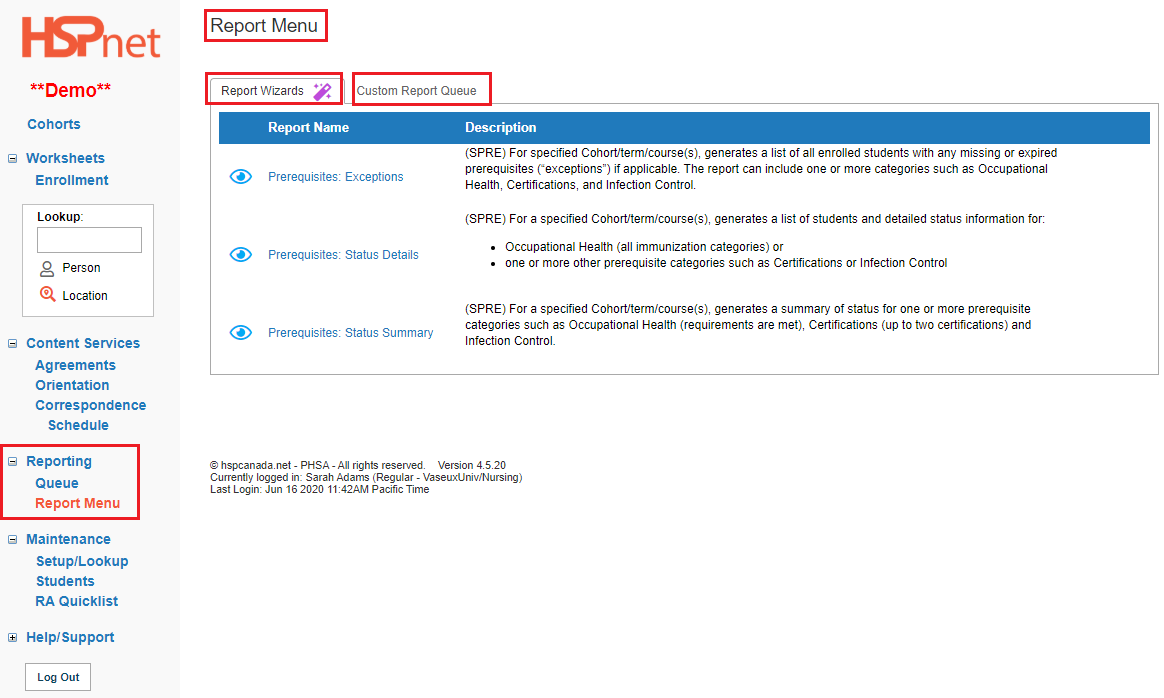
Reporting
Reporting has two links:
- Report Queue - this is where most reports can be picked up. PDF reports can take up to two minutes to generate. If you are waiting for a report, you may need to click: refresh view a few times.
- Report Menu - this is where you create the reports you want. One tab is your gateway to using the report wizards, the other is for submitting custom reports should you need fields that cannot be included using the wizard.
We do not describe the report Wizards in this document, but you can reach them in by searching our Knowledge Base or by clicking these links. These links are all to different documents in the knowledge base (not internal to this document).
Links Internal to this document:
|
|
|
Return to Contents
|
|
|
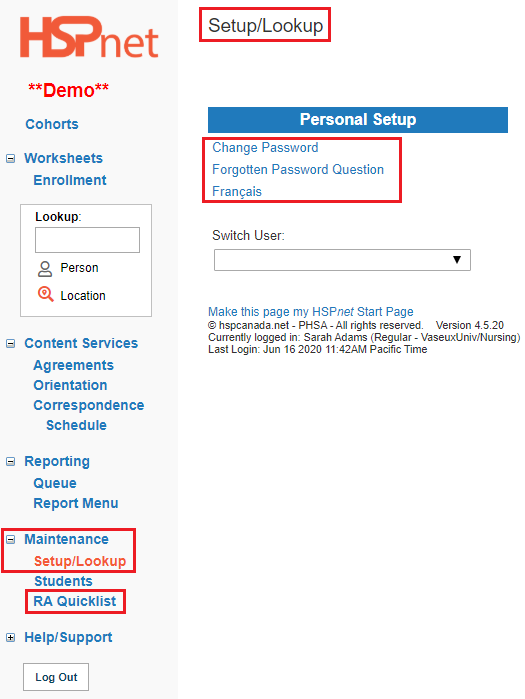
Maintenance
Maintenance has 3 sub-links:
-
Setup/Lookup: this selection is where you can:
- Change your own password.
- Change your forgotten password question.
- Switch your HSPnet screen to French or to English.
-
Student Maintenance: this is the default screen that loads when you log in. Further down in this document we'll show you how student maintenance works.
-
RA Quicklist: This is a personal setting for staff who need to search locations for students. The Placing Coordinator can select which receiving agencies to include in searches and which ones to leave out. This setting may not be of any use for the role of student administrator.
|
|
|
Return to Contents
|
|
|
Help/Support
Help/Support has five links:
- Knowledge Base: This guide is one of many in the HSPnet database. Use key words to search for instructions, and a number of links are provided in this guide. How to use the knowledge base (video guide).
- Glossaries: Click this link to look at HSPnet terminology, role descriptions, placement request types, services, disciplines, etc.
- Online Help: Click this link when you are on a screen already, to bring up the help that is specific to that screen.
- Email Help: Clicking this link will open an e-mail message to the HSPnet support desk (when you can't find the answers you need about the HSPnet software). Responses are normally within 4 business hours.
- Support Info: This link takes you to a public part of the website where you can click again under Privacy & Security Polices and Procedures to access consent forms and hand outs, including student and faculty consents and the Identified Purposes hand outs that goes with the consent forms.
|

|
|
Return to Contents
|
|
|
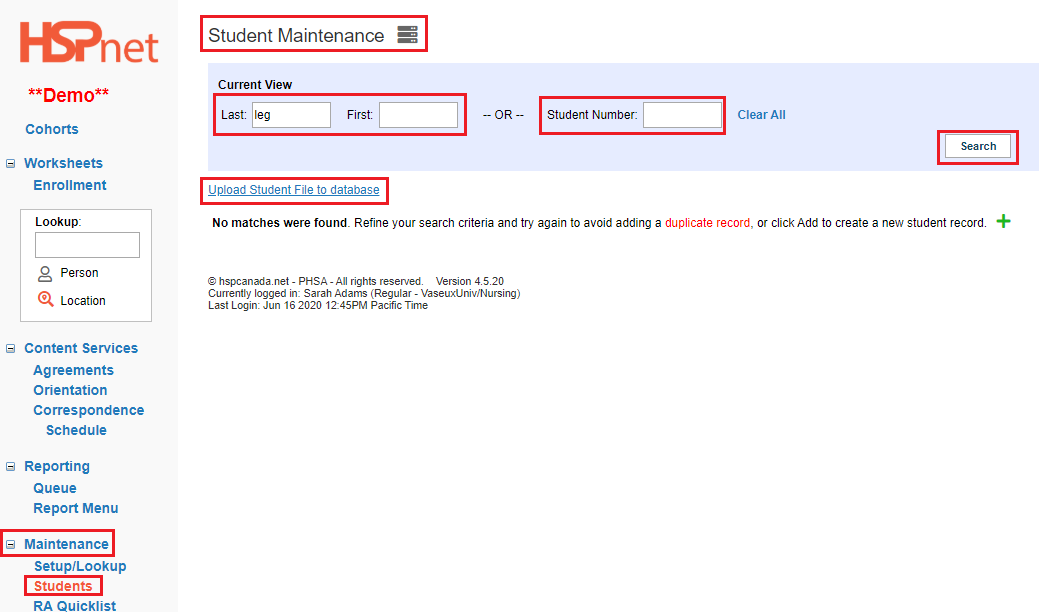
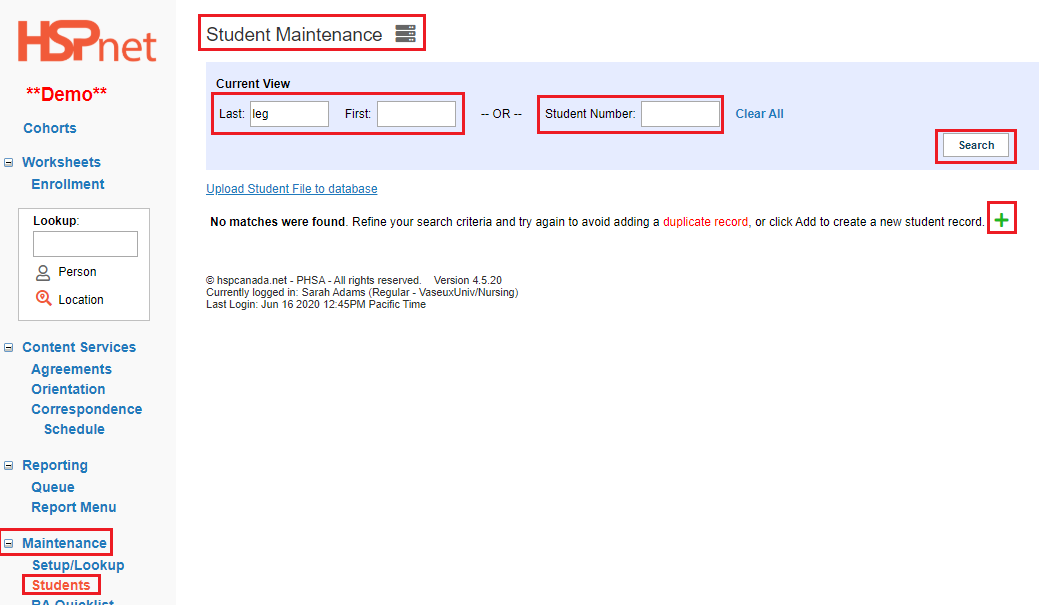
Searching/Adding Students to HSPnet
Best practice is always to check whether the student is already in the database, before adding a new student record using the one at a time feature (automated student uploads will flag the duplicates for you before they are uploaded). Please search carefully before adding a new Student, as duplicate Student records cause incomplete placement histories and other data problems. If a duplicate Student record is displayed after a Search (indicated by a Student name in red), identify the original record and delete any duplicates – contact Support@hspcanada.net if you need help merging the records. Frequently students will enter a program such as BSN and year laters may return to enrol in Specialty nursing courses.
To search:
- Navigate to Student Maintenance: Click: Maintenance/Students.
- Enter 2 – 3 characters of the student's first or last name or the student number. Click the search button.
- If no matching records are found, click the add icon
 to create a new Student record. (Linked detailed instructions in the next frame below). to create a new Student record. (Linked detailed instructions in the next frame below).
|
|
- HSPnet also provides the ability to securely upload student lists from an Excel spreadsheet to the database by clicking the link: Upload Student File to database. There is a printable guide and video to assist you with using this feature. Because this feature works with mass uploads, one of the screens during the process will identify any duplicates that you may have on the list (no need to search the student name in advance).
Linked Documents with how to instructions: (these documents are also linked to the Student upload Screen). These links are to different documents in the knowledge base (not internal to this document).
|

|
|
Return to Contents
|
|
|
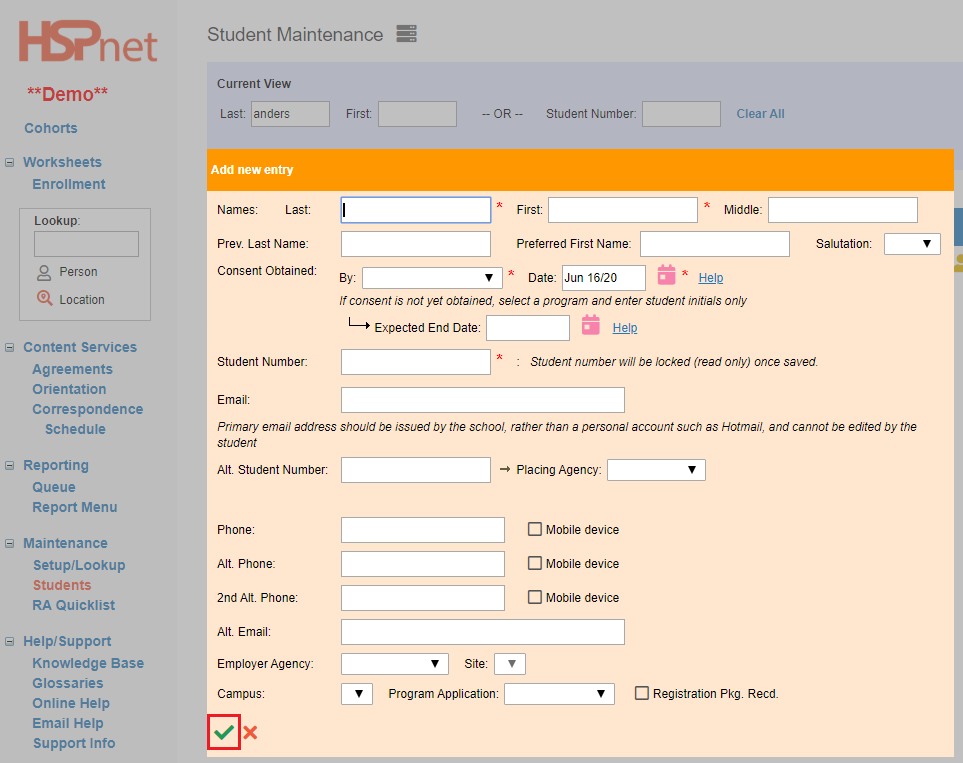
Student Record
When you add one student at a time or a list, the first item created is a student record. A student record can includes all of the fields you can see in the form in the screen capture on the right. The record consists of core information and MUST include information in the five mandatory fields marked by a red star.*
- Student Name fields (first, last and middle are available). If a student only goes by one name, enter their single name into both the first and last name fields (as first and last name are mandatory fields).
- You must also enter the current Program the student has consented to, and the date of the consent. This consent indicates students agree to have their name and information on HSPnet. Never enter student information onto HSPnet without having their signed consent first.
- The final/fifth mandatory field is their student number.
Although the rest of the fields are not mandatory we recommend filling out what you can:
-
e-mail address: this allows the student's assigned supervisor at the placement to be able to contact the student; also, if you grant student access to HSPnet, an e-mail address is required in order to receive the user ID and Password. Best Practice: issue a school e-mail address. The school e-mail address may also be required by the receiving agency for the same reason: to send a user ID and password to a student to use to access their network during the practicum. Many health agencies will not issue a user ID and password to hot mail or g-mail accounts. Patient information systems must be secure and most agencies will only issue access information to e-mail addresses issued by the student's school. Messages may be sent en-masse to students from HSPnet, provided e-mail addresses are entered.
-
Alternate Student Number: There are many collaborative programs in Canada where the student completes the first year or two of their program at a College, and then completes the final senior years at a University. They may have a different student number at the college, which the university can enter (and identity the institution that number belongs to from the Placing Agency drop down list.
-
Phone Numbers: please enter at least one of the options:
- Home/Primary
- Mobile
- Alternates
-
You can also enter an alternate e-mail address, record the student's employer agency if they work at a facility on the drop down list, and even the site if it is a multi-site health authority.
-
If your post secondary institution has more than one campus, you can record which campus this student attends from the drop down list.
SAVE ALL CHANGES by clicking the green check mark icon in the lower left! 
Records may be edited again later, with the edit icon:
|
|
|
Return to Contents
|
|
|
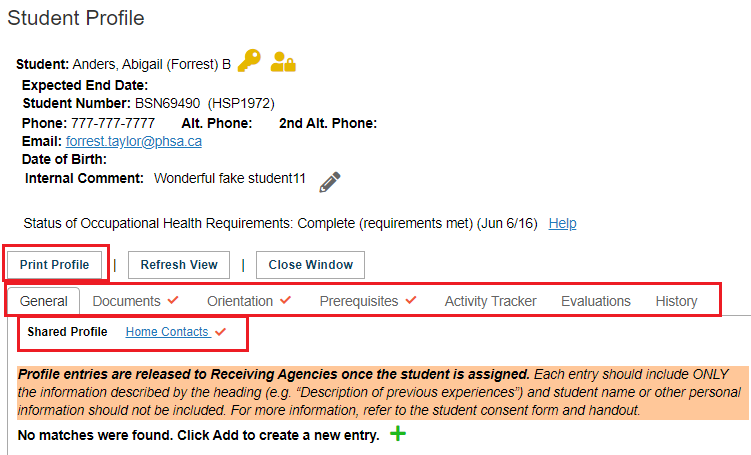
Student Profile
The student profile is separate from the student record. Information can be entered directly into these profiles, or you can also access them by double clicking on a student name in the enrollment worksheet. Prerequisites and certifications may also be entered via Automated Student Prerequisite uploads from Excel data sheets or by changing the mode of the enrollment worksheet.
The profile icon  is where the bulk of the student information is entered. A profile icon for a profile with no information entered, is blank. A profile with information entered has a small red check mark is where the bulk of the student information is entered. A profile icon for a profile with no information entered, is blank. A profile with information entered has a small red check mark  inside it. If you have a list of students and one profile has yellow edges inside it. If you have a list of students and one profile has yellow edges  the yellow colour indicates that was the last profile you opened in this session. the yellow colour indicates that was the last profile you opened in this session.
|

|
|
Student Profile - continued
The top section of each student profile displays information from the student record: name fields, student number, contact information, and (date of birth in Alberta).
There is a Print Profile button for the whole profile and other Print buttons on specific tabs for specific sections of the profile. A link to a PDF report (student profile print out) will appear right above the print button after a moment or two. Click the link to open the file, and select: file save as to save the file to your computer. Once you navigate away from the page, the report link will disappear.
The profiles are divided up into tabs where various types of information are grouped together by category. Some tabs only appear if that feature has been turned on at your organization and we are not showing all of them in this example.
Tabs:
- General: has two sub-links: Shared Profile and Home Contacts.
- You can use the add icon to enter more information under any tab displaying the icon.
- Existing information may be edited with the edit/pencilicon.
- Incorrect information can be deleted:

|

|
|
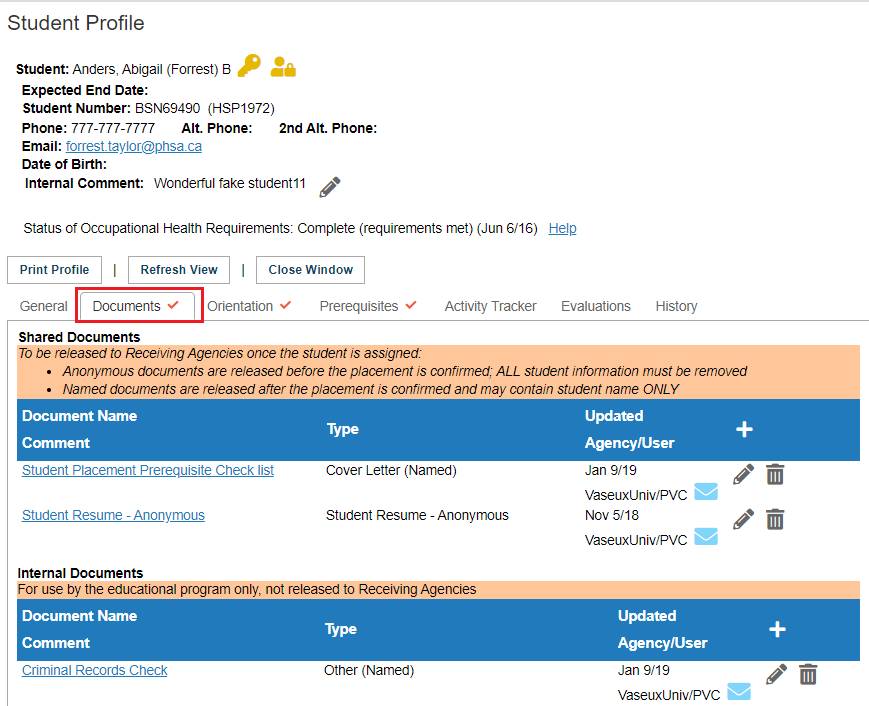
Student Profile - Documents Tab
The Documents tab is divided into two categories:
- Shared Documents which may be released to receiving agencies
- Internal Documents which are not shared with the receiving agencies (only visible for the Placing Agency).
Use the add icon to upload a document: icon to upload a document:
Other Documents that may be useful in the knowledge base on this subject - these links are to different documents in the knowledge base (not internal to this document).
Student Resume: Cohort Placements.
Student Resume: Quick Entry Placements.
|
|
|
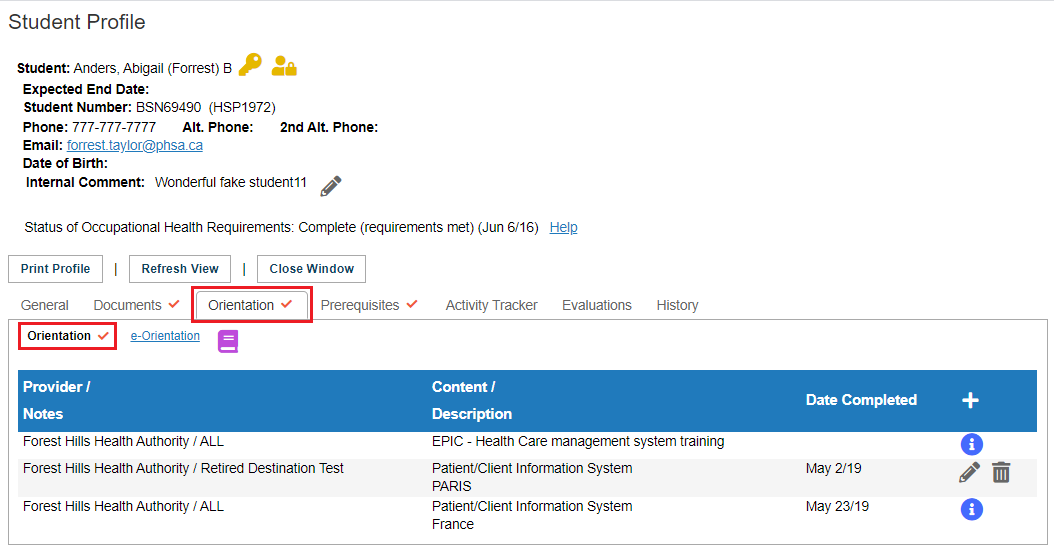
Student Profile - Orientation Tab
The Orientation Tab may also have two sub-links:
- Orientation - you can add and edit information (Unless there is a details icon which means the information is now read only.
- e-Orientation - this link only appears if this feature is turned on. It is used currently in Ontario and Nova Scotia only (June 2020). There is no editing required/available on this sub-link.
|
|
|
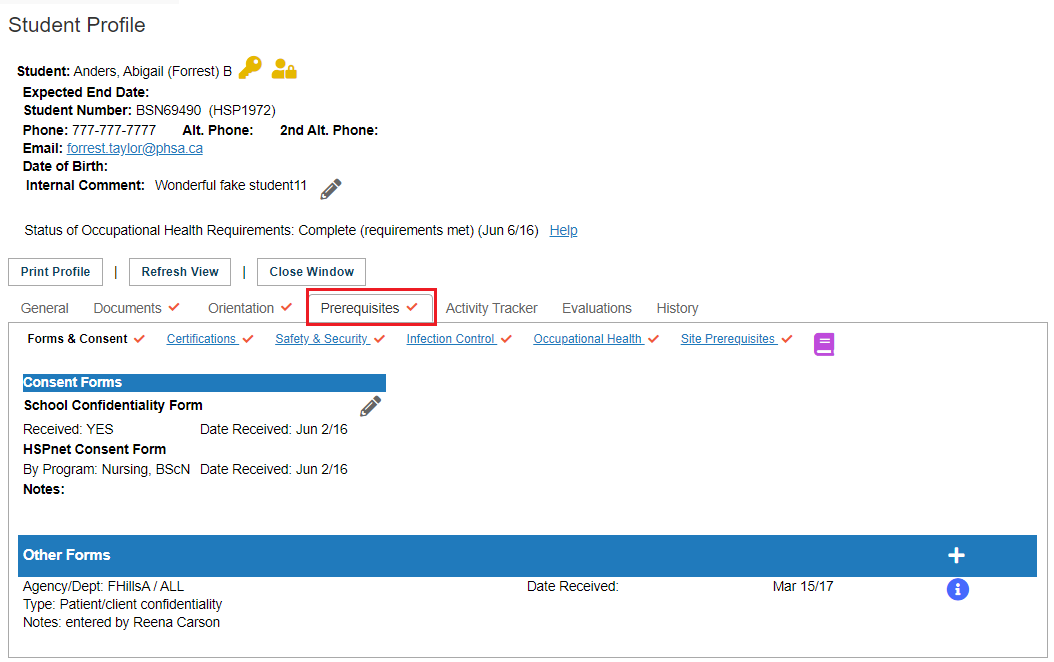
Student Profile - Prerequisites Tab
The Prerequisites tab has 6 sub-links and the ability to record receipt of forms from students. Information can be entered directly into each student profile or you can enter some of this via the enrollment worksheet, or using the automated student prerequisite upload.
Sub links or categories are:
- Forms and Consent. Record the forms sent in by students and the date received. Use the pencil icon to update confidentiality and consent forms; use the add icon to add other forms.
- Certifications: Used the add icon, then select the certification from a drop down list, record the certification number, status, effective date and expiry date. This info can also be entered from the enrollment worksheet or via the automated student prerequisite upload feature
- Safety And Security:This is where Criminal Record Checks are entered; whether an ID card is issued by the school, and any workplace insurance can be entered.
- Infection Control: This is where Respiratory Mask information is entered, including the size of the mask the date the fit test was completed and the expiration date.
- Occupational Health: is where Medical exams, immunization fees and immunizations may be tracked. There is a check box that can be enabled that would confirm to the Receiving site the Occupational site requirements have been met - which is the only information that is released to them.
- Site Prerequisites: allows tracking of site prerequisites from a drop down selection for: having own vehicle, lap top, and language fluency. There is no site requirements met check box as the Placing Coordinator enters this on the Assignment worksheet, which your role is unable to view, and this is done as part of the confirmation process.
Related Guide:
Video Training for PCs - Part 11 - Students - Profile and Prerequisites Video.
|
|
|
Student Profile - Other Tabs
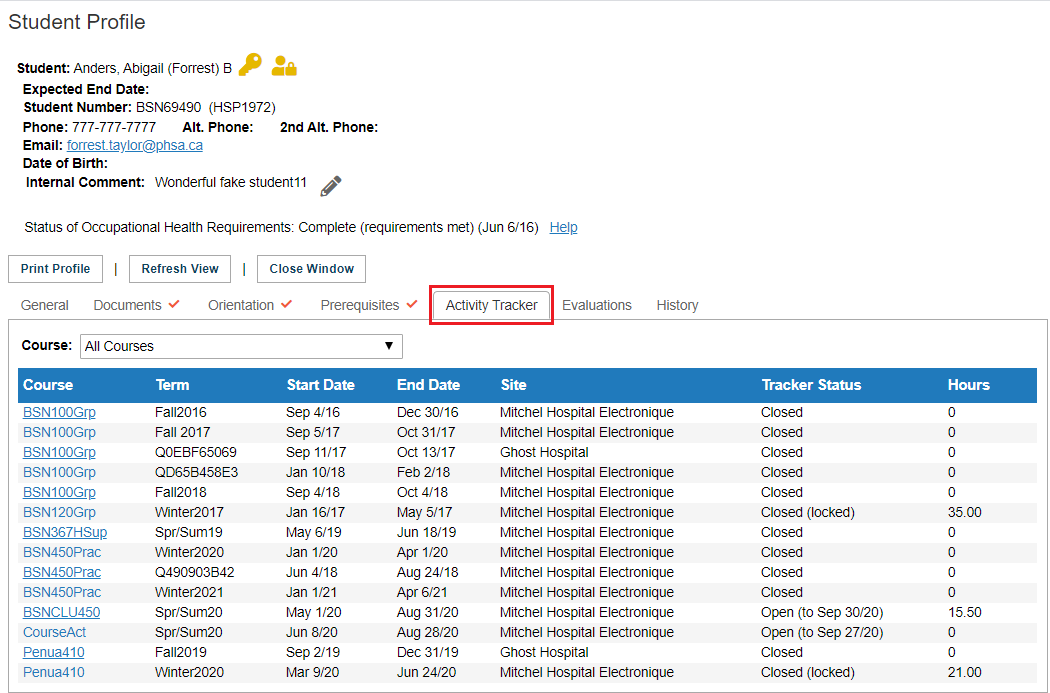
Other tabs may appear on student profiles such as the activity tracker or site selector, depending what programs are turned on at your agency. You may not need to know about these but the links are provided if you wanted to have an overview. These links are all to different documents in the knowledge base (not internal to this document).
Student Activity Tracker.
Student Assessment Module (Physiotherapy).
Student Site Selector.
|
|
|
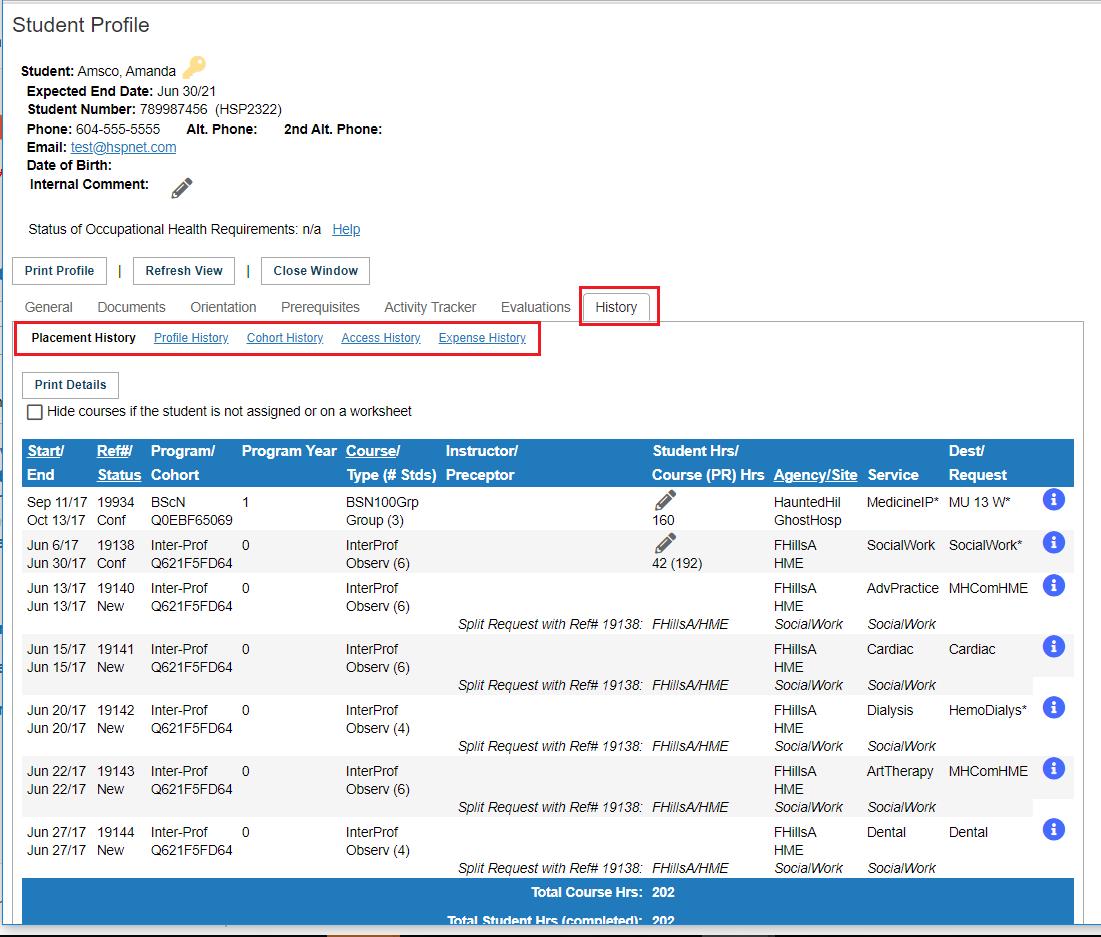
Student Profile - History Tab
The history tab automatically tracks:
- Placement history - all Placements the student was assigned to and confirmed to attend.
- The history of the profile (including when changes were made, what changes were made, and by whom).
- Cohort History - and enrollment.
- Access History (when access is provided).
- Expense History (where that feature is used).
|
|
|
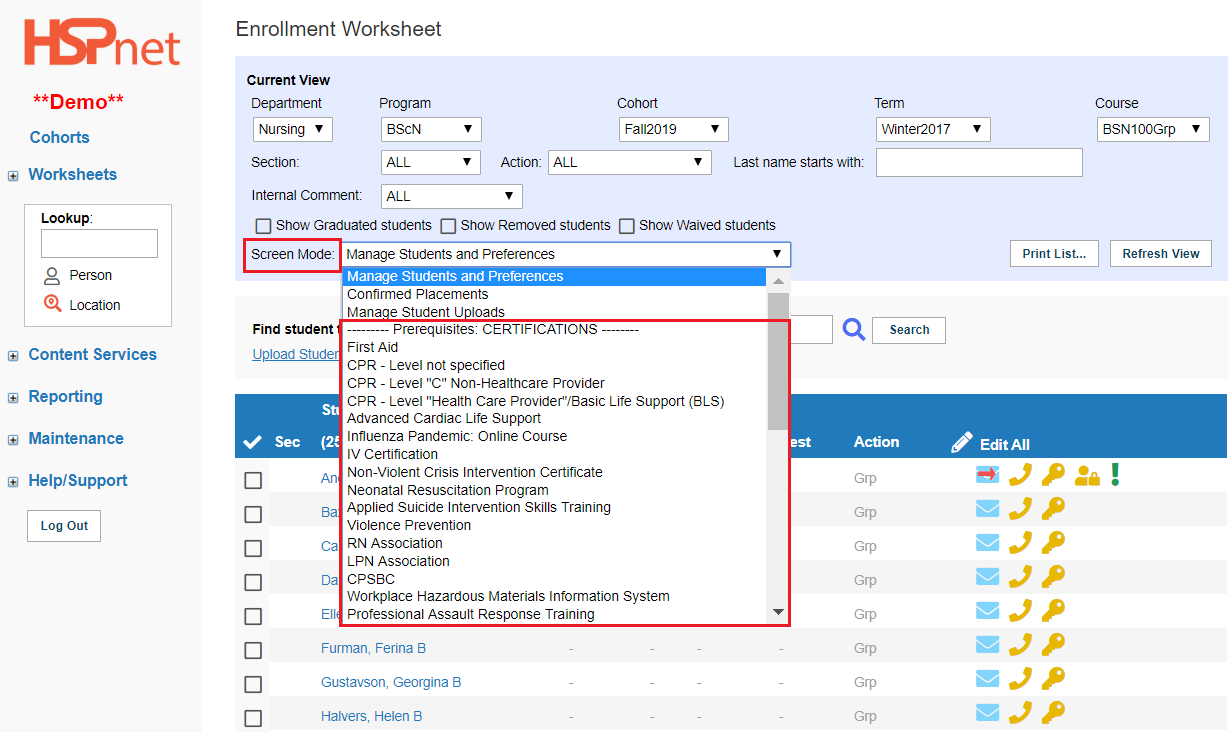
Updating Student Profiles from the Enrollment worksheet (prerequisites, certifications, etc).
- Click Cohorts.
- Click to open the Enrollment worksheet you want to work on
|
|
- On the Enrollment worksheet, at screen mode, select the screen mode you would like to work in from the drop down list. The Screen capture does not show all that are available.
There are 3 basic modes:
- Manage Students and Preferences.
- Confirmed Placements.
- Manage Student Uploads.
There are sections with sub selections that match the student profile individual entry screens:
- Prerequisite Certifications.
- Prerequisite Occupational Health and Safety Requirements.
- Prerequisite Orientations.
- Prerequisite Forms.
- Prerequisite Other.
When you make your selection allow a few moments for the screen to load all of the data. Long lists of students (in the hundreds) may take a few moments.
|
|
|
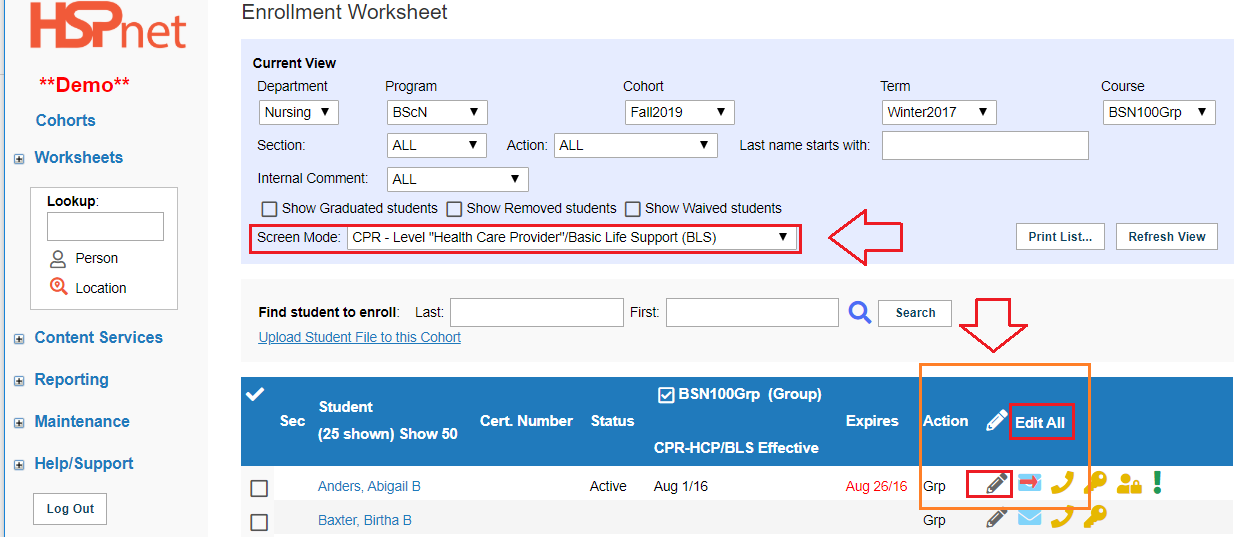
In this example we have selected CPR Level "Health Care Provider." To add, edit or update records:
- You can click the pencil icon beside any student's name to edit that student's profile or:
- Click Edit All and open all of the student fields at the same time. If you are doing this and have to leave, save your work as HSPnet will time out for security reasons after 30 minutes of inactivity, and the entries would be lost.
|
|
|
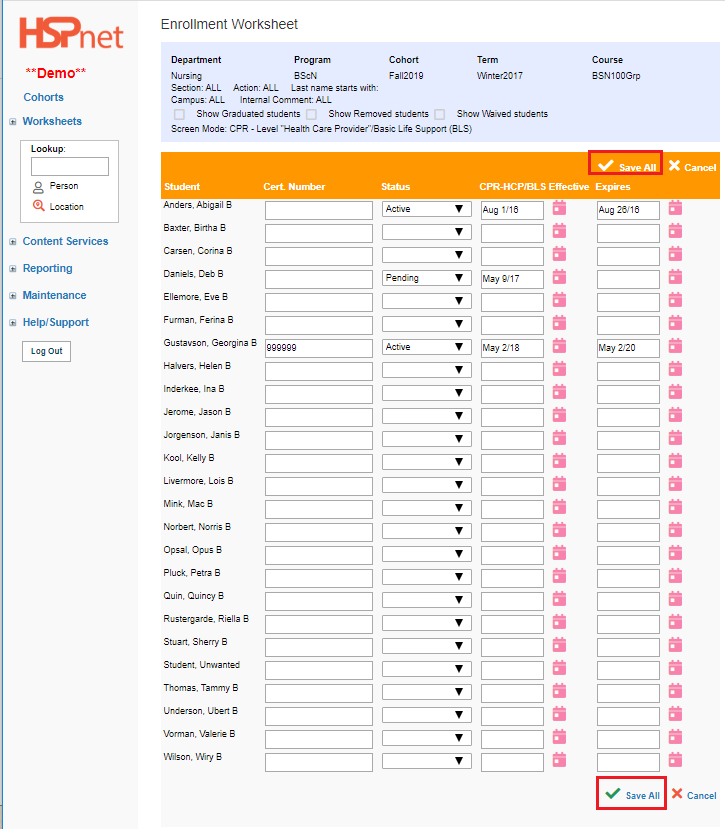
The screens may vary somewhat depending on your selection, but in the certifications, you can enter:
- Certificate numbers.
- Status: active; pending; Other - see file.
- Effective Date: that you can enter with the select a date
 icon! icon!
- Expiry date.
You can update multiple fields at once for multiple students with this feature. This feature may be most handy when students have a deadline they must notify you of any updates in their status and you receive a few to update manually.
You can also upload this data from Excel. Please see the document and or video (click the link) Automated Student Prerequisite upload.
|
|
|
If you need a new certification added to the dropdown, please contact (email help) support@hspcanada.net to request its addition.
|
|
|
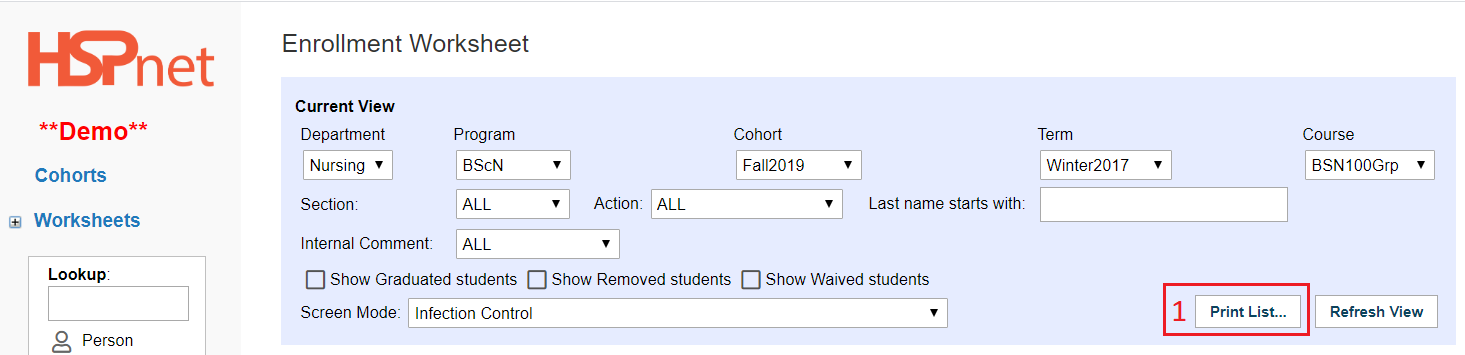
Printing Student Reports from the Enrollment worksheet
A detailed report for all Students in a class or course may be generated from the *Print List *button on the Enrollment screen.
- Click the button: Print List.
|
|
|
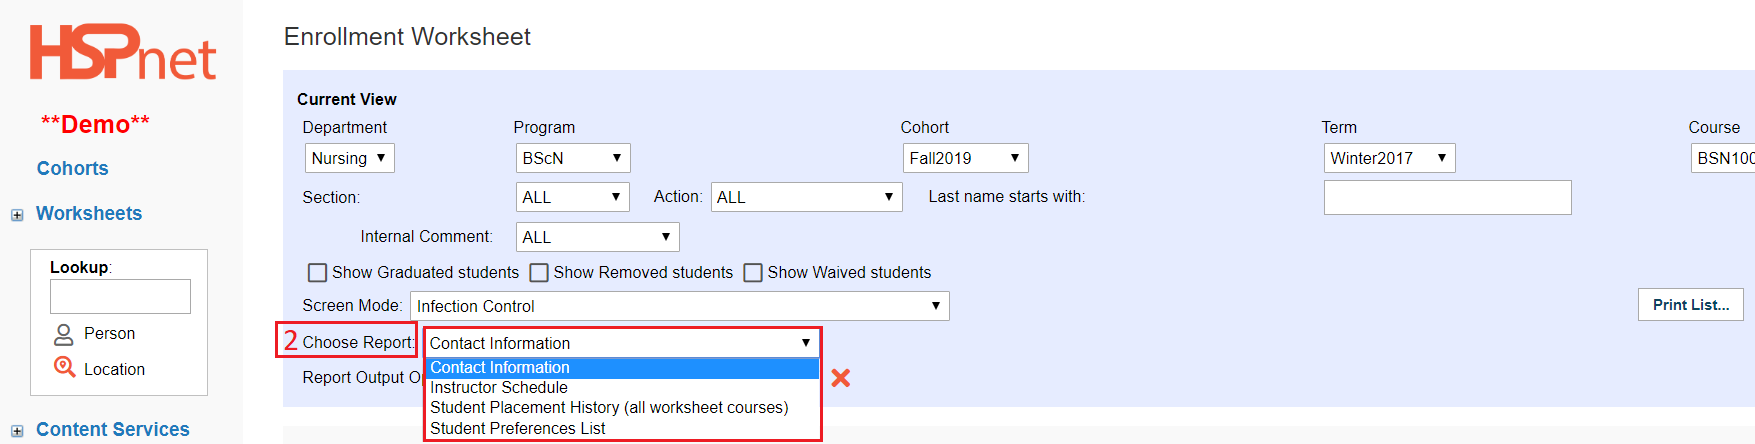
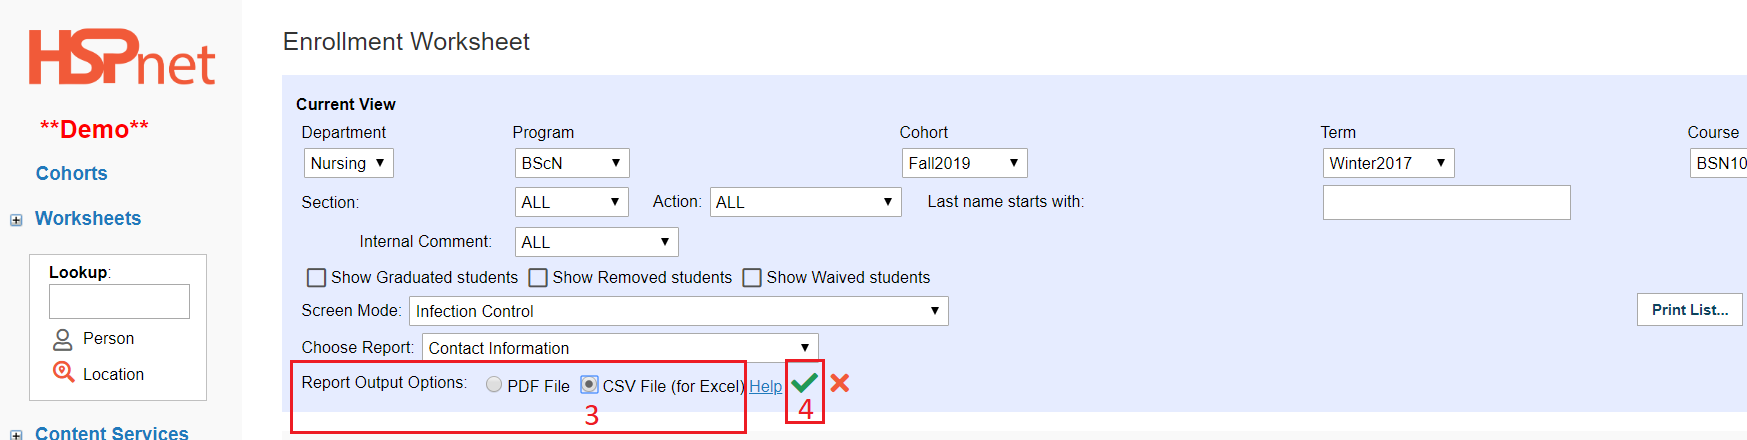
When you click the Print List button, a new dropdown list appears and the ability to select the report output.
-
At Choose Report, select a report from the drop down list.
-
At Report Output Options click to select either the PDF (Default) or Excel report.
-
4. Click the green check mark to run the report.
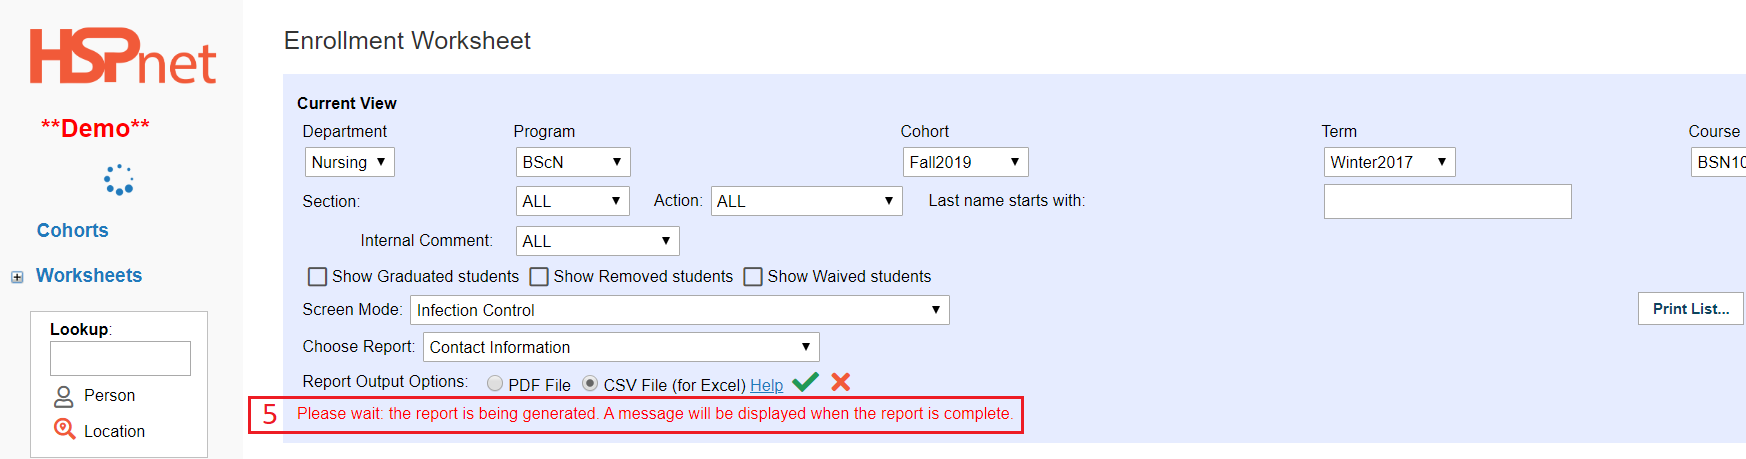
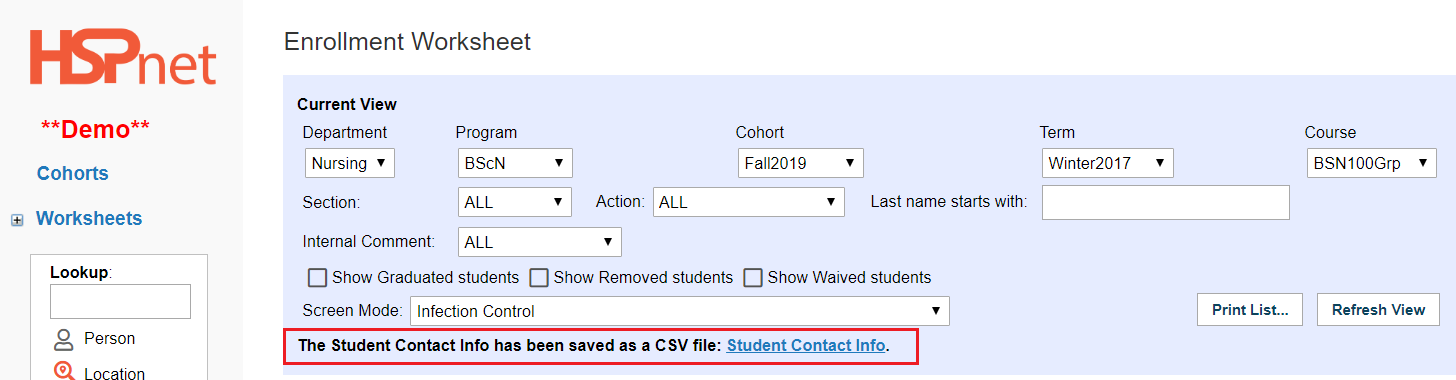
-
The report will generate in a link directly underneath.
- Click the link to open the report. The report will download to your browser. Click the report and select file save as to save a copy to your computer.
|
|
|
Return to Contents
|
|
|
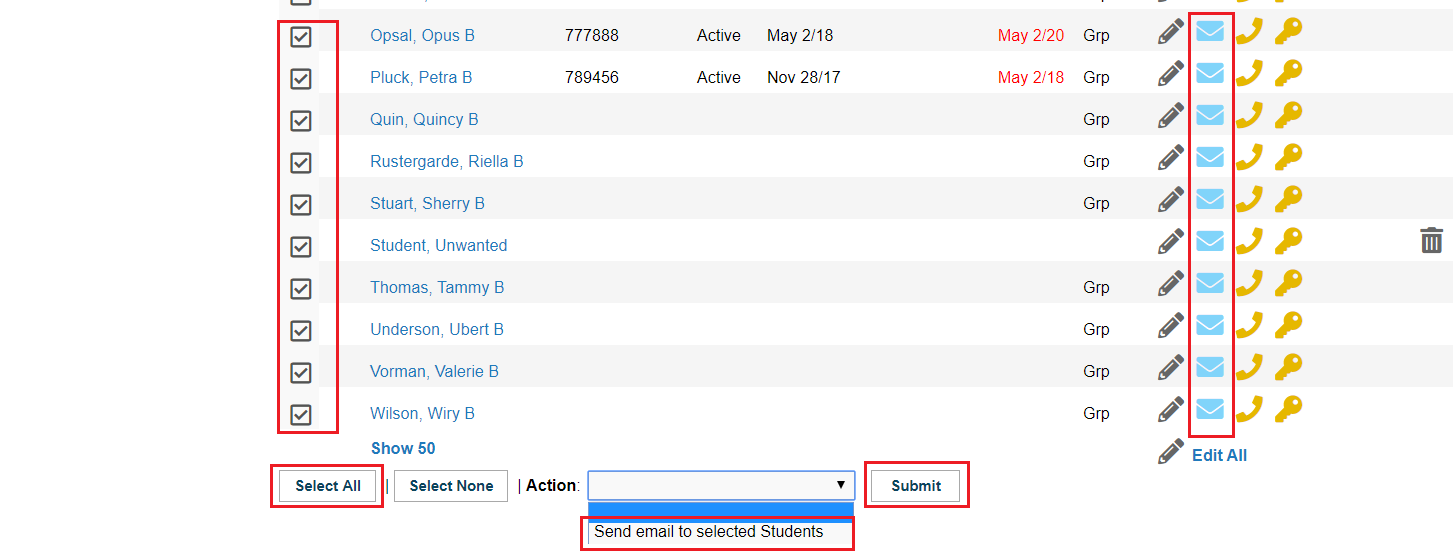
Send Emails to Students:
If a Student's email address has been entered in Student Maintenance, an Email icon will appear next to their name. In most of the modes on the Enrollment Worksheet you can send an e-mail message to one or more students. If Send email to selected students is not on the Action drop down list, change the screen mode at the screen mode drop down list. (See 5 frames up - CPR example).
- Click the envelope icon to generate a new email message for that student only.
- Click to place check marks in the boxes to select the students you wish to e-mail if selecting a few students only. At the Action drop down, select: Send e-mail to selected students.
- Click: Select All to e-mail all of the students. At the Action drop down, select: Send e-mail to selected students.
- Click the Submit button.
NOTE: Students will not be able to see each others' names/email addresses in the HSPnet message, but a copy of the message listing all Student recipients listed will be sent to your regular email inbox).
If you need to send confidential messages to multiple students (such as their log in ID or code for electronic systems), you can:
- Generate the contact info report in Excel (See the print list instructions above).
- Copy the contact information (e-mail field) into your own mail merge system (outside of HSPnet).
|
|
|
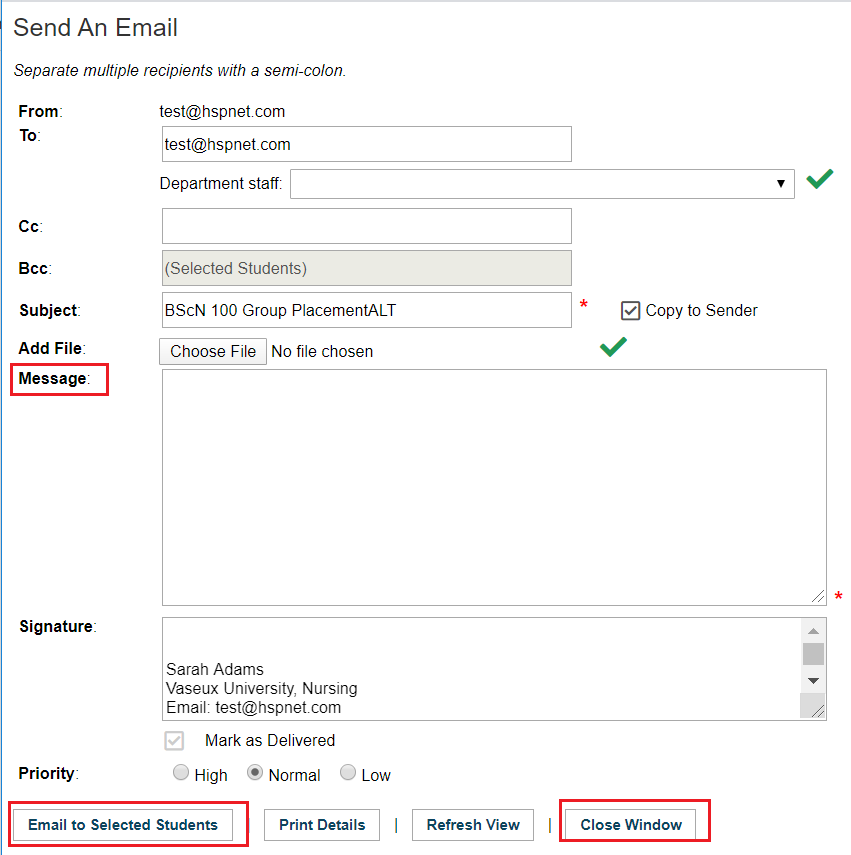
When the Send An Email screen opens:
- At Department Staff, select anyone from the drop down list that you wish to copy. Click the green check mark
 icon to save each name. icon to save each name.
- Text in any name you wish to cc. You may want to copy yourself so you have a record of the message you sent and when.
- Enter a subject.
- If desired attach a file. Click: Choose File and select a file from your computer, then click the green check mark icon to save this attachment.
- Text in a message. If you have repetitive messages, you may want to keep some stock messages in a word document and cut and paste them as needed into this text field.
- When ready, click: Email to Selected Students and click Close Window.
|
|
|
Return to Contents
|
|
|
Graduating Students
Student Consent within HSPnet is valid for 6 years, after which a student's profile will be automatically hidden to all users. Placing Agencies have the option to perform the action of graduating their students prior to the 6 year timeline, which will hide student's names and information earlier. Once consent is expired, only a consent expired icon displays where the student's name was previously listed. If the action of graduating students is not submitted, a warning of upcoming expiry will display 180 days prior to the 6 year expiry date, in order to remind placing coordinators that these student records will disappear from view. Click the this frame's title link to find out how to graduate students.
|
|

 You can click to open any details icon to see further information about a course. The information is read only. The left column is information about the course, the right column is information about that course in this particular cohort (if you open the latter: what is enabled is checked and what is not enabled is not checked (Example: Allow students to use e-orientation).