
Staff/Users - User Account - Placing Agency New User Setup and Edit Guide
Placing Agency Related Guide (PARG)
Summary:
- This guide explains how to create a user account from an already existing staff record.
- If the staff record has not been created yet, follow the directions on this knowledge base page first: Staff/Users - Staff Record - Create (or edit) a new staff record (non-user - no User ID)
- IMPORTANT - If the account is to be a new Placing Coordinator, here is the training information below. Your new PC will NOT have full access rights until they have done the PC training and quiz.
To edit access rights: click on a user key and the same screens below may be edited.
|
Before you start: Placing Coordinator User Accounts are not compatible when you add the user roles of Course Leader or Instructor.
If you need more information, please visit the document: PC/Instructor Dual User Accounts. (PC multiple roles).
A placing coordinator role also includes student and staff administrator - these additional boxes should not be checked if placing coordinator is already checked. |
|
|
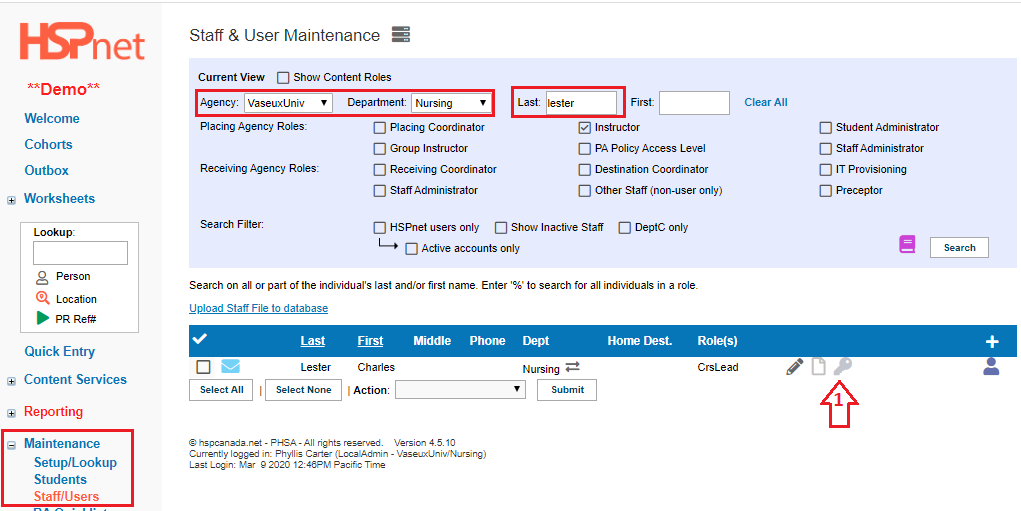
Click: Maintenance/Staff/Users in the navigation bar.
Search the database (including inactive staff) to locate the staff record. If needed, edit the role (Placing Coordinator, Course Leader, Instructor, Student or Staff Administrator). If the Staff member is not in the database, please add the staff record then return to the steps below.
|
|
|
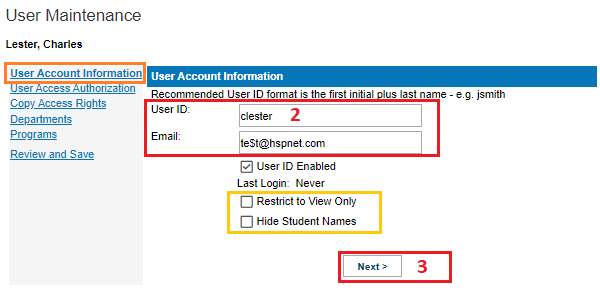
User Account Information
2. Enter a User ID: Please format with the first initial and last name such as: clester for Charles Lester. If that user ID is taken, add a number to the end, such as: clester2. Another Option is to add a middle initial, such as celester for Charles E. Lester. Potentially, you may see your own user ID appear when you click on the blank field - this is your auto form fill from your browser and it is trying to fill out the form for you. Click in the user ID field and text in the user ID you plan to assign to this user and that will overwrite the appearance of your user ID. For Placing Coordinators using the Student Assessment Program, clinical instructors at private clinics are issued a different format user ID explained in that program guide.
3. Click "Next." If you are editing an existing account you can click directly onto the link to go directly to that step of the wizard. The link is on the left hand side of user maintenance. |
|
|
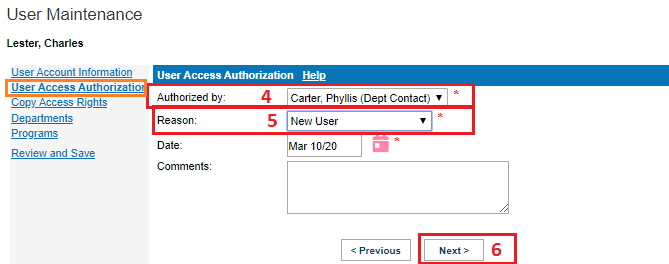
User Access Authorization
4. Select who authorized the user account from the drop down list. (The drop down list is populated by staff records that have the role: Department Contact). When Other is chosen, please enter a name in text box that will open. 5. Select the reason for the access. 6. Click: "Next." If you are editing an existing account you can click directly onto the link to go directly to that step of the wizard. The link is on the left hand side of user maintenance. |
|
|
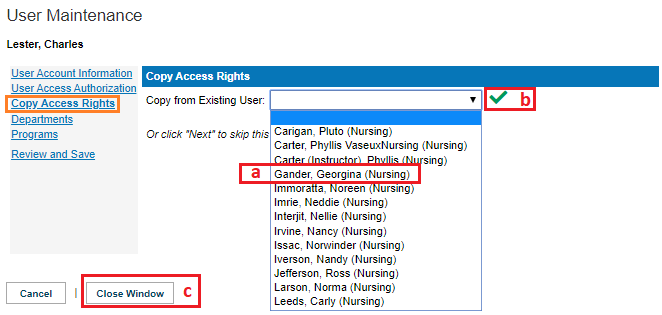
Copy Access Rights
If there is no one to copy from: skip steps a, b, c below and go to the next box of instructions below: Departments of instructions (step 7).
If you are using the feature: Copy from Existing User: If there is already a staff member who needs the same department and the same program access as an existing user, you can copy department and program access from one user to another user. (This does not affect the Level of Access. If you are creating a new PC/Local Administrator, the new user (must have HSPnet access) will need to complete the training outlined below.
You are done with the new set up and will see a green message indicating a message has been sent with a user ID and temporary password. |
|
|
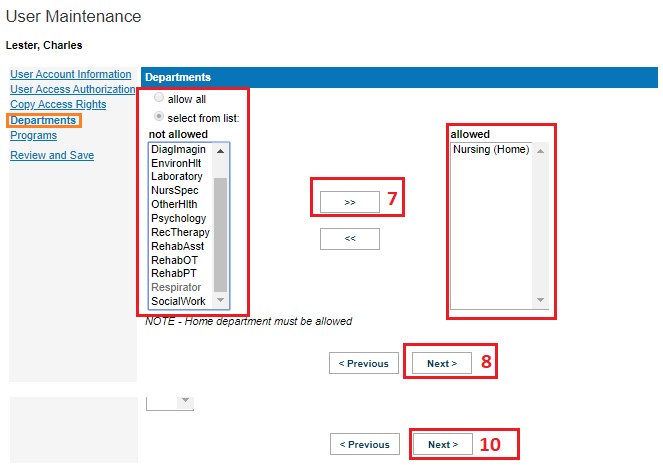
Departments
7. By default, the user will already be in the department you filtered to when you started to create the user account (where the staff record was added). Most users only need access to their home department. Access is on a "Need to know" basis, so should only be provided for users who work in more than one department. For instance if you keep all of your staff who work with Health Care Assistant students in the department of HCA, a PC who assigns instructors to both Nursing and Health Care Aid students, would then need access to both the Nursing and HCA departments.
8. Click: "Next." If you are editing an existing account you can click directly onto the link to go directly to that step of the wizard. The link is on the left hand side of user maintenance. |
|
|
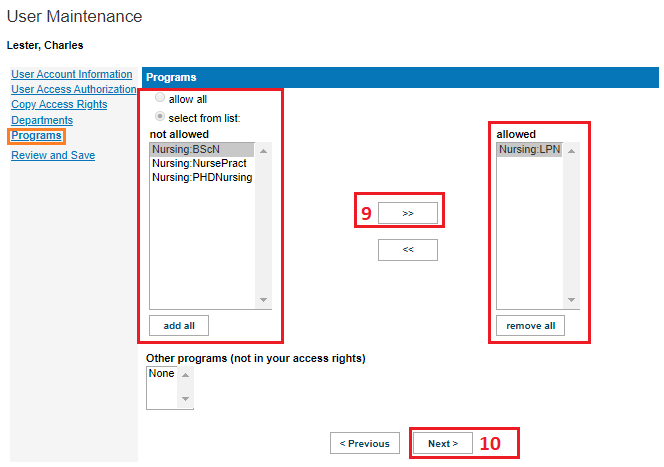
Programs
9. Click to highlight a program in the not allowed box, then click the arrow pointing toward the allowed box to move the program into this user's access rights. Allow All, or add all can also be used on a need to know basis. Programs can also be removed if editing this account later. 10. Click: "Next." If you are editing an existing account you can click directly onto the link to go directly to that step of the wizard. The link is on the left hand side of user maintenance. |
|
|
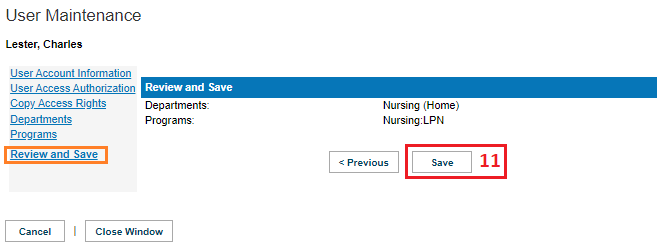
Review and Save
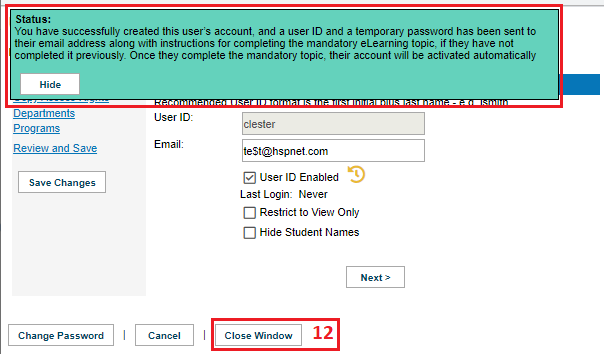
11. If the access is correct, click the save button; otherwise the previous button will allow you to go back and make changes. When you click save, a green background message will advise:
Status: You have successfully created this user’s account, and a user ID and a temporary password has been sent to their email address along with instructions for completing the mandatory eLearning topic, if they have not completed it previously. Once they complete the mandatory topic, their account will be activated automatically. |
|
|
12. Click: close window to refresh/update the staff and user maintenance screen. The user key will now be a darker shade of grey.  |
|
|
|


|
Training requirements for a new PC user:
All new user accounts (regardless of copied access) are at the "Regular" level, which does not include all of the edit icons. Additional training is required for PC (Placing Coordinator) users. There are a series of training videos for placing coordinators, but the one needed to obtain full PC edit icon access for can be found: at the link below:
Training for new Course Leaders.
Training Requirements for Student Administrators.
Training for new Instructors:
|