Student Admin - Assigning via Quick Entry Screen and Outbox
Placing Agency Related Guide (PARG)
Summary:
- Process overview of a creating a Quick Entry request.
- How to assign a student to a Quick Entry request.
This guide assumes students are already in the database. If you need to add the students to the HSPnet database please review the applicable documents linked below:
- Student Maintenance: Add students to the database one at a time.
- To upload multiple students from a spreadsheet: Automated Student uploads.
A student already entered into the HSPnet system can be added when initiating a quick entry from a school quick entry screen. Students may also be added through the details icon in the outbox for a quick entry, and students can be removed/reassigned.
|
Placing Agency Quick Entry Process Overview:
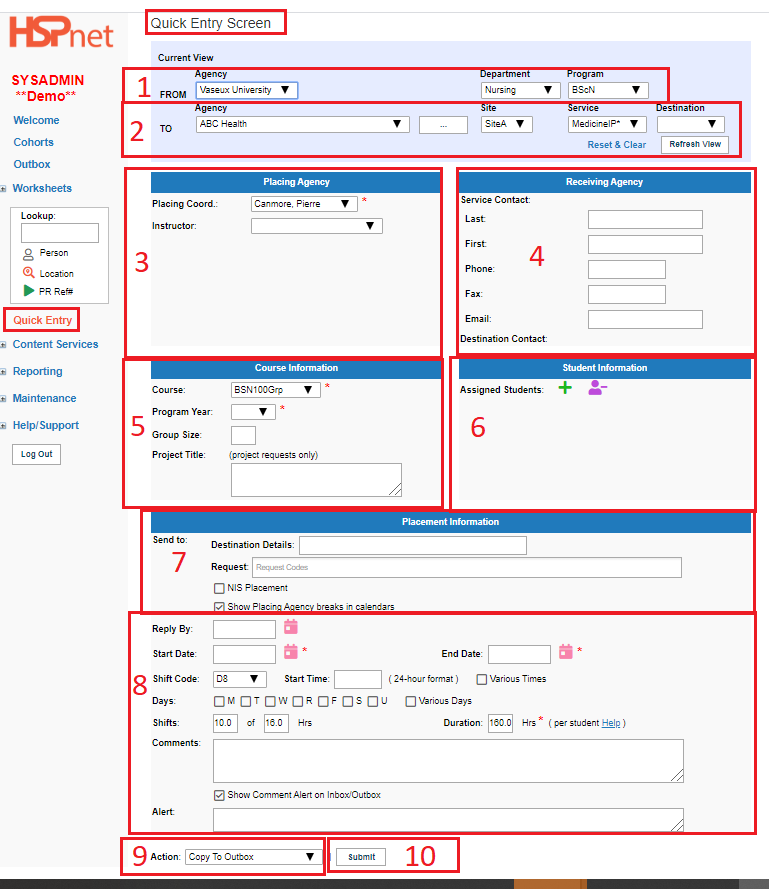
- From fields: Select the agency, department and program. This is critical information.
- To fields: Select the Agency, the site, the service and the destination from the drop down lists. All four fields are required. If the agency you need is not in the drop down lists: click the blank box with the three dots in it next to agency, to add the agency to your RA Quick list (Receiving Agency Quick list).
- Placing Agency Fields: Enter your name or the appropriate placing coordinator from the drop down list and select the instructor if needed, from the drop down list.
- Receiving Agency Fields: These should auto-populate when you are selecting the to fields,if they have been entered at the Receiving site. Otherwise the information may be added by text field.
- Course Information fields: You can select Course and program year from a drop down list. Enter group size if a group. Project title is an optional text field.
- Student Information fields: Please see the rest of the document below for a step by step guide.
- Placement Information Fields: these are not mandatory. The required fields were selected in the the to fields. Destination details is where you can text additional optional information; if request codes are available click in the field to select the ones desired. Click to place a check mark in the box, NIS Placement, if the request is going to use a provincial release date and needs to be held back until that date. Show Placing agency breaks is activated if checked (which it is by default).
- Enter a reply by date (the date you would like to receive a response by). Enter start and end dates. Optionally enter shift codes (D8 = Days 8 hours). Optionally enter start time, or click to place a check mark in the box: Various times. Normally if a student is in an individual placement, you would also click to place a check mark in the box: Various Days as the student attends with their supervisor. If it is a group request: please indicate the actual days of the week the students will attend: R = Thursday and U = Sunday. Enter either the total duration of the placement per student, or how many shifts times shift length and the system will calculate the total hours. Total hours is more important if the facility shift lengths are not what was anticipated. Comments and Alerts are optional text fields.
- Action: you can select Copy to Outbox, or Send to Receiving Agency.
- Click Submit.
|
|
|
Assign student when creating the quick entry:
Students can be assigned after you have clicked submit above, or before you click submit above.
Assign the student before you click submit (when creating the quick entry).
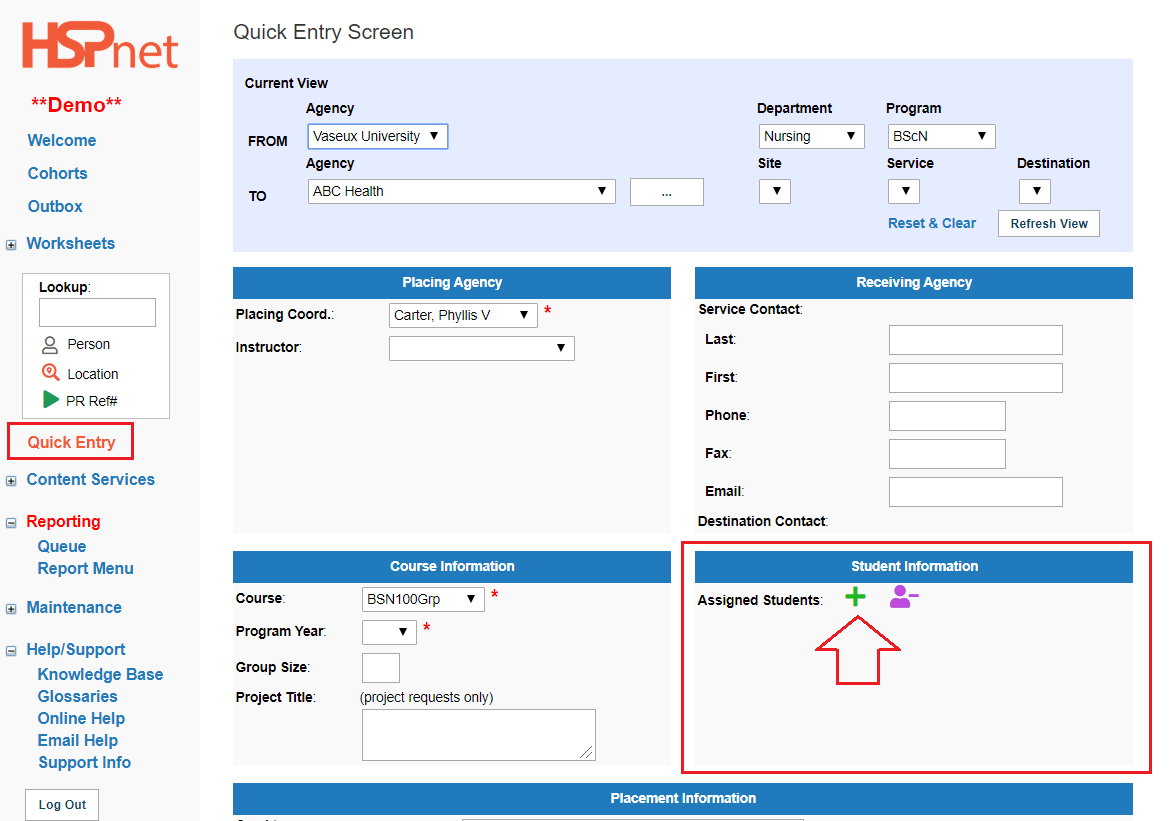
In the student section section:
- Click the add icon

- Find Students to Place opens.
|
|
|
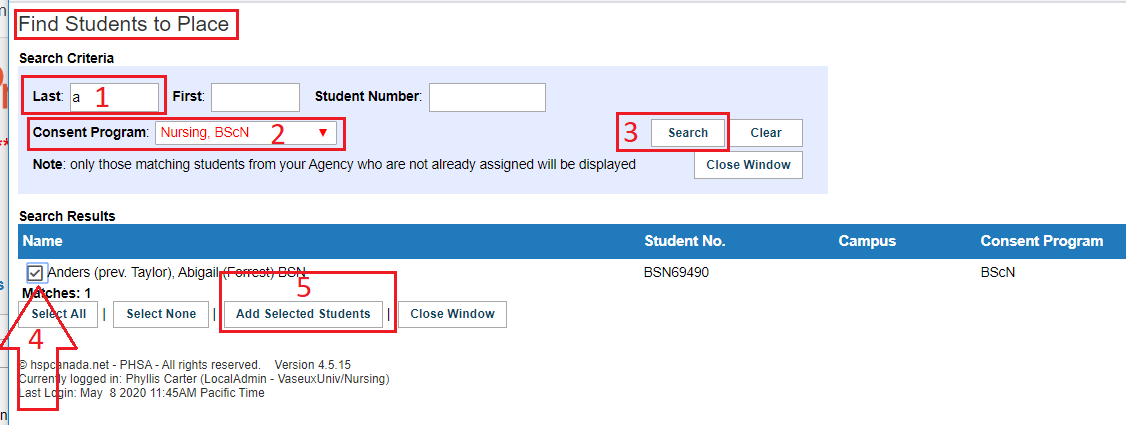
Find Students to Place:
- Enter % into the last name field to find all students or a single letter to find all students with last name A, or you can enter an actual name. You can also enter only a student number.
- Select which consent program to search.
- Click: Search.
- Click to place a check mark in the box in front of the student(s) you wish to select
- Click "Add selected students."
|
|
|
Assign students after a request is created and in the outbox:
To assigned the student after you have clicked the submit button on the quick entry screen.
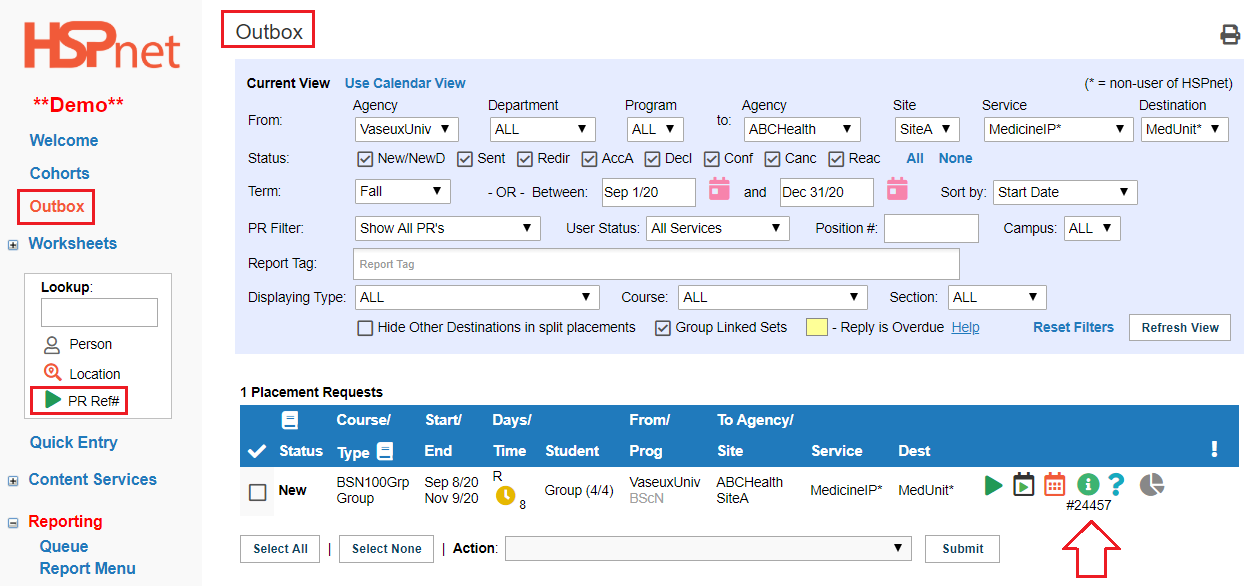
Options to locate the placement request in your outbox:
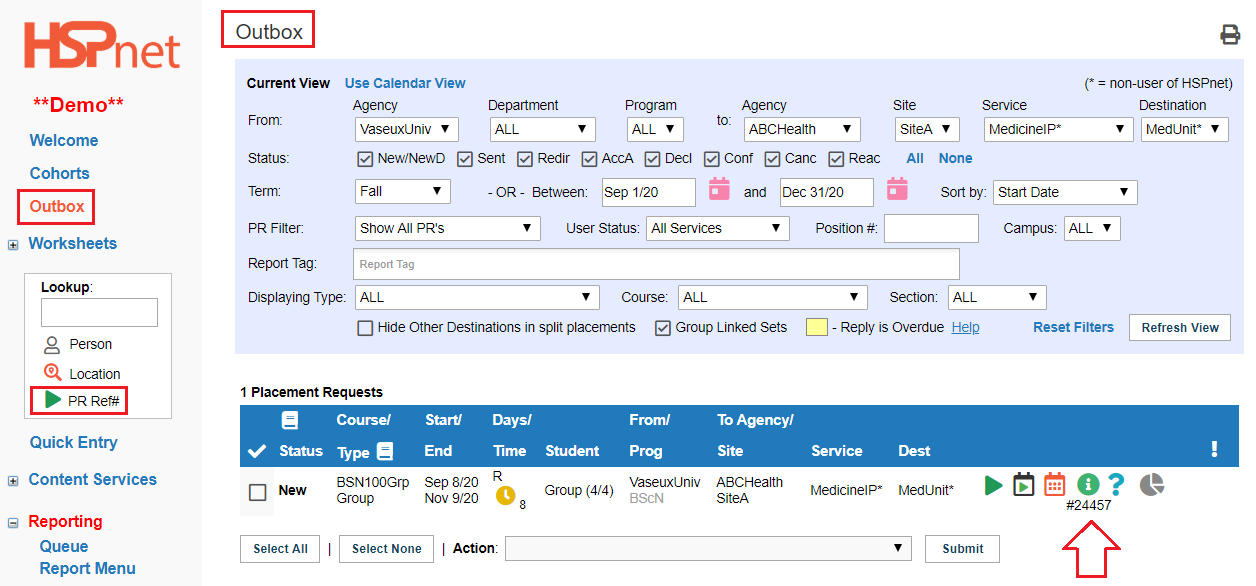
- Immediately after clicking the Submit button on a quick entry creation: Click the go to button in the message you receive after you submit the quick entry. It will take you to your out box and highlight the placement request with a green background.
Any time after the quick entry has been created and you need to find it again in your outbox:
- Use the Look Up Tool to search by reference number. The placement request you searched for details icon.

- Filter your outbox to the correct filter settings (Department/Program/Term; Agency, Site, Service, Destination) to enable you to find the placement request.
|

|
|
Assign students after a request is created and in the outbox, continued.
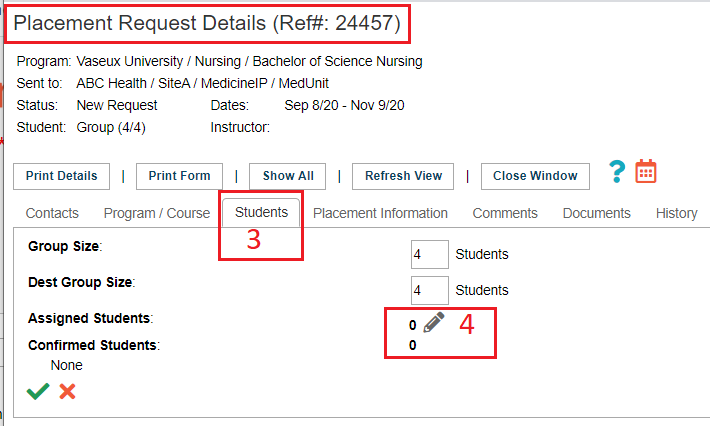
-
Select: he Students tab.
-
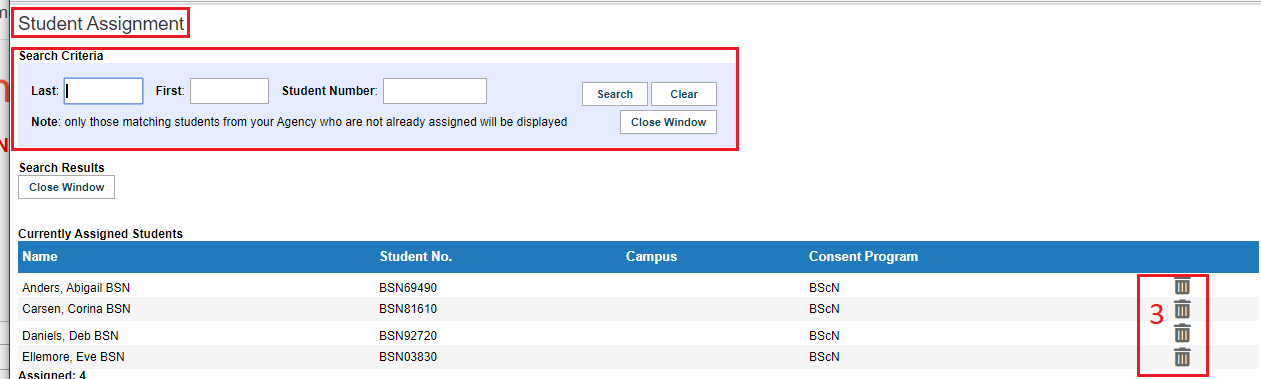
Click: the edit (Pencil)  icon. The Student Assignment Screen will open.
|
|
|
Student Assignment Screen (continued from above).
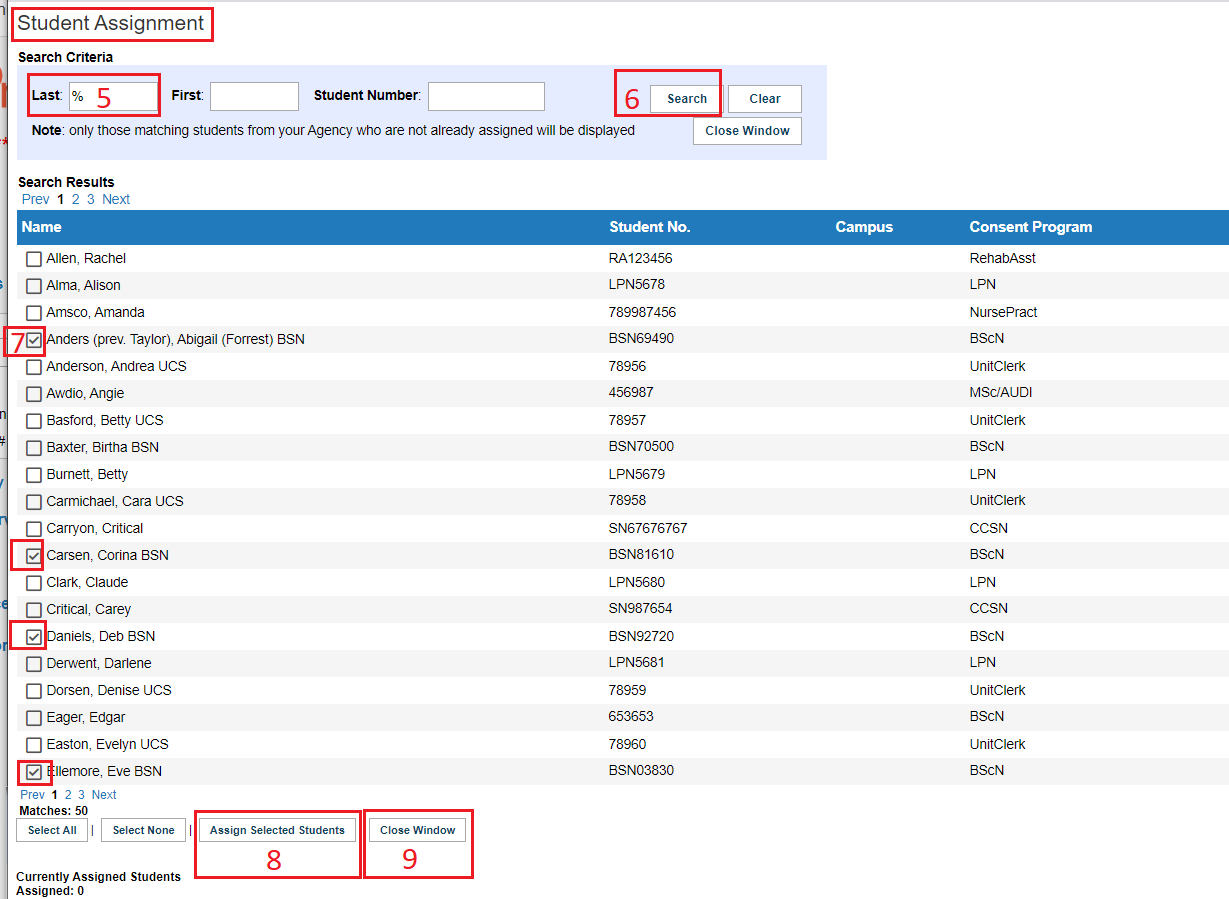
- Search by one of the criteria below: (if you are not sure of spelling part of a name, entering a couple of the first letters may be a more efficient look up).
- last name
- a single letter
- first name
- student number
- % to search "all"
-
Click: Search.
-
Click: to place a check mark in the box beside the student's name. If you have a group, as in this example, you could use % in the last name field to be able to select all four students at the same time, or you can do one at a time and repeat these steps 5 to 8.
-
Click the button: Assign Selected Students.
-
Click the button: Close Window to update the quick entry screen to display your edits. (If you use the X to close the window in the upper right hand corner, your Quick Entry screen will not be updated. Click refresh view to update the screen if needed.
|
|
|
View Student Assignments:
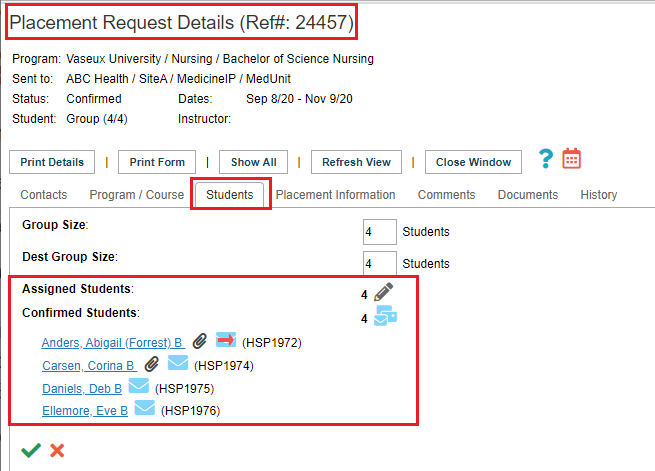
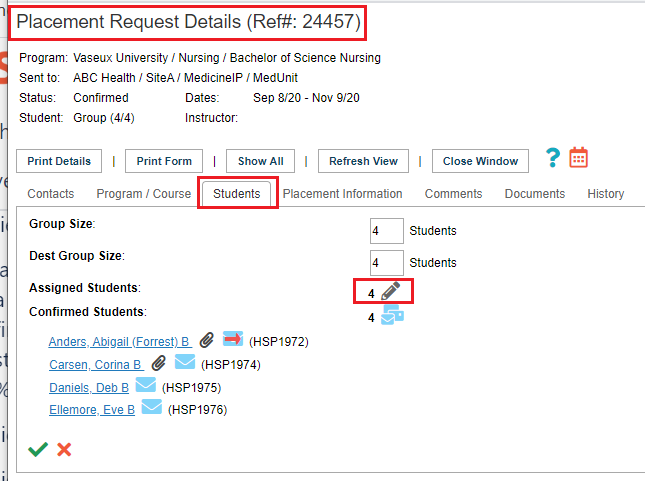
Assigned student(s) should show up as in the adjacent example.
If the students do not show up and it says no students are assigned:
- Click the pencil icon. If the student names are there, they will show as in the adjacent sample when the student placement request is Confirmed.
|
|
|
Switch Students
If you need to switch students entered via Quick Entry, whether assigned or confirmed:
Remove A Student:
- In the outbox, re-open the details icon and go to the student tab

- Click the edit icon
|
|
|
Switch Students, continued.
- Click the "Delete Permanently" icon. You will see a warning: "Are you sure you want to delete this entry? This cannot be undone." Click: OK.
- Clicking "delete permanently" does not delete the student record – it only removes the student assignment from this request.
- You can re-add the same or any other student from the list, using the search process outlined in the steps above (in spite of the dire warning).
Add Another Student:
- Search for the replacement student using the steps 5 to 8 shown above.
|
 |