|
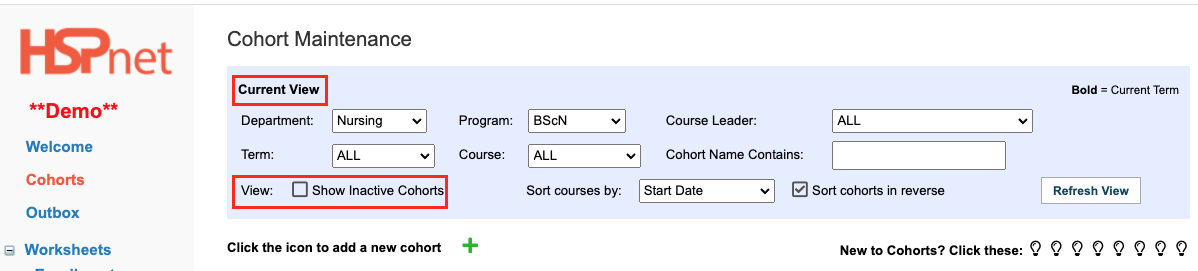
Current View:
At the top of the cohort maintenance screen is a light blue shaded area called the Current View.
- If you have access to more than one Department or Program, you can select a specific Department and Program on the top line. If you have course leaders assigned, you can select a specific Course Leader from the drop down list to see the courses they are assigned to on this screen. The default is to show all cohorts (not restricted by Course Leader assignments).
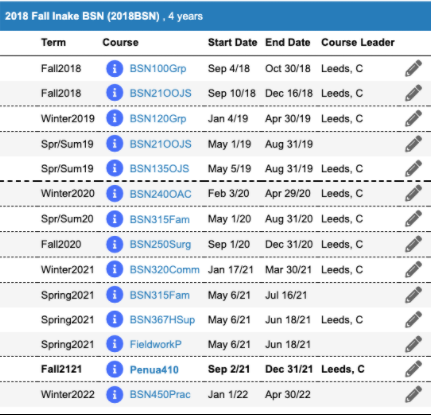
- You can also filter by term, course, start date, and there is a text field that would enable you to filter to view one Cohort only. For example: entering 2018 in that field would hide all of the other cohorts and only show the one in the screen capture below (and right), as it is the only cohort with 2018 in the name.
- If you have inactivated cohorts, you can also view those by clicking to place a checkmark in the box in front of Show Inactive Cohorts, and click the Refresh View button. You can reactivate cohorts in this mode by clicking the folder icon in the blue bar.
- On this line you can also choose how to display the courses in the cohort: by start date or by course short name, you can also reverse the order the cohorts appear on the screen. The refresh view button may need to be clicked to load the new filter settings.
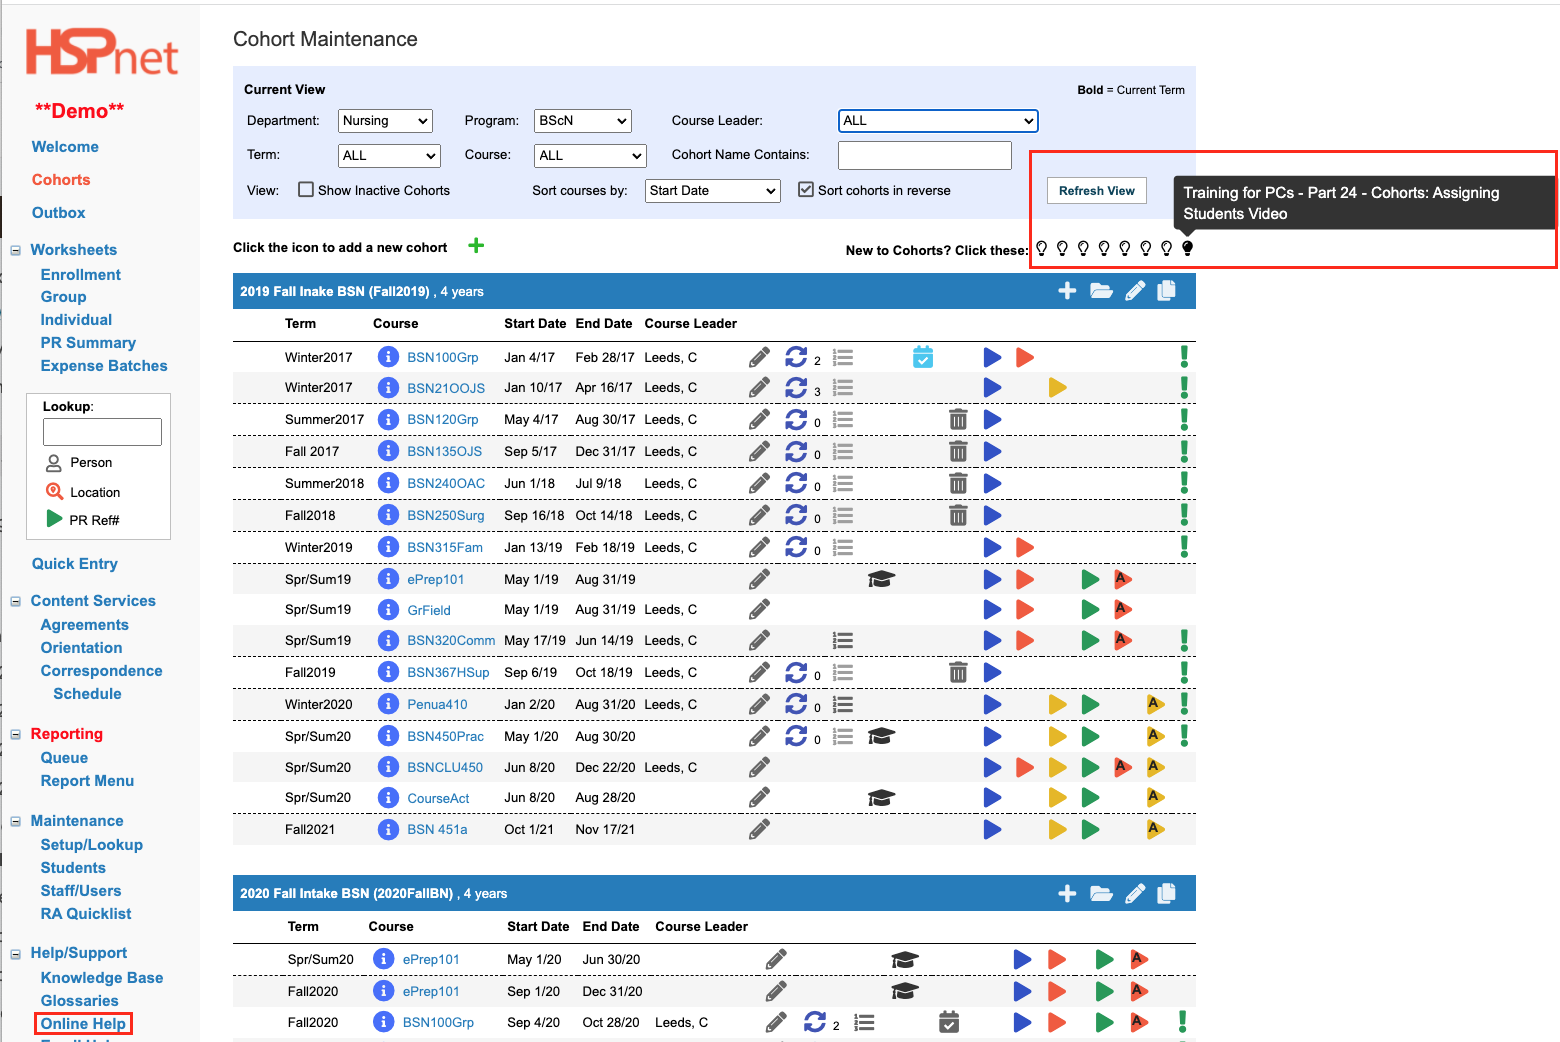
- If you need help: hover your cursor over the light bulb icons to see which video about cohorts that light bulb links to.
|
 |
|
Each Cohort has a blue bar as a header, with the long name, short name and length of the program.
 The add icon enables you to add a course from course maintenance to this cohort. The add icon enables you to add a course from course maintenance to this cohort.
Detailed guides: Cohorts - Add A Course to A Cohort. Cohorts - Remove a Course from a Cohort.
 The folder icon is used to inactivate this cohort. When the cohort is inactive the icon shows the folder closed The folder icon is used to inactivate this cohort. When the cohort is inactive the icon shows the folder closed  . In inactive cohorts, the blue bar turns grey. Clicking the closed folder in the grey (formerly blue bar) will reactivate the cohort. . In inactive cohorts, the blue bar turns grey. Clicking the closed folder in the grey (formerly blue bar) will reactivate the cohort.
Detailed Guide: Cohorts - Archive a Cohort.
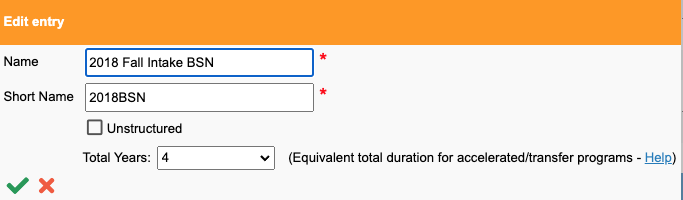
 The Pencil icon allows you to edit the name and short name of the cohort; this is where you can change from structured to unstructured, and the number of years/duration of the program.
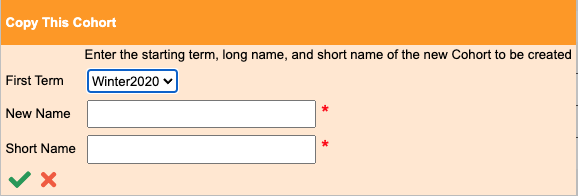
 The Copy this Cohort icon will duplicate your cohort and allow you to: The Copy this Cohort icon will duplicate your cohort and allow you to:
- Name the Cohort (long and short name required).
- Select the first term courses will be held in the new cohort
- Save the changes with the green check mark in the lower left hand corner.
As soon as you save this new cohort, you should edit the dates for each course as although it will update the years based on the first term selected, it will not update the start and end dates!
Detailed Guides: Cohorts - Copy An Existing Cohort. Cohorts - Create New Empty Cohort
|
Cohort Screen
 The Pencil Icon in the blue bar opens this screen: The Pencil Icon in the blue bar opens this screen:
 The Copy this Cohort icon opens this screen: The Copy this Cohort icon opens this screen:
|
|
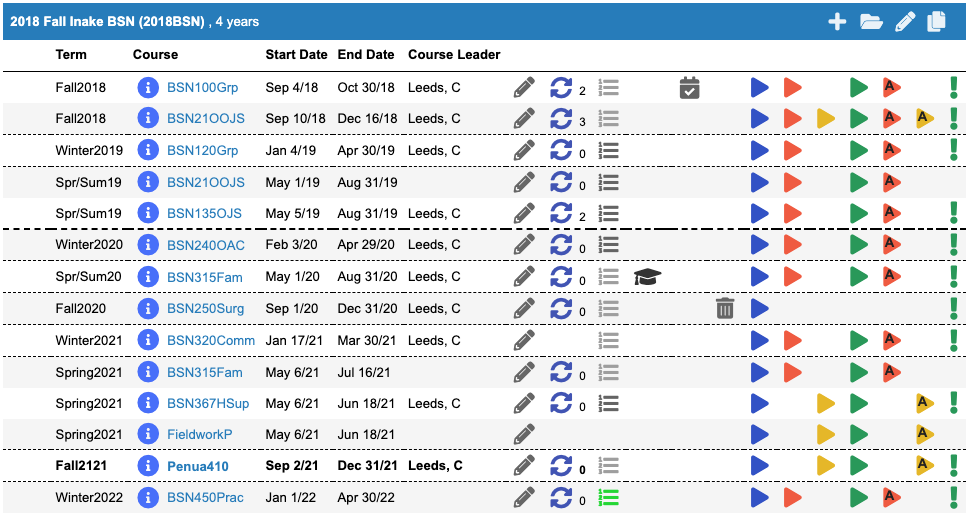
The Body of the Cohort:
The Body of the cohort should contain every course the students in this cohort will participate in, whether the cohort is structured or unstructured. In this example: the courses progress from the first group placement, held in the first term of year one, to the final preceptorship (supervised experience) before graduation in final year four.
The Term Column:
- The first column identifies the Term when the course (placement requests) are planned. HSPnet has 3 stock terms: Fall (Sep 1 to Dec 31), Winter Jan 1 to Apr 30), Spring/Summer (May 1 to Aug 31). Schools can also create Custom Terms more suitable to their program (but the dates of their practicums will cause the requests to display in all of the HSPnet default terms that include the active dates of the placement request. For example: a custom one year long term will display in all 3 of the HSPnet stock terms for that year.
Detailed Guide: Terms - Set up and Use.
The Course Column:
- The second column includes: 1) a details icon for each Course with a details icon for a read-only view of the basic course information, and 2) the short name of the course. Each student can be assigned only once to each course per term. In some cases, you may have one course at your educational institution, that you sub-divide into 2 or 3 separate courses on HSPnet - for rotations, or for someone who needs to repeat, or for extra placement time over and above normal.
Detailed Guide: Course - Create A Course (or edit a course)
|
|
|
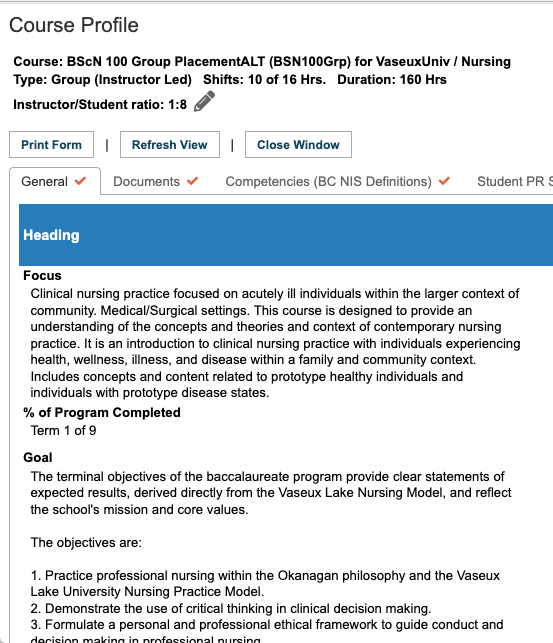
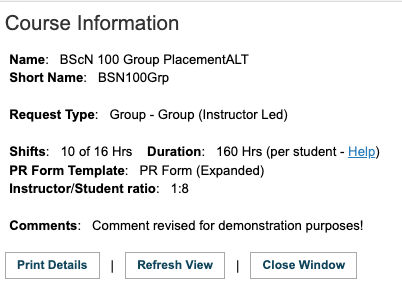
The Body of the Cohort - Course Details icon:
Click the Course Details icon to open the Course Information screen, which includes basic course Information in a read only format: to open the Course Information screen, which includes basic course Information in a read only format:
- name of course
- short name of course
- Request Type
- duration
- PR Form Template: Means: Placement Request Form Template. Explanation: Whenever a Placement Request is being sent to a non HSPnet user, the system will automatically generate a PDF version of the request that can be e-mailed to the non-users from the HSPnet Report Queue. This information cannot be edited here: only in Course Maintenance.
|
 What the details icon shows when clicked on the Cohort Maintenance screen: What the details icon shows when clicked on the Cohort Maintenance screen:
|
|
The Body of the Cohort - Course Short Name:
- Next to the Course Details Icon in the course column, is the Course by its short name, which is also the link to the course profile.
- If your Course short name does not have a link to your course profile, it means you have not entered information in the Course profile. It is recommended you populate all course profiles, as every single placement request you generate will display the course name, but unless you have entered information in the course profile, there will be no link. Busy Destination Coordinators that are not familiar with your program course codes or names, could decline your request if a request competing for the same time period, contains a link into their course profile, so the destination coordinator can access instant information on demand (Descriptions, guide books, etc).
- Courses created in Course Maintenance can be added to this cohort, as described above, using the add icon in the blue bar. Courses may be deleted if there is a garbage can icon showing.
|
Course Link: (To course profile):
|
|
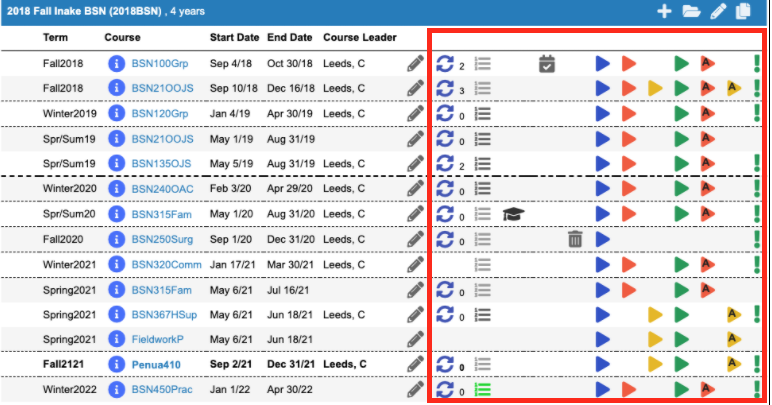
The Body of the Cohort: The Pencil icon:
- Each pencil icon lets you edit information specific to its course (on the same line), in this specific cohort only. Here is where you can do:
- Change the start and end dates.
- Change the program year.
- Assign Placing Coordinators and Course Leaders.
- Change the shift code, days of the week, hours; use or not use the provincial release dates and enter the release date, enter start times, etc.
- Enable students or instructors to use e-orientation (Ontario and Nova Scotia as of this writing).
- Change the default comments (will be entered on every placement request created after this change).
- Save the changes with the green check mark.
|
The Pencil Icon:


|
|
All those icons!!!
The Right side of the screen may not be the same as yours, depending on the features turned on for your program. All of these colourful icons can be confusing, but on HSPnet when you hover your cursor over an icon, the system will tell you a bit about that icon. There are detailed instructions for these features elsewhere, as they may or may not be turned on/in use at your organization.
 This icon indicates this course is using Rotations: This icon indicates this course is using Rotations:
The small number on the right of the icon advises how many rotations there are.
-
  These icons indicate the course uses the site selector. These icons indicate the course uses the site selector.
It may appear in different shades of grey and other colours,
which indicate where in the process that course is within the site selector
-
 This icon means the course has e-orientation turned on . This icon also appears in different colours (on other screens) to indicate student completion or incompletion. This icon means the course has e-orientation turned on . This icon also appears in different colours (on other screens) to indicate student completion or incompletion.
-
 This icon indicates the course has Correspondence schedules set up . It turns blue when the correspondence schedule is activated. This icon indicates the course has Correspondence schedules set up . It turns blue when the correspondence schedule is activated.
-
 This icon is very similar in appearance to the icon above indicates student assessment modules. There are several different colours associated with the student assessment module icons indicating when it is open or closed. This icon is very similar in appearance to the icon above indicates student assessment modules. There are several different colours associated with the student assessment module icons indicating when it is open or closed.
-
 This icon only appears before worksheets are created: it is a delete icon to remove a course from a cohort. As soon as worksheets are built, this icon will disappear as it is not possible to remove a course from a cohort once you add other worksheets. This icon only appears before worksheets are created: it is a delete icon to remove a course from a cohort. As soon as worksheets are built, this icon will disappear as it is not possible to remove a course from a cohort once you add other worksheets.
|
Right side of the cohort screen
 |
|
Worksheet Icons and the role of each worksheet:
These icons indicate the progress of the course within a cohort. Initially each course will only display an empty enrollment worksheet icon (and a garbage can icon that would enable you to remove that course from this cohort). The other icons are added as the course set up progresses. Each icon is also a goto button. Click the icon will open that worksheet.
Enrollment Worksheet:
Group and Individual Worksheets:
Depending on the request type selected for each course on the Course Maintenance screens, either a red or yellow icon will appear; in some cases where there may be a mix of group and individual placements made, you will be offered both icons. The middle course in the top screen capture on the right has both icons (it is flanked by two group placement courses above and below).
In cases where both icons are available: you must gather the placements required for group placement on the red worksheet, and the individual requests on the yellow worksheet, otherwise, when you go to assign the students you may have issues. The most serious issue is you cannot use an individual request worksheets for group placements: only one student can be assigned per placement request.
If you make a mistake and use the wrong worksheet, you can get by with a group worksheet for individual placement requests by assigning only one student per Placement Request but you can never fix an individual worksheet to allow you to assign a group.
-
 A dark red icon is a group worksheet. On the group worksheet you search for locations/destinations and draft a list of potential placement locations to send the groups. A dark red icon is a group worksheet. On the group worksheet you search for locations/destinations and draft a list of potential placement locations to send the groups.
-
 A dark yellow icon is an individual placement worksheet. On the group worksheet you search for locations/destinations and draft a list of potential placement locations to send the individual placements. Destinations selected on either the group or individual worksheet are added as draft placement requests that can be copied to the next stage of making requests: the outbox. A dark yellow icon is an individual placement worksheet. On the group worksheet you search for locations/destinations and draft a list of potential placement locations to send the individual placements. Destinations selected on either the group or individual worksheet are added as draft placement requests that can be copied to the next stage of making requests: the outbox.
The Outbox:
 This is the icon for the outbox. The outbox displays New Placement requests when you copy your request(s) to the outbox from either the group or individual worksheets; you can Send the requests to the receiving agency from this screen. You will see the status of requests change to Accepted or Declined as user agencies respond to your requests. You can also accept requests here on behalf of NON USERS. You can Confirm placement requests that are accepted on this screen. You can cancel requests on this worksheet and you can enter Declines on behalf of NON USERS. This is the icon for the outbox. The outbox displays New Placement requests when you copy your request(s) to the outbox from either the group or individual worksheets; you can Send the requests to the receiving agency from this screen. You will see the status of requests change to Accepted or Declined as user agencies respond to your requests. You can also accept requests here on behalf of NON USERS. You can Confirm placement requests that are accepted on this screen. You can cancel requests on this worksheet and you can enter Declines on behalf of NON USERS.
The Assignment Worksheet:
-
 The Red Icon is for group assignment, The Red Icon is for group assignment,
-
 and the Yellow Icon is for individual placement Assignment. In the centre course in the top screen capture to the right, the group assignment icon only works with the placements gathered on the red group worksheet; and the yellow Assignment Worksheet icon only works with the placement requests made on the yellow individual worksheet icon. and the Yellow Icon is for individual placement Assignment. In the centre course in the top screen capture to the right, the group assignment icon only works with the placements gathered on the red group worksheet; and the yellow Assignment Worksheet icon only works with the placement requests made on the yellow individual worksheet icon.
|
Screen capture one: the top and bottom lines show Group Worksheet icons and group worksheet assignment icons; the middle course shows both group and individual worksheets, and both group and individual assignment worksheets.
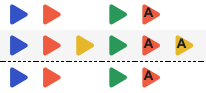
Screen capture two shows an individual worksheet and individual assignment worksheet only.
 |


 This is the enrollment worksheet icon. Light Blue means no students have been enrolled yet. When one student or more are added to the enrollment worksheet the icon turns dark blue
 .
. 