|
Step by Step instructions:
Create A User Account: Receiving Agency Instructions for Receiving Coordinators.
Receiving Agency Agency user roles are all compatible, so multiple roles of Receiving Coordinator, Destination Coordinator, and Supervisor are possible in one user account. There is a warning that Receiving and Destination coordinators are not normally combined, but you can still click: Okay and proceed.
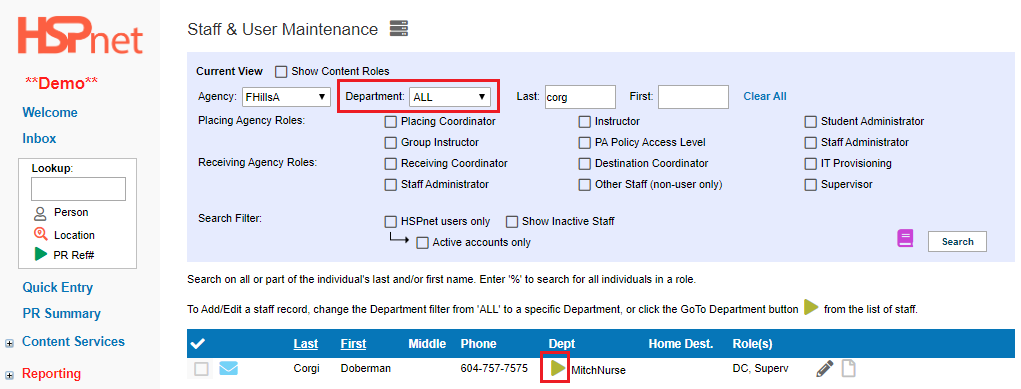
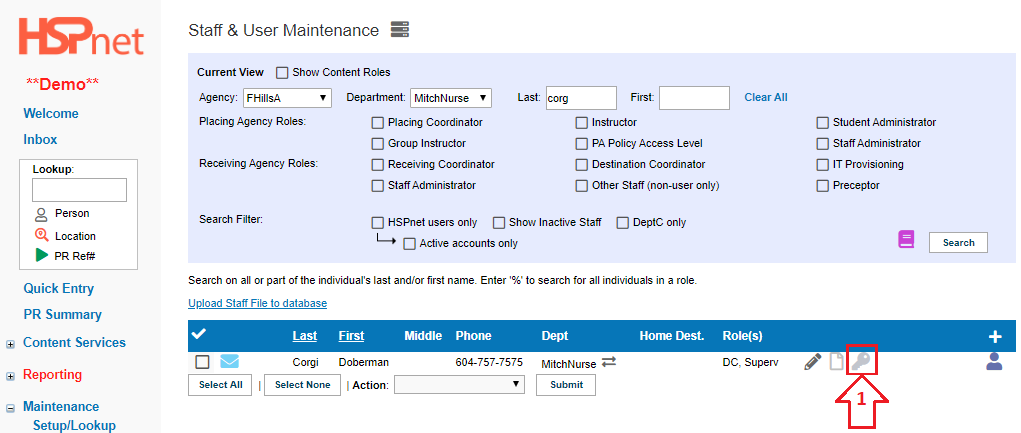
Click: Maintenance/Staff/Users.
Search the database (including inactive staff) to locate the staff record.
When you locate the staff record, use the the Department drop down list or the the go to  icon to filter to a single department and access the edit icon and user key icon for the staff record. If needed, edit the role (Receiving Coordinator, Destination Coordinator, Supervisor, Department Contact. Administrator). If the Staff member is not in the database, please please add the staff record then return to the steps below.
|
|
- Click the User Key
 of the staff record and the the User Maintenance screen will open. When you hover your cursor over a light grey key it says: "Create user Account."
If there is a user account already, the key can still be opened to edit the user account; the keys will be:
- dark grey
 (user account created, but user has not logged into HSPnet (but may have logged into the training mandatory training module)
- yellow
 (regular user account: normal level for Supervisors and Destination Coordinators; RC with this level does not have local administrator access and will be missing many edit icons - (regular user account: normal level for Supervisors and Destination Coordinators; RC with this level does not have local administrator access and will be missing many edit icons - see training link).
- blue
 Local Administrator/Receiving Coordinator Local Administrator/Receiving Coordinator
- a red icon
 over a yellow, blue or dark grey key is disabled. Click any of these user keys to to edit any of these user accounts or reactivate a disabled user account.)
|
|
|
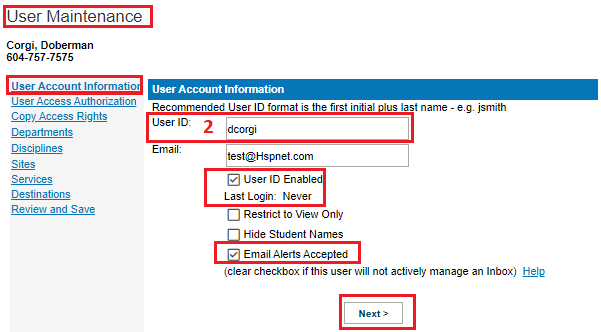
2. Create a user ID, normally first initial and last name. If that user ID is already in use you will be alerted and you can resolve this by adding a number to the standard format such as as dcorgi2. User ID's are not case sensitive. An e-mail address could also work as a user ID, but "forgotten password help" gives the hint the user ID will be first initial and last name. Potentially, you may see your own user ID appear when you click on the blank field - this is your auto-fill from your browser - backspace/overwrite it - type in the user ID you plan to assign to this user.
The box in front of "User ID enabled," is checked by default and so is "Email Alerts Accepted." "Email Alerts Accepted" MUST be checked if you are assigning this record/user account on the service or destination maintenance pages and if it is is not checked, the person will be shown on HSPnet as a a NON USER.
You can also restrict access on this screen to to view only (no edit icons will be available in the account; and/or you can can hide student names.
Click: Next
|

|
|
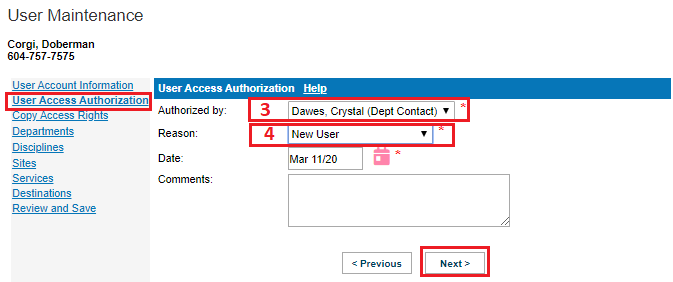
3. Indicate Indicate who authorized the access (normally a department contact from the department drop down list) or you can add a text entry when you select "other," from the drop down list. If your department contacts are out of date HSPnet support can remove the outdated names for you.
4. A A reason for issuing this user account must also be selected from the drop down list.
Click: Next.
|

|
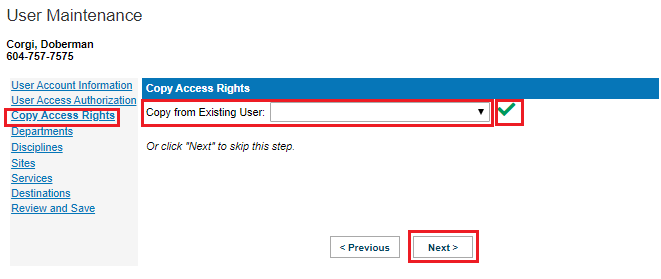
- Skip this screen if there is no user to copy from (someone with the exact same access you wish to provide to this new user)
and and go to step 5.
- Copy from an Existing
User User if possible and save with the green check mark mark  - an automated message sends the new User ID and temporary password and you are informed of this by a green background message. Click Click close window. An account with the same site, service, destination and discipline access is issue at the the regular level.
Copying access from a a local administrator to a new user will provide the same agency access (Sites, Services, Destinations and Disciplines) but as a a regular user only; additional training is required for for local administrator level access, which HSPnet support will add when RC training is complete.
Local Administrator level includes the edit icons a regular user would not have. If copy user is not an option, click "Next" to skip this step and move to the next.
If you have copied a user access, this is your final step; please continue if you are not copying a user to set up a new user correctly.
|

|
5. The The department department where the the user record is located becomes the user's home department. If the user requires access to other departments click to highlight and select those departments in the the not allowed box: then click arrow key key   to move the department over to the the allowed box.
Departments on HSPnet are collections of staff records/names. Access to these departments is required for anyone assigning staff names on HSPnet from that department. A Receiving Coordinator may have access to all or most departments. Most Destination coordinators would only need (and should only get) access to their home department. Departments that show in light grey lettering only, are departments you do not have access to. Another RC with access could provide access to you or edit this account afterward to add it to this user's access.
An example of someone who would need more than one department would be a nurse that may coordinate maternity placements at two different hospitals. In the screen capture sample, Doberman's home department is at Mitchel Hospital Nursing; Nylint Hospital Nursing could also be added if required. |

|
|
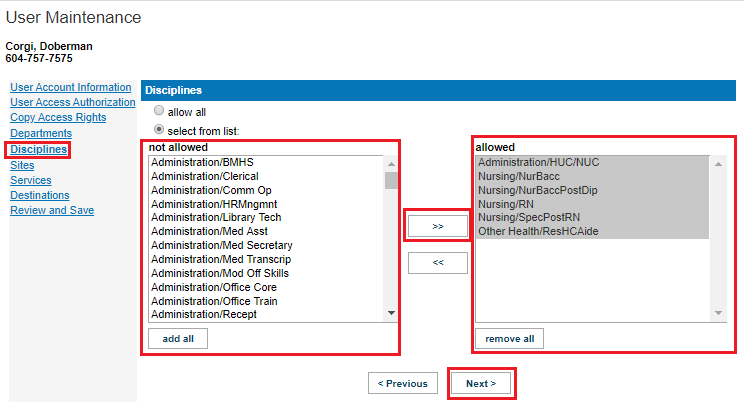
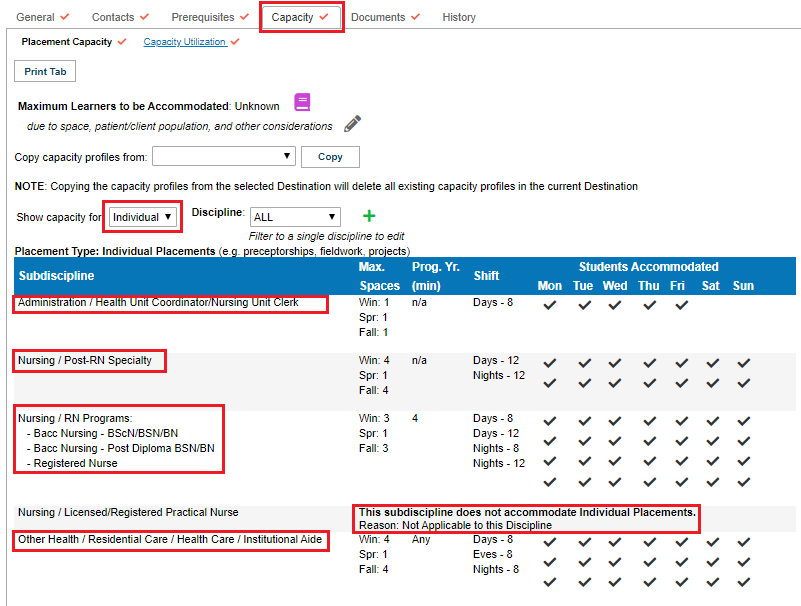
6. User access is on a a need to know basis. Receiving Coordinators may need "all disciplines," but a Destination Coordinator's access is normally restricted. Only the the disciplines coordinated by the user should be included, and these should correspond to the sub-disciplines identified on the capacity tab of the Destination Coordinator's destination profile in the services the DC is assigned to. You need to check individual and group capacity to identify all of the disciplines/sub-disciplines required, and on all of the destination profiles the destination coordinator is assigned to on destination maintenance (these can be assigned by service, so it is possible for example to have one destination coordinator assigned to the services of administration and nursing on one destination profile, while another destination coordinator may be assigned to the same destination profile, but to the service of Physiotherapy).
To assign access to disciplines, click to highlight and select them in the not allowed box, and click the arrow to move them to the the allowed box.
The second screen capture shows the Destination Profile Capacity tab for the above coordinator. Doberman does not have access to Nursing/Practical Nursing, as the unit does not consider this type of student, as they have no LPN's on the unit that could supervise LPN students.
Click: next
|

The destination profile capacity matches the access given above.
|
|
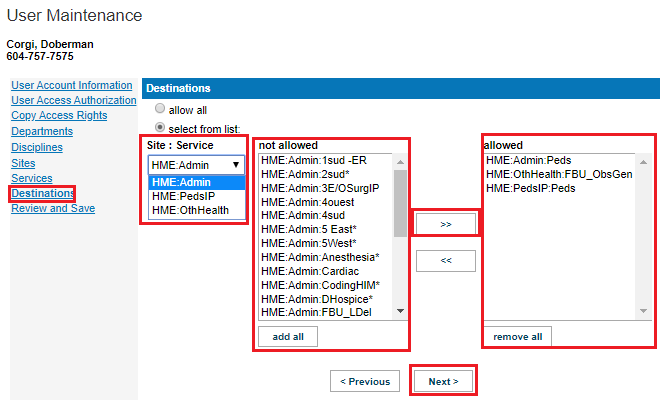
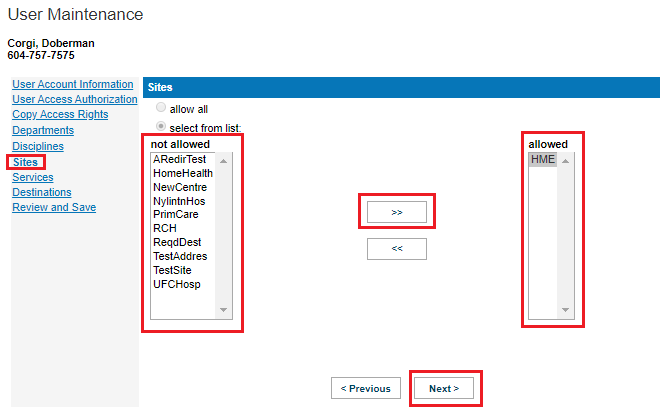
7. Determine the the sites the destination coordinator needs access to. Select them from the "not allowed" box by clicking to highlight them, and then lick the right facing arrow to move them to the "allowed" box.
When ready, click: Next
|
|
|
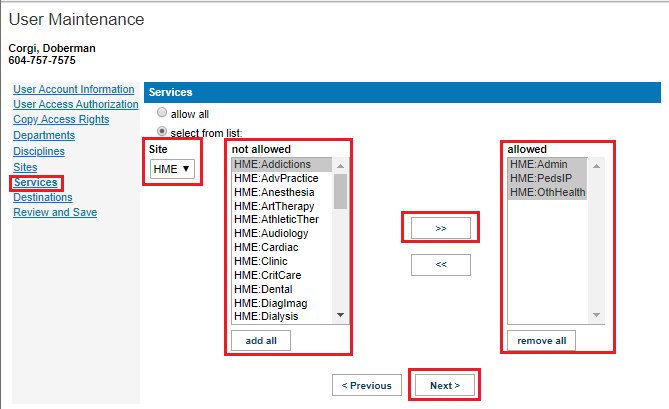
8. The The services needed by the destination coordinator should only be those the destination coordinator will be coordinating. In this model Doberman coordinates Unit Clerk students, so needs the service of of Administration; Doberman also coordinates all of the nursing students, and the main nursing service at this destination is is Pediatrics, so Peds/IP needs to be included. Doberman also coordinates the Health Care Assistants, which at this destination are under the service of "Other Health."
Important: This guide still shows how to set up a new user, but when you assign a destination coordinator on the the destination maintenance screen (second screen capture): the assigned services and destinations will will automatically be added to the DC user access.
However, should you ever move this destination coordinator from an old assigned destination to a new destination on the destination maintenance page, the new destination's site service(s) and destination is also also automatically added to this DC' access - the old site/service/destination is is not automatically removed, this must be done done manually in the reverse order.
How to is shown adding them here: eg edit this profile again and use the left facing arrow to remove unneeded destinations, services and sites from this user access, or they will continue to see all of the placement requests and messages for their old destination. Why does it work this way? HSPnet is not like a private e-mail account. You can assign the same access to back up destination coordinators and even though they are not listed as the destination contact, they also can have identical access to the person who is assigned as the contact.
Click "Next."
|

|
|
9. When you set up Destination access, you also need to do this in conjunction with the drop down list on the left: Site: Service.
10. When you select HME: Admin on the the Site: Service drop down, you can select the destination Admin: FBU_ObsGen from the "Not allowed" box; when you select HME ObstGen on the the Site: Service drop down, you can select: HME: ObstGenFBU_ObsGen;
Finally, select HME: OthHealth on the the Site: Service drop down in order to select and move HME: OthHealth: MHComHME from the "Not Allowed" box to the "Allowed" box.
Click "Next" when done.
|

|
|
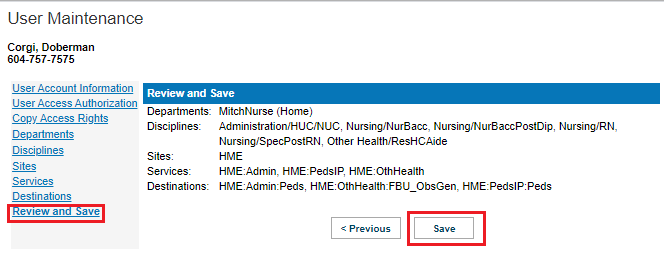
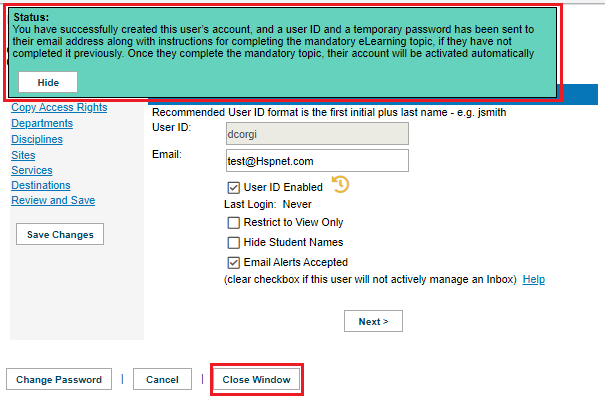
11. Review the information; if everything is correct: use one of the save buttons (or click the the previous button to go back and edit). An automated message sends the new user ID and temporary password. A message with a green background appears and confirms this for you. Click: Close Window.
|

|
- The new user receives a link to HSPnet in the e-mailed message Behind the scenes, on first log in a new user will actually be be redirected into the short mandatory training for all new users.
- The user key will still be grayed out but is a darker shade indicating an account has been set up.
When you hover your cursor over this shade of grey key, the most common message you see is: "User Account is on hold pending completion of mandatory training. Last login: Never." This is normal as soon as you issue the new user account. The message may change to show a last login date and still be dark grey: this means the new user logged in once only and completed mandatory training; their key has not turned colour because they still need to log into their welcome page for the first time. (The new user needs to wait at least two minutes after the module is completed, and then log in again to fully activate their access and reach their welcome screen).
- Once the user has completed the online module and has logged in again, the user key will be yellow
(regular user). This will be the case even if you copy your access for a new RC/local administrator from a blue key user.
|

|