e-Orientation - Guide for PC and RC (eOPE)
Placing & Receiving Agency Related Guide (PARG RARG)
PLEASE NOTE: The e-Orientation site and student profiles update hourly. Student e-Orientation modules may not show completed right away.
Summary:
This guide explains how to use the eOPE (e-Orientation Practice Education) feature if available in your province. It explains how:
- Placing Coordinators can enable the eOPE feature for a Program and specific courses.
- Receiving Coordinators can adopt available eLearning courses for their sites, to be completed by students as part of their orientation for an upcoming placement.
- Placing Coordinators can also obtain the role of E-Orientation content manager to adopt e-orientation for internal destinations at the post secondary institution.
- Placing Coordinators and Receiving Coordinators can monitor student progress/completion of e-orientation modules.
Glossary
Content Author – a special type of user role, normally granted to the Lead Agency in a province, for individuals who create and maintain eLearning courses that are available for adoption by receiving sites.
Content Manager – a role that is held by a Receiving Agency user, for individuals who manage the adoption of eLearning courses for their sites.
Moodle – a third party application that is integrated with HSPnet, and used to create and maintain e-Orientation courses for a province.
Background
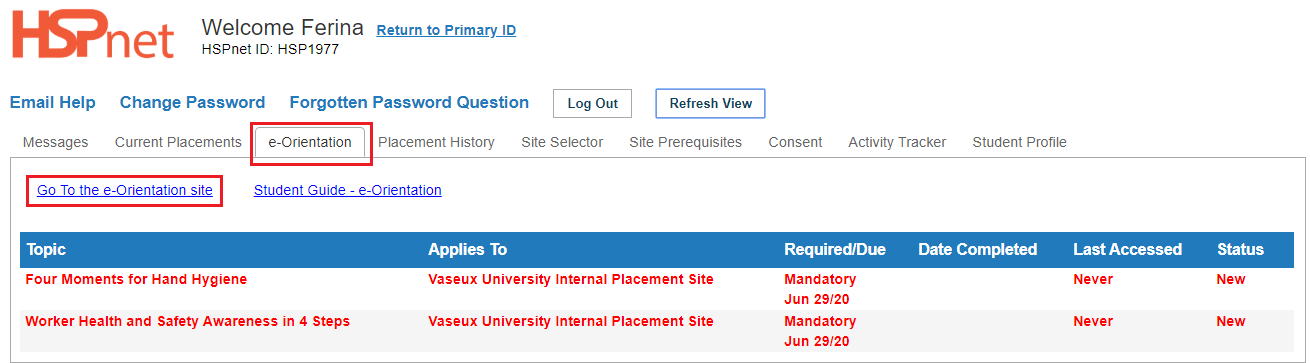
The eOPE feature integrates a provincial HSPnet instance (e.g. HSPnet-ON) with an instance of Moodle that contains e-Orientation topics that are available in that province.- Content Authors can access Moodle to publish and maintain eLearning courses for their province.- Content Managers can then "adopt" courses in HSPnet and apply them to one or more sites and disciplines.- Placing Coordinators can set up a Cohort, or even specific courses, to allow students with an HSPnet account to access e-Orientation courses as required by their upcoming placement site.- Students can view a list of e-Orientation topics that are required for an upcoming placement, plus those previously completed for a past placement. From this list they can access Moodle directly, without another login.
Requirements:
- Programs must allow students access to HSPnet and e-orientation. (Department access can be enabled for faculty/instructors).
- Students must be enrolled in a Course that is set up in Cohorts to use the eOPE feature.
- Students must be assigned to a confirmed placement at a site/destination that has adopted one or more e-Orientation courses.
Contents:
- Program set up (Placing Agency) - set up student access.
- Department set up (Placing Agency) - set up instructor access.
- Cohorts/Course set up (Placing Agency) - enable the course on the cohorts screen to allow students/instructors to use e-orientation.
- Content Manager role set up (Receiving Agency; Placing Agency - for internal e-orientation destinations.
- Preview available e-orientation modules.
- Adopt e-orientation modules.
- Monitor Student completion of e-orientation (Placing and Receiving Agencies).
|
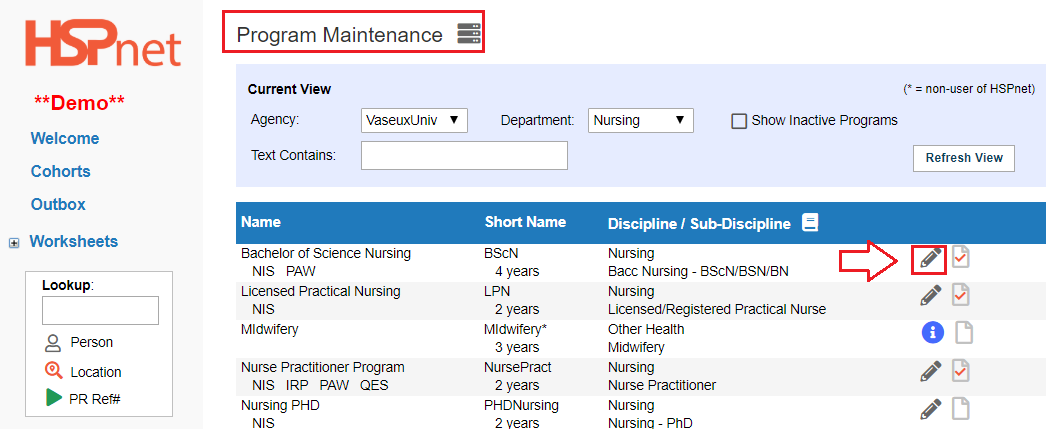
Placing Agency Set up: Programs.
To check whether your program has e-ope enabled, check your program record to see whether e-orientation is allowed for students.
|
|
|
Placing Agency Set up: Programs - continued.
|
|
|
Placing Agency Set up: Programs - continued.
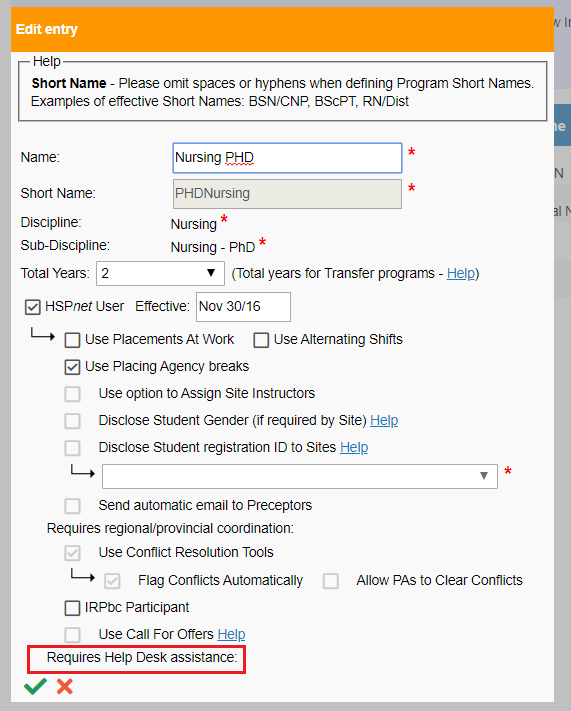
Example One: Program is not set up:
Check the bottom of the edit entry screen. If student access is not turned on for this program, it will only say: Needs Help Desk Assistance (above the green save check mark).
|
|
|
Placing Agency Set up: Programs - continued.
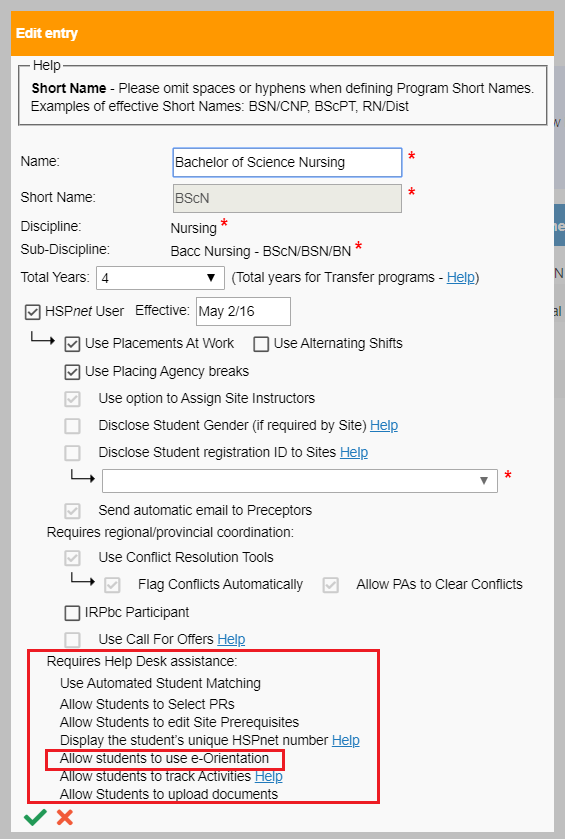
Example Two: Program is set up:
Near the bottom of the edit entry screen, beneath Requires Help Desk Assistance, it will say:
|
|
|
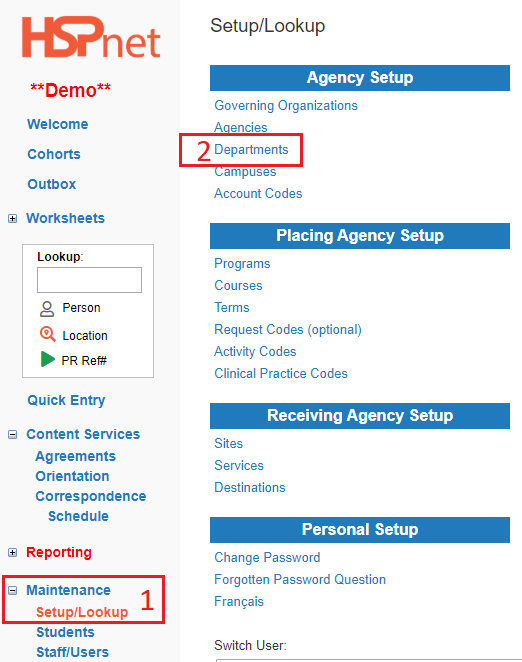
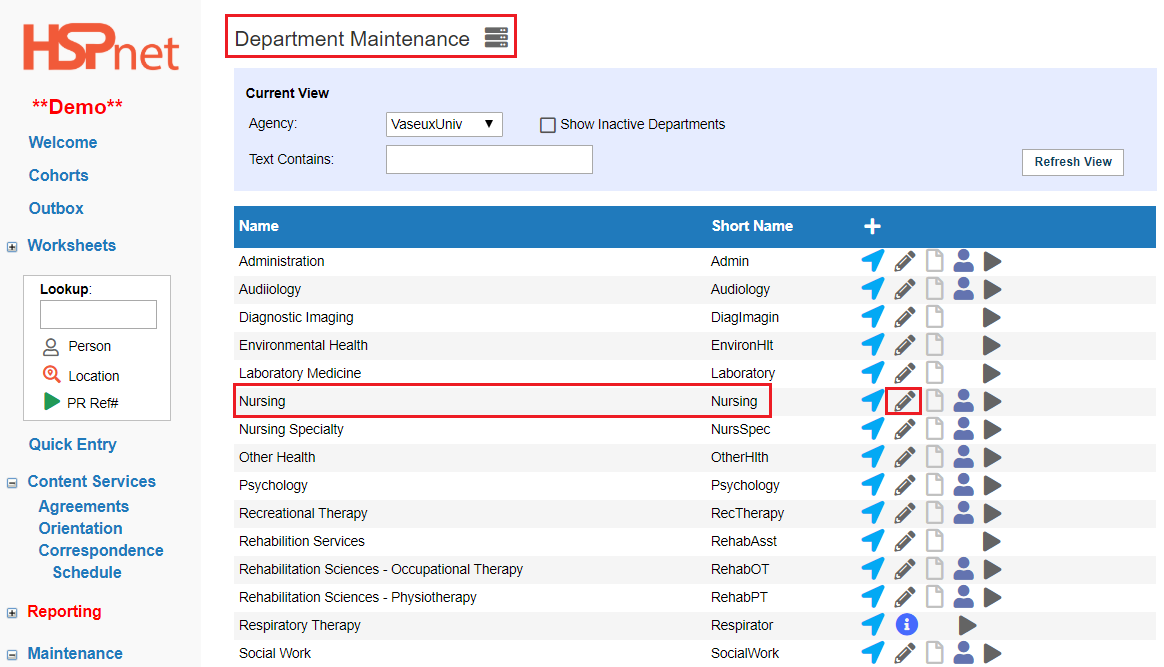
Placing Agency Set up: Departments.
Above, we organized turning on the e-orientation program for students at the program level. If you need to enable e-orientation for faculty/instructors also attending those sites, you can turn this on yourself in department maintenance.
|
|
|
Placing Agency Set up: Departments - continued.
3. Click the Pencil icon beside the department where you wish to enable the instructors/faculty to take the e-orientation at the site where they may be assigned. |
|
|
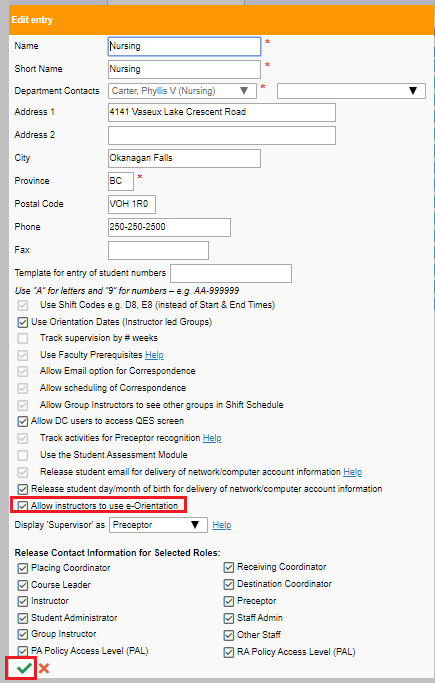
Placing Agency Set up: Departments - continued.
4. Click to place a check mark in the box adjacent to: Allow instructors to use e-orientation. 5. Save the changes with the green check mark.
In theory, any instructor assigned to a placement request where e-orientation modules are required will now be able to access and complete the e-orientation... but only when e-orientation has also been set up at the course level, shown in the next set of instructions. |
|
|
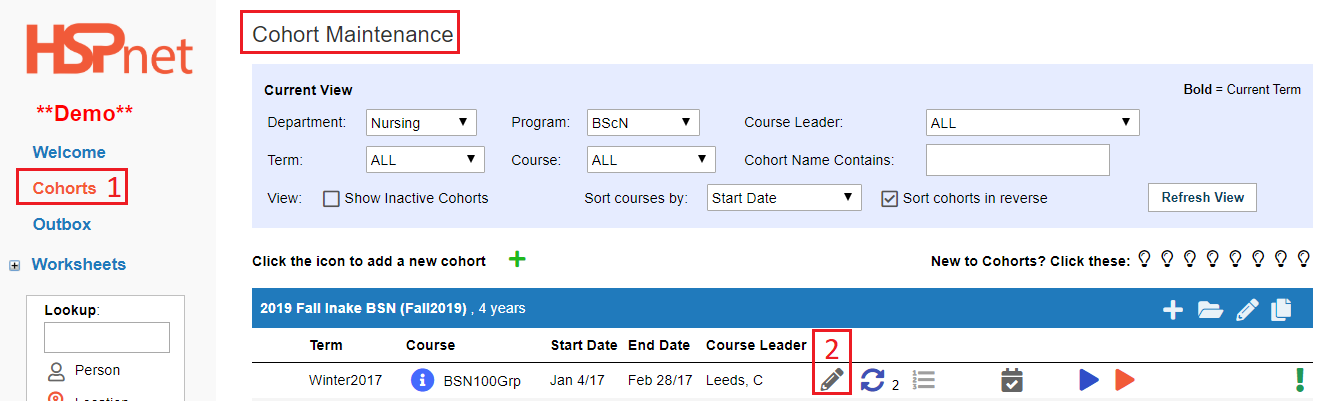
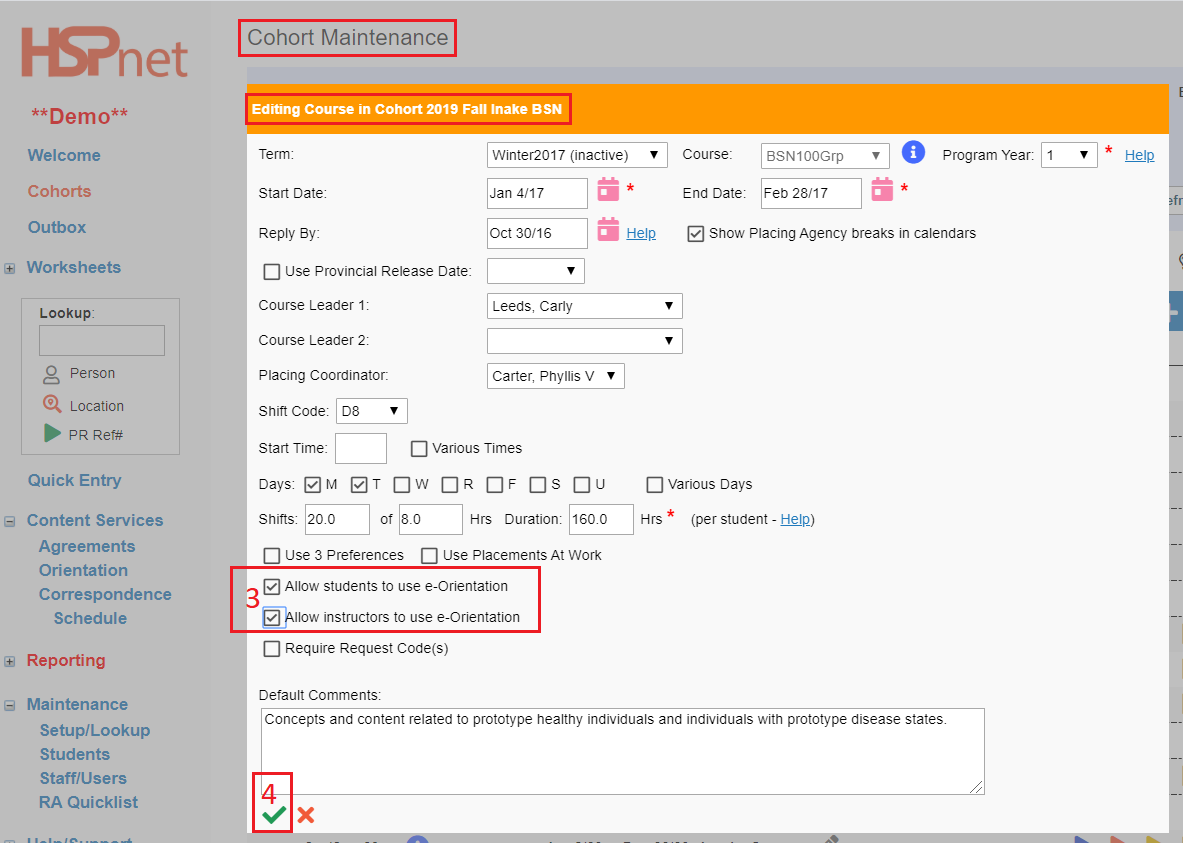
Placing Agency Set up: Courses in Cohort Maintenance.
You do not need to enter e-ope into a course record or profile in course maintenance, but you do need to enable a course on the cohort screen for e-ope.
|
|
|
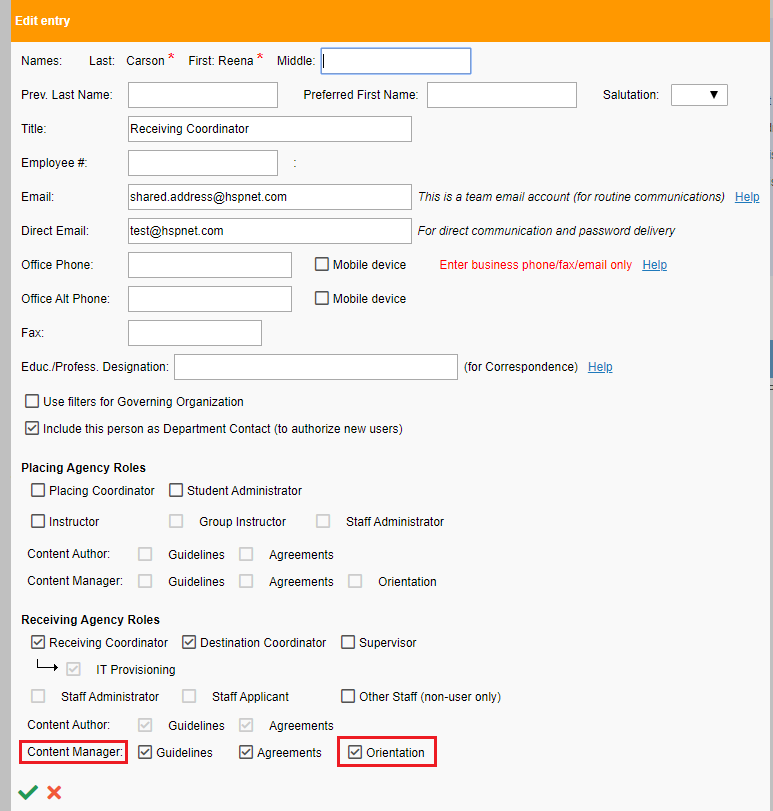
Content Manager Role set up: Receiving Agency or Placing Agency with an internal e-orientation site (Receiving or Placing Coordinator).
A Content Manager(s) needs to be created to Adopt e-orientation courses. This should be in the role of a Receiving Coordinator to adopt the e-orientation modules the sites and destinations will require, or if this is an internal e-orientation destination at Post Secondary Institution a Placing Coordinator may be set up with the Content Manager role.
To determine whether you already have this role or need to request it:
Look yourself up in the data base. You must have EOM (E-Orientation Manager) showing up as one of your roles; if not please use e-mail help to contact HSPnet support and request the EOM role to be added. |
|
|
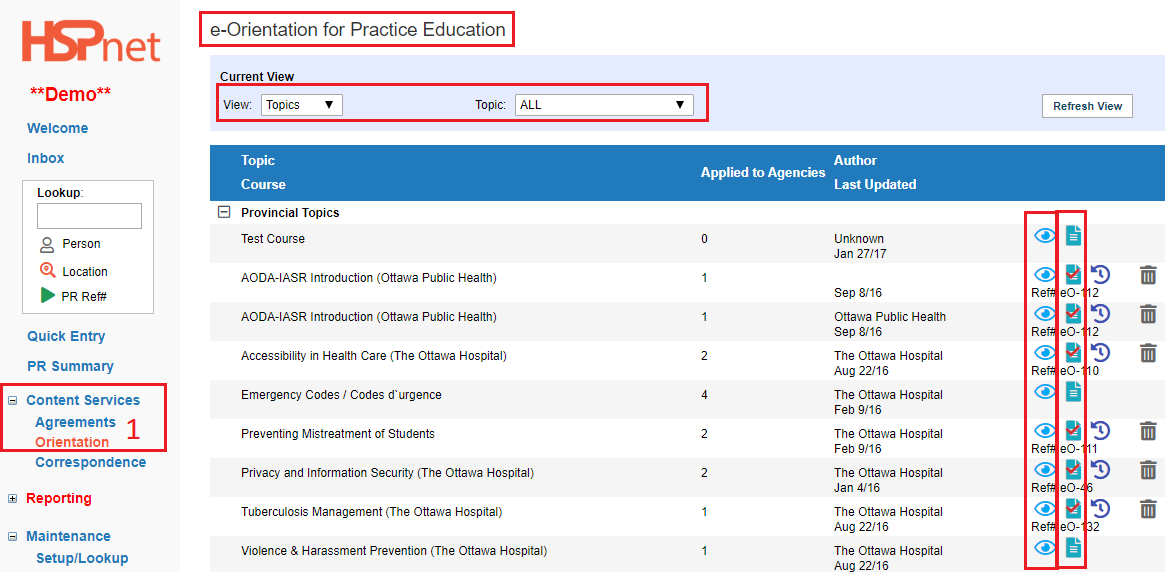
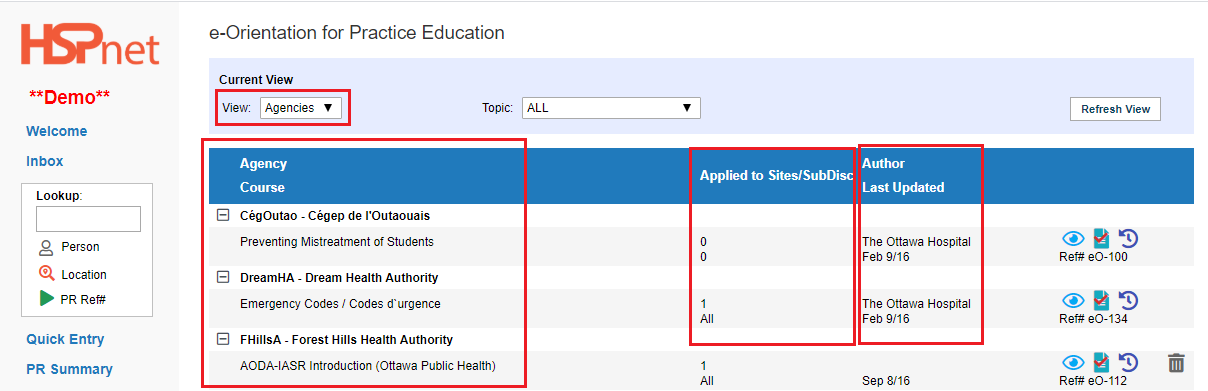
Review Available e-Orientation Topics (Content Managers)
You do not need to sort, but on the screen: e-Orientation for Practice Education, you can sort adoptable topics by:
There are four columns that very depending on the way you are sorting:
|
|
|
Adopt e-Orientation Courses Content Managers only:
Receiving Agencies or internal Post Secondary institutions with e-orientation destinations).
|
|
|
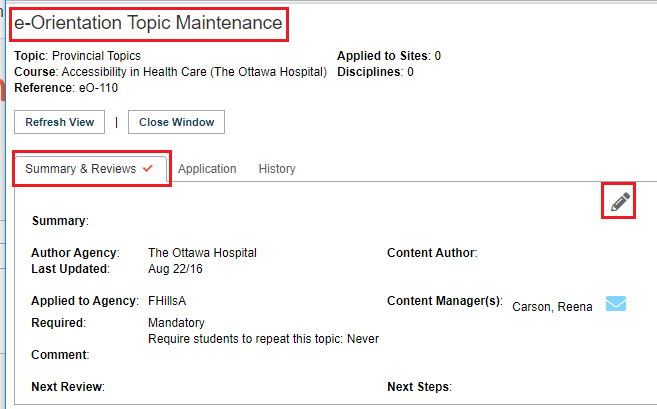
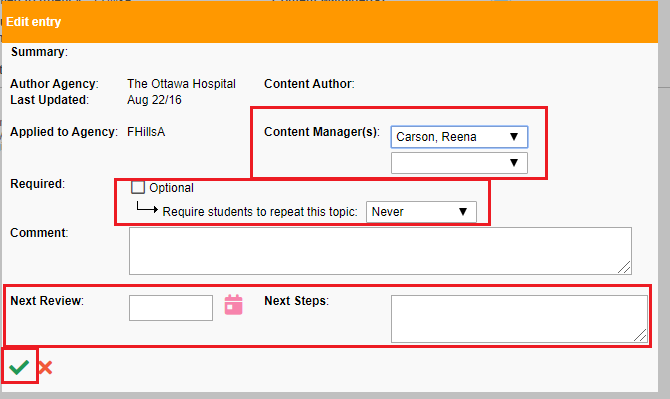
Summary and Reviews tab: Click the Edit
|
|
|
Application Tab - select Disciplines:
Select the Application tab.
The application tab enables you to specify which students must complete this orientation module. For instance, you may require nursing students to do the “Tuberculosis Management” module, but you do not need the Unit Clerk students to complete this. On this tab you can specific sub-disciplines that must complete the module.
|
|
|
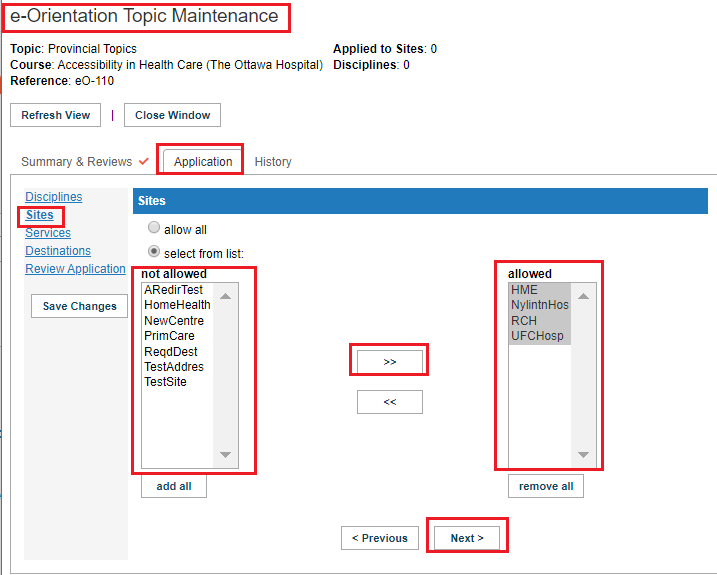
Application Tab - select Sites:
If you have access to multiple sites, you can specify which specific site the orientation module applies to. You can add all, or as with the sub-disciplines, specify as little as one site. In this case the orientation is applied to four hospitals: HME, Nylintn, RCH and UFC. The orientation module is not required at any site in the not allowed box; but is applied to all of the sites in the allowed box.
If you are now applying the course to all services and destinations at the above sites, simply click the “Save Changes” button. If the course only applies to some services and some destinations, click Next! |
|
|
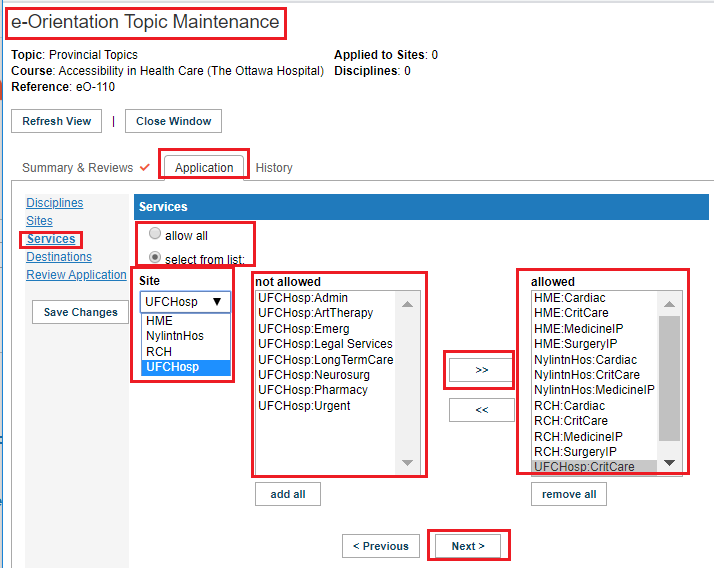
Application Tab - services:
Select any or all services from the not allowed box and move to the allowed box. The orientation module will apply to all of the services in theallowed box. You need to do this site by site. In this example, HME was the first site in the drop down list, so all of the HME services to be included were moved to the allowed box. Next, All of the services at Nylintn were moved, then the services at RCH, and finally UFC.
Click: Next to specify destinations or “Save Changes” if all destinations use the orientation. |
|
|
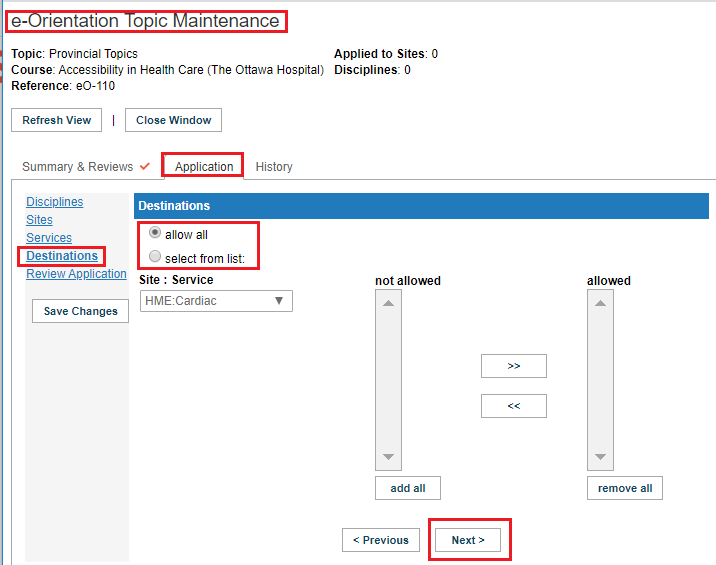
Application Tab - destinations:
If you do need to specify specific destinations, rather than allow all the same would apply as above: select one service at a time from the site: service drop down list. Site/Service by Site/Service select the destinations to include. This would only be needed if you had more than one unit using a service, such as cardiac, and you needed to apply the module to only one of the two destinations.
|
|
|
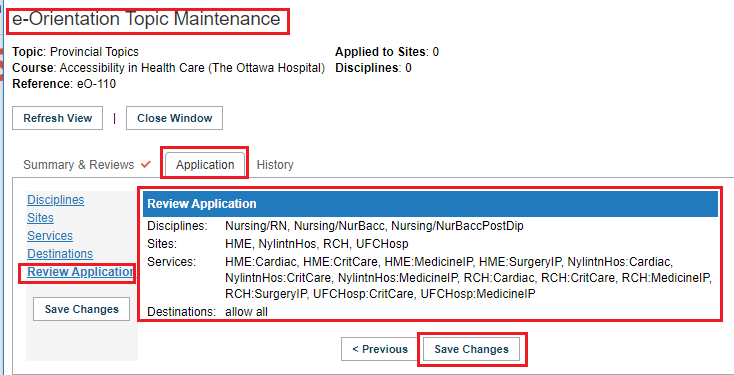
Application Tab - Review and Save:
The final piece of this process/wizard is called "review and save."
Where you have selected: allow all, this will be displayed, or where you have specified disciplines, sites or services, this will be displayed.
By making selections in the discipline, sites and services, you are not truly allowing all destinations to participate: you are allowing all destinations that have those selected services, at the designated sites, who have RN or BSN students.
To truly apply an e-orientation to all destinations at a site: select the site, all services and all destinations; this would still be restricted to BSN and RN students only, unless you select more disciplines or allow all. |
|
|
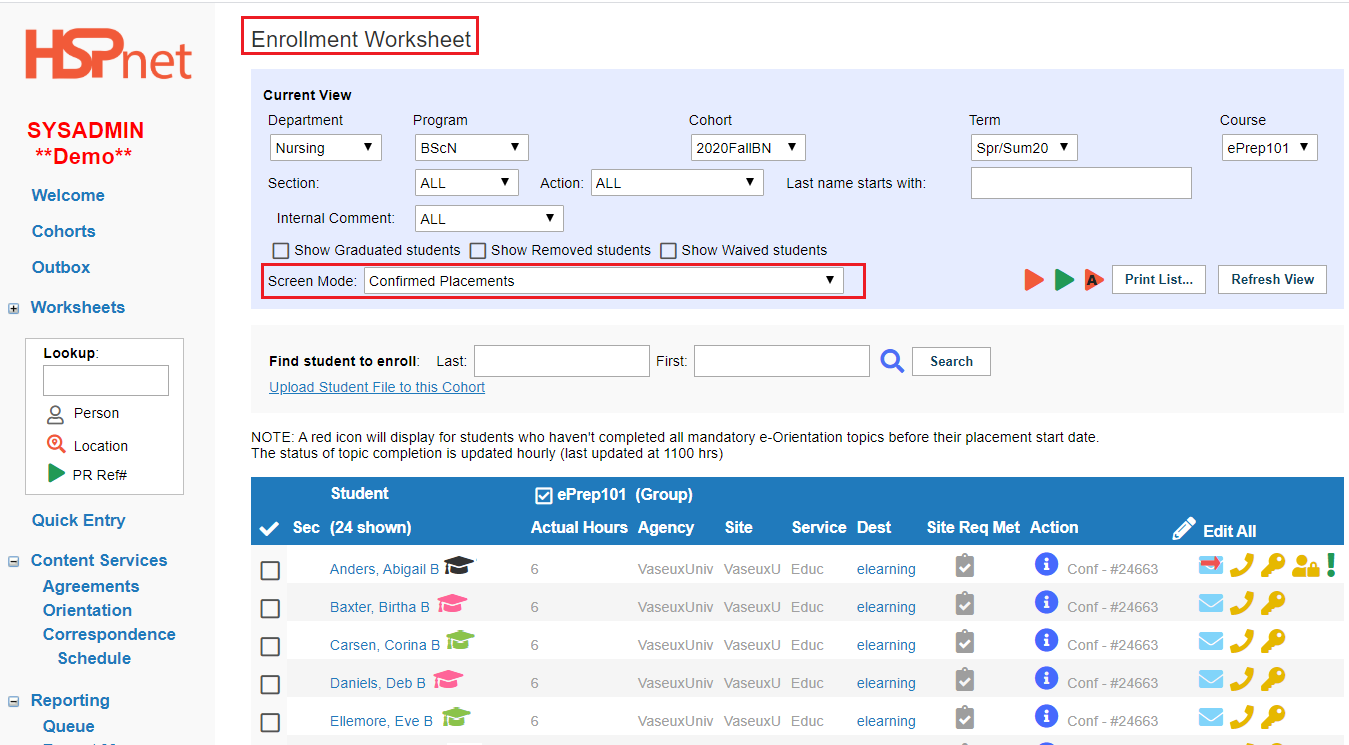
Monitor Student Progress and Compliance in the Enrollment Worksheet (PLACING agencies only)
|
|
|
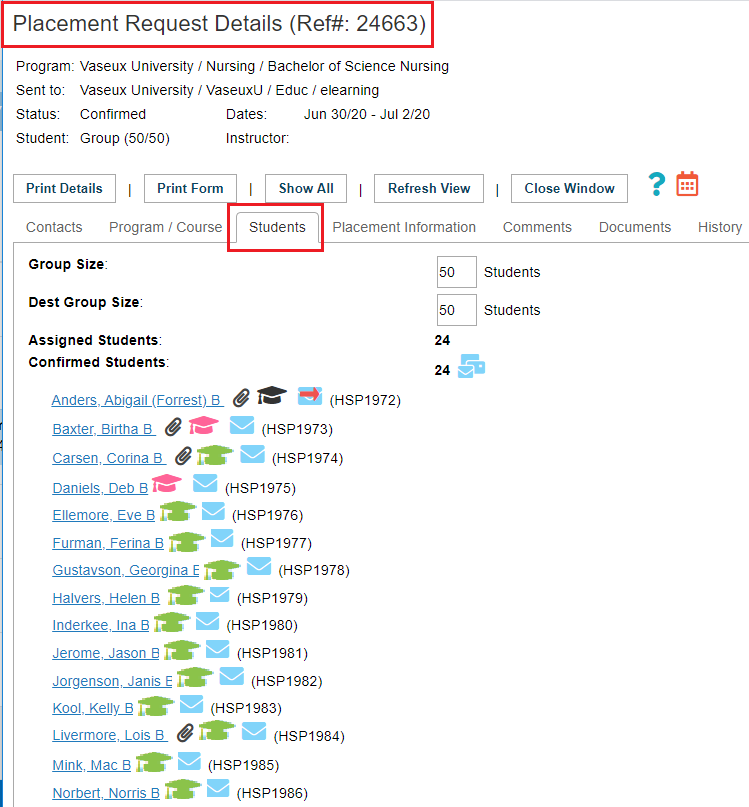
Receiving and Placing Coordinators may Monitor Compliance in the Placement Request Details Screen.
PC and RC:
|
|
|
Monitor Student E-orientation, continued.
|
|
|
Monitor Student E-orientation, continued.
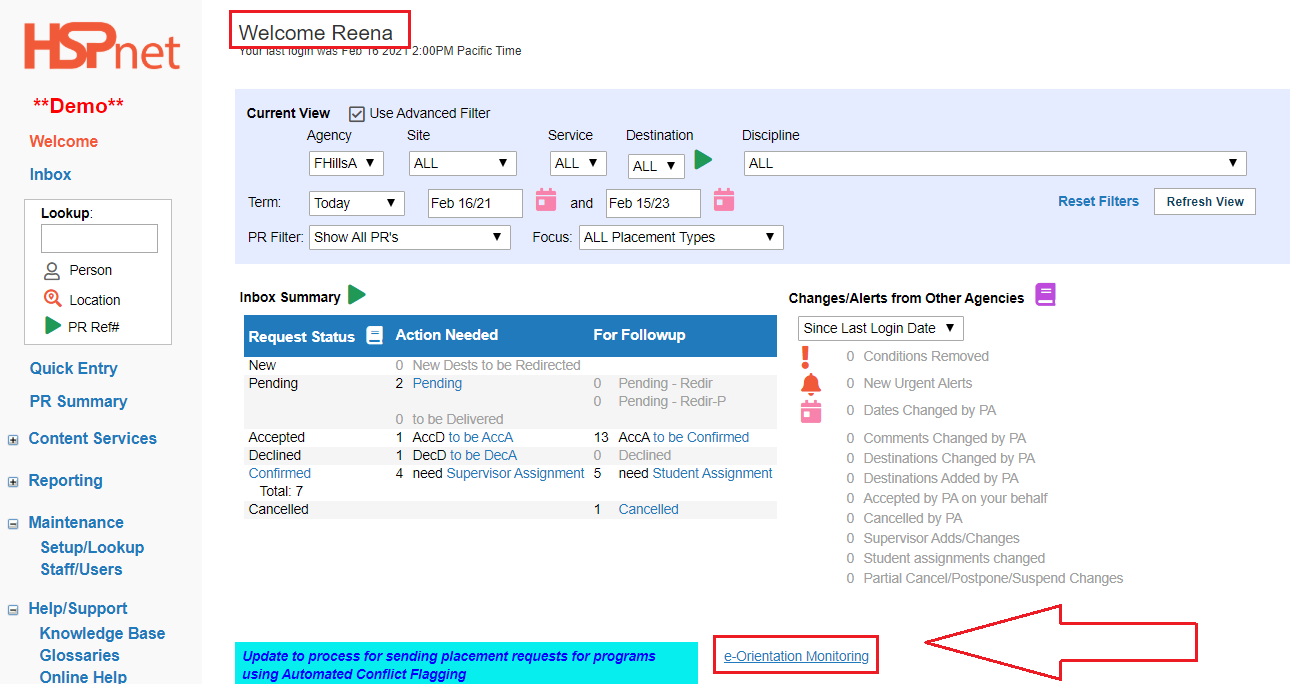
Receiving Coordinator Welcome Screen:
Receiving Coordinators have an e-Orientation Monitoring Link on the Welcome Screen.
From the file drop down menu you can select file save as to save the file to your computer. |
|