|
First Login to HSPnet
- When your user account is created, you will receive a "Welcome to HSPnet" email message with your user ID and temporary password.
- Visit the HSPnet website at www.hspcanada.net To log in: click on your province on the map of Canada.
- On the log in page, enter your user ID and temporary password.
- Follow the instructions to enter a new password and forgotten password question, and to accept the user responsibilities as per the National HSPnet Policies.
- On your first log in, you are automatically redirected to the eLearning site to complete a 5-minute orientation that is mandatory for all new users. Please make sure you complete the training to activate your user key.
- Wait roughly two minutes after completing the training before trying to log back into HSPnet. On your second log in, you should reach your welcome page.
|
|
Return to Contents
|
|
Your Welcome Screen (DC View/DC Lite)
When you login again after completing the eLearning orientation, you will be greeted by your Welcome screen that is organized by tabs. It also offers these links:
Online Help – a link to the Quick Reference Guide plus some tips on using HSPnet.
Email Help – launches a new email to HSPnet Support from your regular email system, with a subject that allows us to identify you and the screen you are using.
Change Password – allows you to change your password (before the 90-day expiry period).
Forgotten Password Question – allows you to change the question to be answered when requesting a new password.
Switch to Advanced DC - there is a more advanced/complicated version of the DC screen you can switch to, and back again to this screen which is called DC View. DC View is the default screen, as generally DC View is much easier to navigate than DC Advanced. The instructions in this guide are for DC View only. DC Advanced is more appropriate for destination coordinators who:
- have a large numbers of destinations to coordinate (more than 3 or 4)
- have a large volume of placement requests in the same period of time. (If you have several pages in your inbox, you may wish to try DC Advanced). Click this link to Access the DC Advanced guide.
DC Advanced could also be used by a destination coordinator with multiple destinations who will be redistributing placement requests to others (like a Receiving Coordinator who DOES NOT NEED to:
- Redirect requests to another user (but can e-mail them from the report queue to non-users).
- Create user accounts.
- Add services or destinations to a site).
|
There is also a 15 minute video: DC Introduction to HSPnet.

|
|
Return to Contents
|
|
|
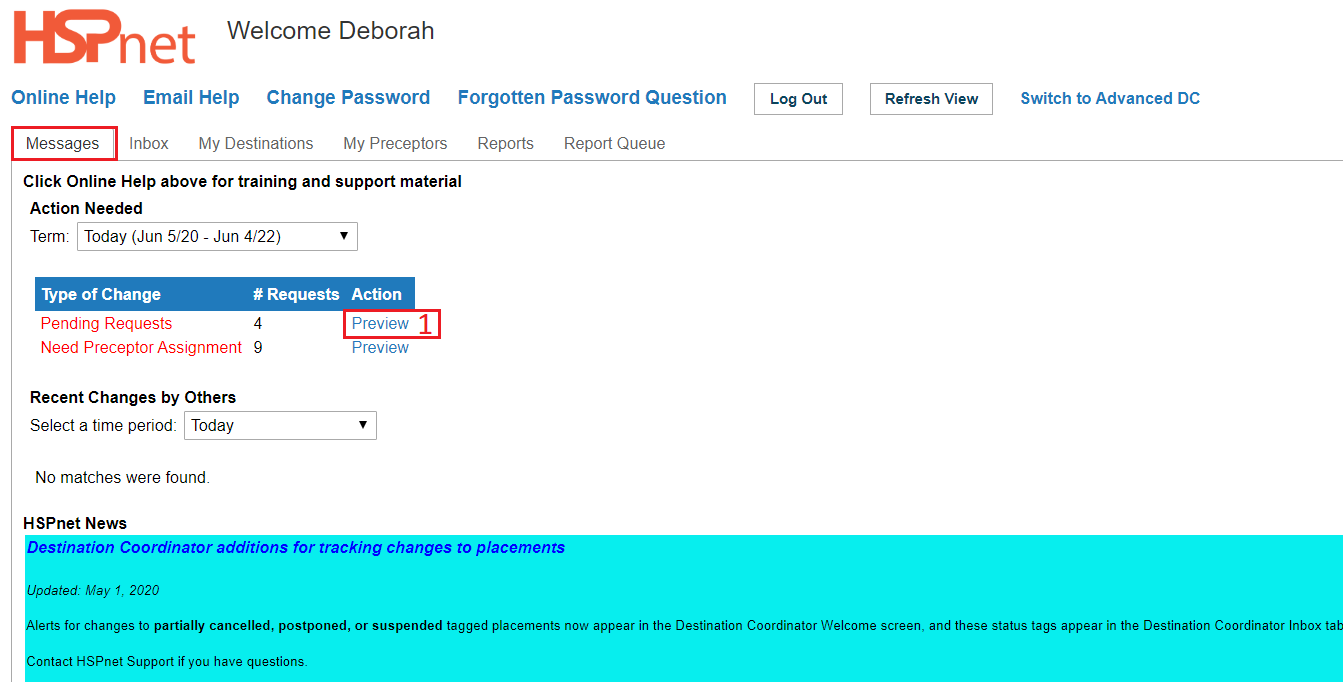
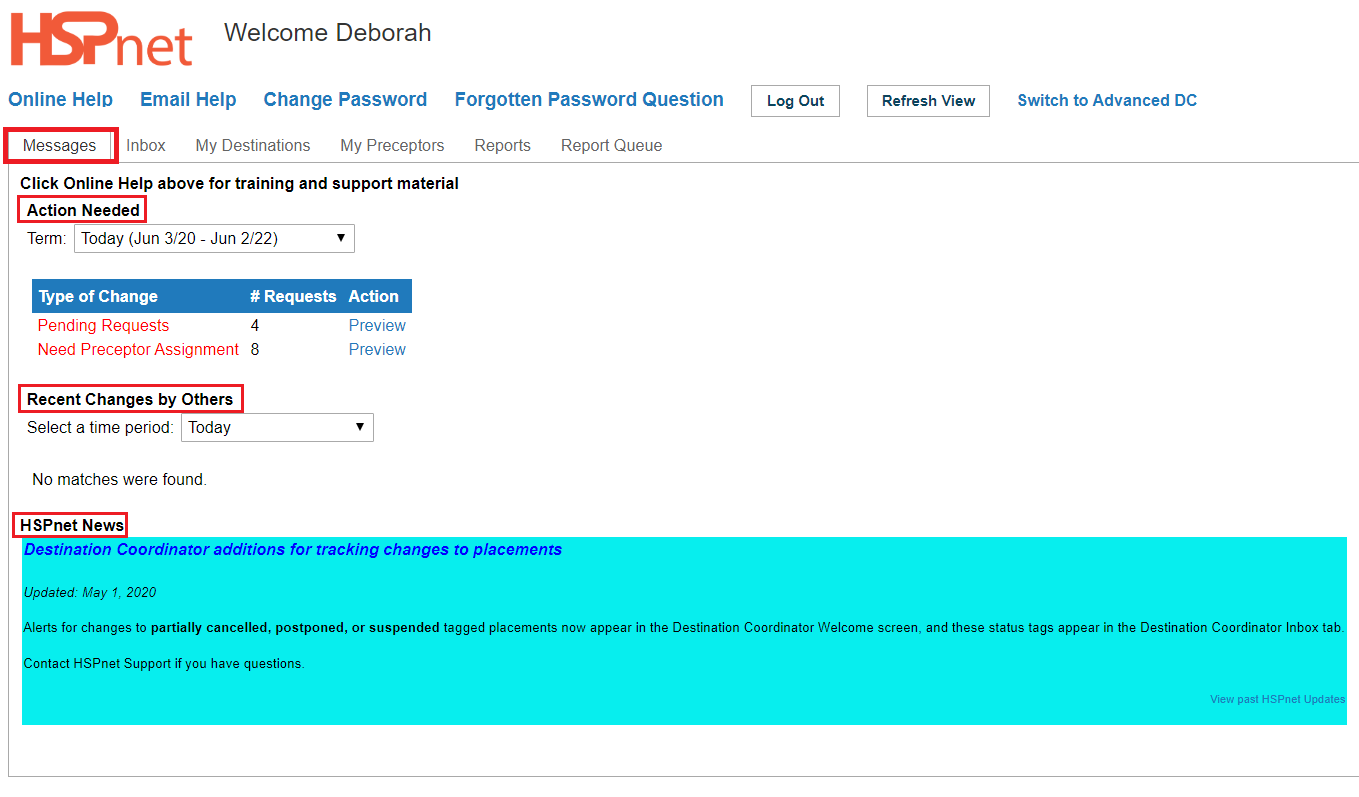
Your Messages Tab
Your Messages tab has several sections:
Action Needed –
- Term Filter setting - default to "TODAY" a two year period beginning on today's date. You can filter to see a previous term if desired by selecting your choice from the drop down list. You may need to click the button: refresh view after changing the term.
- a list of placement requests in your Inbox to be reviewed and accepted or declined, or that require a supervisor to be assigned.
Recent Changes by Others – a list of updates and alerts from educational programs, such as changes to placement date or destination, or recent cancellation of a placement.
This section provides a "time period" filter to show past alerts that you may want to review again; the default view after login is "Last Login", which displays all changes made since your last HSPnet session. If you need a reminder of previous changes, change the filter to "past week" or "past month" to review older updates.
HSPnet News – information for DC's about new features or important changes.
|
The Video: DC- Responding to A Placement Request from the Preview Screen is also linked above (Quick Overview of accepting a request on HSPnet and adding a staff supervisor); the same video is also linked here because it includes an overview of the messages tab.
|
|
From Your Messages Tab you can:
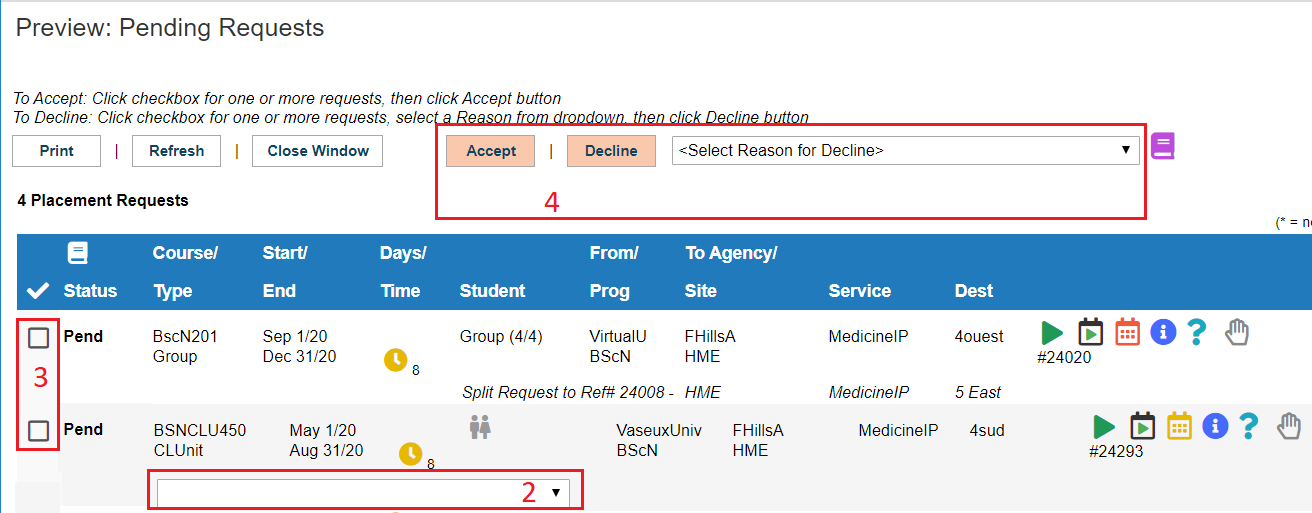
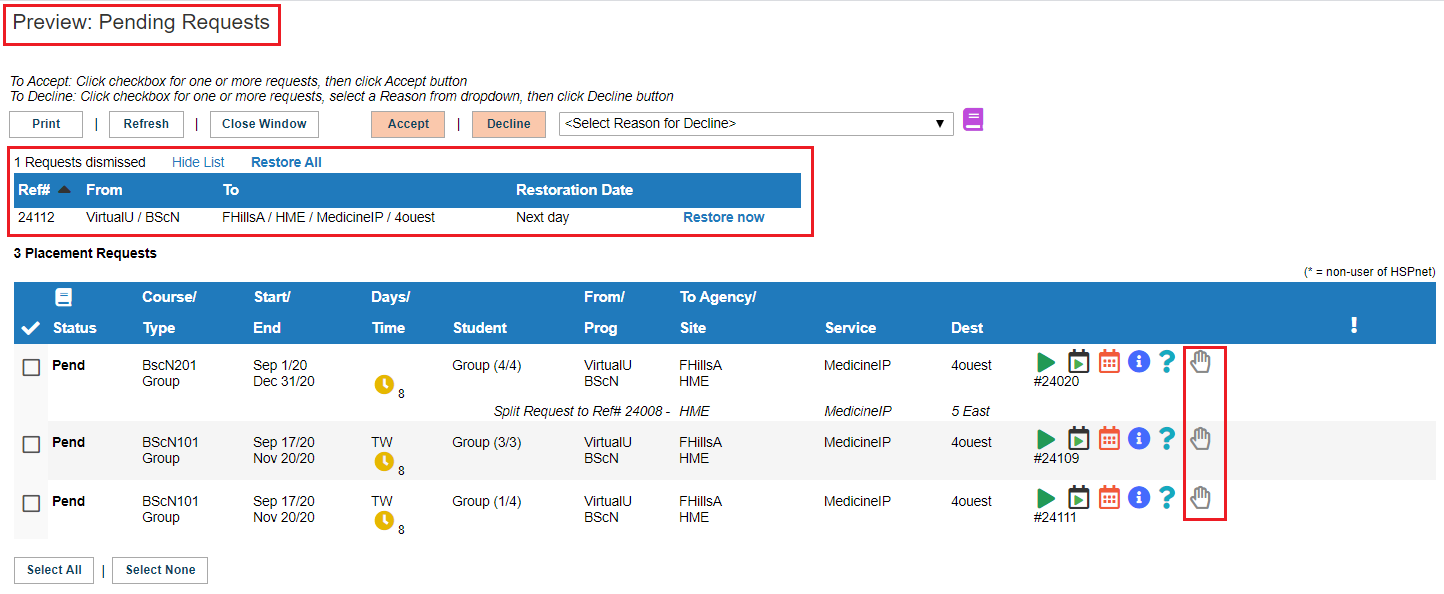
Preview your requests as shown above in the Quick Overview of accepting a request on HSPnet, by clicking the Preview links. From the Preview Pending window you can: accept or decline, add supervisors, open the details icon, the shift schedulers, dismiss requests, etc. Potentially you can do almost everything to do with placements from the preview pane on the messages tab. The inbox however, is described below as it provides additional filters, and shows ALL requests, the preview only shows Pending or new requests. The various icons are described below in Placement request Details.
On the preview Pending Screen there are a number of columns and icons:
The second blue bar in this screen capture has these columns:
- Status: Pending (no response has been entered to the request); other status are AccD (accepted at the destination); AccA (accepted by your agency - this status is entered by the Receiving Coordinator): Confirmed: this status is entered by the school making the request. In Pending Preview you will only see Pending requests! See more about Status in the inbox section below.
- Course Type: HSPnet has a glossary of request types: in many ways there are really only two types: Individual or group placement requests. The full glossary covers all of the variations from observation only to final preceptorship.
- Start and End Dates.
- Days/Time. There are "Clock" icons in this column: Yellow represents days shifts
 ; Blue for evenings: ; Blue for evenings:  ; Dark grey for nights ; Dark grey for nights  ; and no colour for various shifts ; and no colour for various shifts  (nights, days, & evenings). The small number appearing to the right of the icon indicates the shift length in hours, and the letters indicate the days of the week students will be present in group requests. Days of the week are represented as follows: M - Monday; T - Tuesday; W - Wednesday; R - Thursday; F - Friday; S - Saturday; U - Sunday. (nights, days, & evenings). The small number appearing to the right of the icon indicates the shift length in hours, and the letters indicate the days of the week students will be present in group requests. Days of the week are represented as follows: M - Monday; T - Tuesday; W - Wednesday; R - Thursday; F - Friday; S - Saturday; U - Sunday.
- Student: In group requests you will see what looks like a fraction: (Group 4/4). The first number indicates how many students will be on the unit in the request at any one time: 4/4 means a group of four students will be on the unit; 3/4 means the group has 4 students, but one of them will be elsewhere at all times: on an adjacent unit or observing somewhere near by for the day: so 3 students would be the maximum on the unit at any one time. 1/4 seems weird, but this appears often on alternate observation requests: for example, a student group on the maternity unit may allow for one of those students to observe in Labour and Delivery, so the L&Del request would indicate only one of the four students would be present during any given time during the placement.
- The next five columns are: From Agency and Program, such as Vaseux University BSN program; then the next four columns identify where the request is to (which is useful to destination coordinators with more than one destination or more than one service at the destination): Agency, Site, Service, and Destination.
- The Green Triangle icon
 is a goto button. It will take you to your inbox. is a goto button. It will take you to your inbox.
- The Green Triangle icon inside a calendar icon
 is another goto button. This will take you to a calendar view: but it will also switch you in the DC Advanced Screen which is quite a bit more complex. To get back to the DC View screen, click the link in the upper right hand corner of your screen. is another goto button. This will take you to a calendar view: but it will also switch you in the DC Advanced Screen which is quite a bit more complex. To get back to the DC View screen, click the link in the upper right hand corner of your screen.
- The Individual and group and shift schedule icons
  are in the next column. Yellow is for individual; red is for groups. There are links in your online help that explain these icons further. are in the next column. Yellow is for individual; red is for groups. There are links in your online help that explain these icons further.
- The Placement request details icon
 (explained below)! The Preview Pending Screen shows only the "short hand" overview of the placement request; the details often contain links to the program/course and supporting materials, etc. (explained below)! The Preview Pending Screen shows only the "short hand" overview of the placement request; the details often contain links to the program/course and supporting materials, etc.
- The who can view this request icon
 (explained below). (explained below).
- Meet the Hand:
 . This is the dismiss icon! Click it and the Pending request will not appear in your Pending Preview screen again for the rest of the day (it will come back after 24 hours, or you can click: show list and restore now: see the area around the smaller blue bar). The purpose of this feature is to allow you focus on the placements you would like to work on today, and hide the others. These requests will still show up in your in box. . This is the dismiss icon! Click it and the Pending request will not appear in your Pending Preview screen again for the rest of the day (it will come back after 24 hours, or you can click: show list and restore now: see the area around the smaller blue bar). The purpose of this feature is to allow you focus on the placements you would like to work on today, and hide the others. These requests will still show up in your in box.
|
|
|
Return to Contents
|
|
|
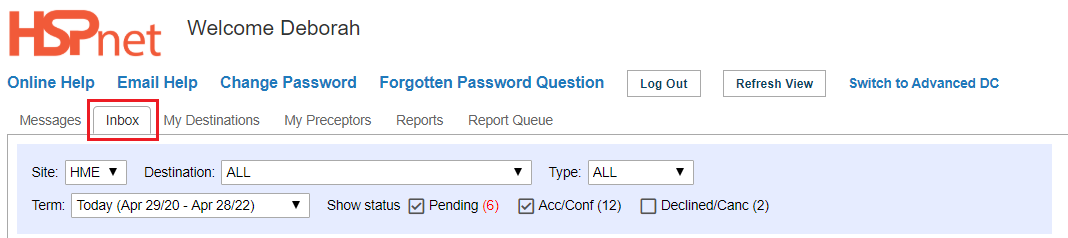
Monitor Requests in your Inbox
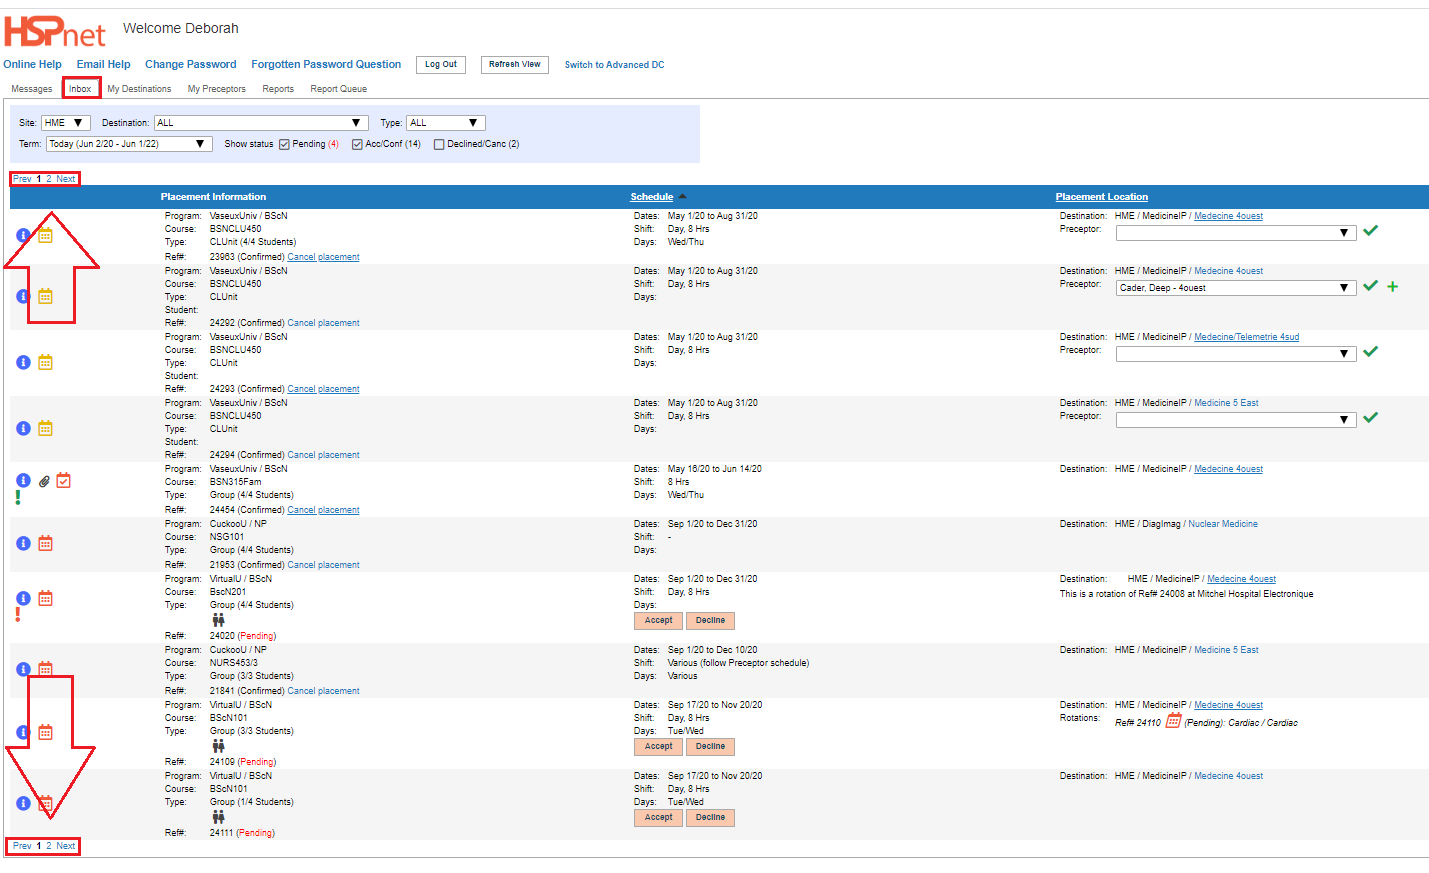
After you log in your Inbox is filtered automatically to all requests that are Pending or Acc/Conf (Accepted or Confirmed), for the time period or Term of "Today".
- A counter appears after each status to indicate how many requests have this status, even if your screen is not filtered to include these requests. In this example there are 12 accepted/confirmed placements; 2 Declined or Cancelled and 6 pending requests. The tally for Pending requests is displayed in red as an additional reminder for action.
The time period of "Today" will display all placements that are active now, even if they started before today, and for the next two years. Other options include the three academic terms (Winter, Spring/Summer, or Fall) plus "Past Term."
|
There is also a 5 minute video called the Placement Cycle Overview for Destination Coordinators.
|
|
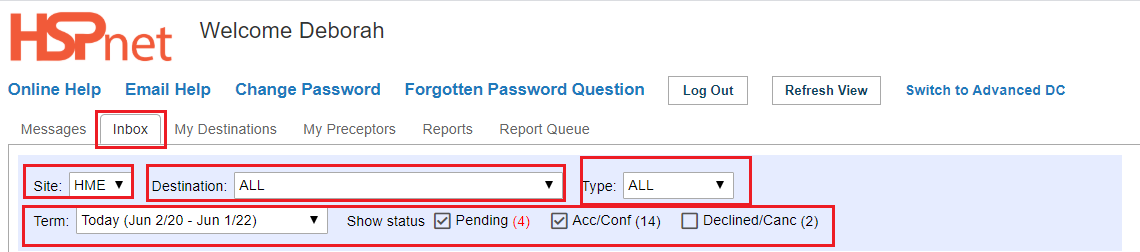
Inbox
Your Inbox includes other helpful filters:
- Site: if you cover student placements at more than one site you will have a drop down for All, and for specific sites.
- Destination: if you cover student placements at more than one destination you will have a drop down for All, and for specific destinations.
- Type: allows you to filter to view only Group requests or Individual placement requests, or All.
- Term: enables you to view specific periods of time. The default setting is Today: which includes the current date and into the future for two years. (Most professions do not receive requests that far in advance, but some students, such as MRI tech students may request placements more than a year in advance of the start date.
- Status: Pending requests need a response: Accept or Decline. Accepted requests may still need to be accepted by the Receiving Coordinator at your agency, and then the school will Confirm the placements. Declined requests are not shown by default: please click to place a check mark in the box in front of Declined/Cancelled to see any declined or cancelled requests. After a placement has been confirmed, a link will appear beside the request, permitting you to cancel it if circumstances change and there is no longer a supervisor available for the student. (It is not instructing you to cancel the request, just the button if you need to)!
|
There is also a 15 minute video called the DC Inbox.
|
|
Return to Contents
|
|
|
In Box continued
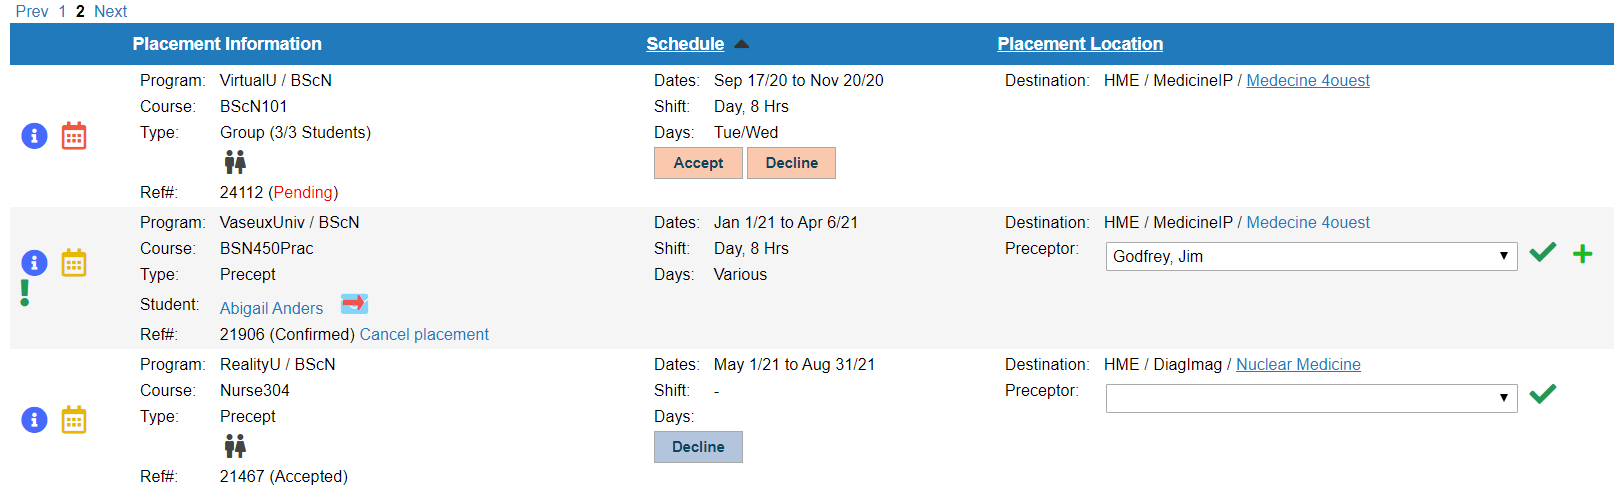
Your Inbox (In DC View) displays 10 requests per page. To toggle between pages, click the links (Previous) Prev, Next. or click on a number. These links appear on the left of the page, just above the blue bar, and after the last placement.
To reduce the number of placements being viewed in your inbox:
Click to remove the check mark from the box in front of Acc/Conf and click refresh view, if you want to to view Pending requests only. Put the check mark back in and refresh view to see the Accepted and Confirmed requests again.
|
|
|
Review Placement Request Details
The examples in this inbox show:
- one Pending request - which can be accepted or declined using the accept or decline buttons. When you decline, you must select a reason from the drop down list or the decline will not be saved.
- one Confirmed request; the student name has been released, and she has made her e-mail account visible to the receiving agency.
 The link: cancel placement appears beside confirmed placements in case circumstances change and you need to cancel the confirmed placement. (We hope not). The link: cancel placement appears beside confirmed placements in case circumstances change and you need to cancel the confirmed placement. (We hope not).
- one Accepted request: you still need to assign a supervisor; the school needs to confirm this placement and release the student name. If your circumstances change: you would click the decline button. After it the placement is confirmed only use the cancel button.
|

|
|
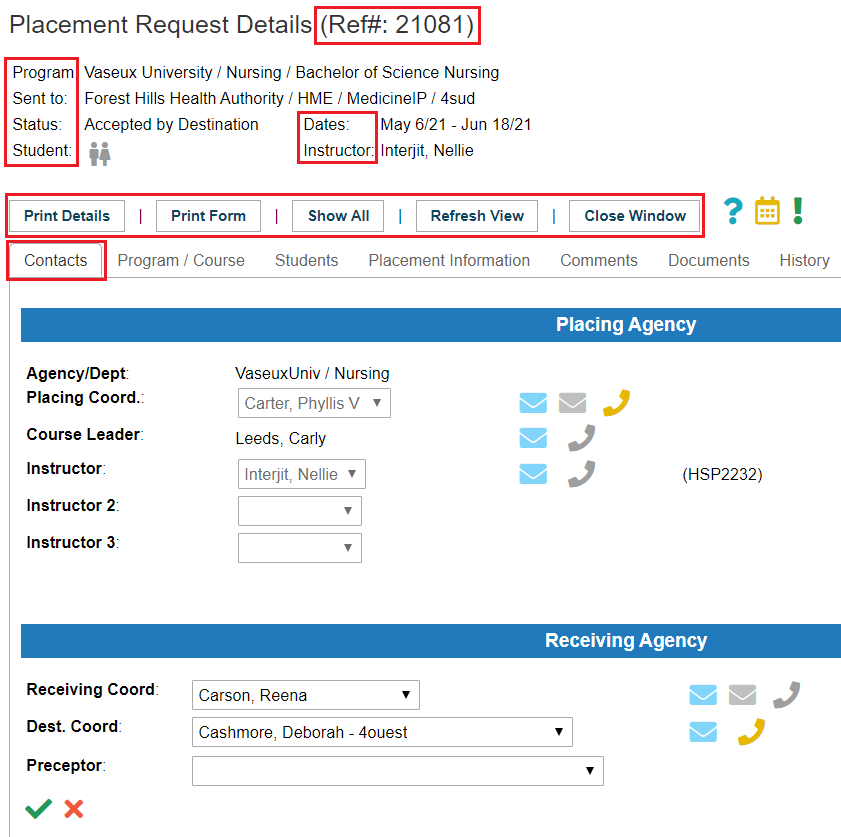
Placement Request Details.
To view more information about a request, click to view the Placement Request Detailsicon, at the left of the screen in the inbox (it is on the right side in the preview screen).
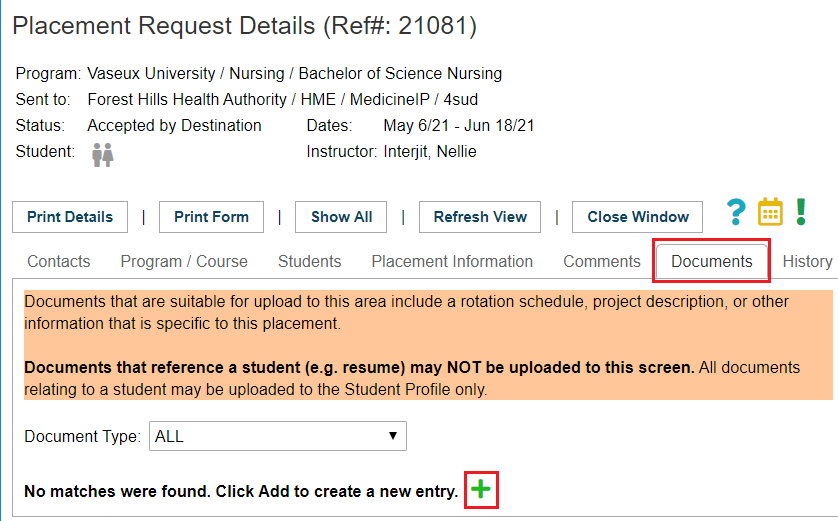
When the details icon opens, at the top of every placement request you will find:
- A unique Placement Request Reference Number. (use this # in correspondence so others can identify the request you are discussing).
- The Program the student is enrolled in.
- Where the request has been Sent to, specifically: Agency, Site, Service, and Destination.
- Status of the placement request (see placement status glossary for more information but basics are: Pending (response needed). Accepted at the Destination means your Receiving Coordinator can see this internal information but the school placing coordinator cannot see this information before your receiving coordinator accepts the request on behalf of your agency when it will say Accepted by the Agency, and a "final status" is Confirmed... although this final status can still be cancelled by the school if the student is not ready, or by the destination coordinator if the circumstances change and supervision is no longer available.
- Start and end Dates of the placement.
- There may be an Instructor assigned.
- Normally the Student name(s) are not released until after the request is confirmed. Some programs may have exceptions where interviews are required prior to acceptance: such as in Social Work, Recreation Therapy and Psychology.
There are a series of buttons:
- Print details: opens your local printer control
- Print form: generates a PDF link on the Placement request. You need to open the link and use file save as to keep a copy as after you navigated away from this screen the link will no longer be available.
- Show All: simply changes the display from tabs to one long scroll.
- Refresh View: reloads your screen to show any updates you have saved.
- Close Window: reloads your screen to show any updates you have saved and closes the current screen.
Icons: hover your cursor over any icon in HSPnet and it will identify what it means.
- Who can view this Placement Request? Click on it to find out: this information can change: initially only the placing coordinator(s) can see it; this expands to include the Receiving Coordinator(s) after it is Sent. This will include you as the destination coordinators and any back up destination coordinators with an active HSPnet user account; eventually instructors and students can also see the request once assigned to it and the request is confirmed.
- or are Individual (yellow) and Group Shift schedules (red). The group shift schedules are populated because days of the week must be indicated for group placements; individual shift schedules would need to be filled in before they will contain any details. There is also a 16 minute video: DC - The Group and Individual Shift Schedule.
 This icon indicates there are comments on the comments tab, which can be accessed by hovering your cursor over the icon, or you can open the details icon above to see the full comment. This icon indicates there are comments on the comments tab, which can be accessed by hovering your cursor over the icon, or you can open the details icon above to see the full comment. This icon indicates a Condition has been added (also on the comments tab). Your Receiving Coordinator may prescreen your requests and set conditions before forwarding the request to you: such as change the group size, or add a resume. You can also add conditions: for instance in a locked down area you may add: contact facility prior to start, and provide contact information in the comments field. (Never put a student name in the comments field but a staff name or number is permitted). This icon indicates a Condition has been added (also on the comments tab). Your Receiving Coordinator may prescreen your requests and set conditions before forwarding the request to you: such as change the group size, or add a resume. You can also add conditions: for instance in a locked down area you may add: contact facility prior to start, and provide contact information in the comments field. (Never put a student name in the comments field but a staff name or number is permitted). Urgent Alert Icon, also on the comments field is used for urgent matters. Urgent Alert Icon, also on the comments field is used for urgent matters. Request a Site Instructor. This icon is mainly used in Quebec. A placement request can also be used to request an instructor who is an employee at a Receiving Agency to be the "site" instructor, instead of sending their own faculty instructor. This icon is only available where this feature has been turned on. Request a Site Instructor. This icon is mainly used in Quebec. A placement request can also be used to request an instructor who is an employee at a Receiving Agency to be the "site" instructor, instead of sending their own faculty instructor. This icon is only available where this feature has been turned on.
|
There is also a 16 minute video: DC - The Group and Individual Shift Schedule.
|
|
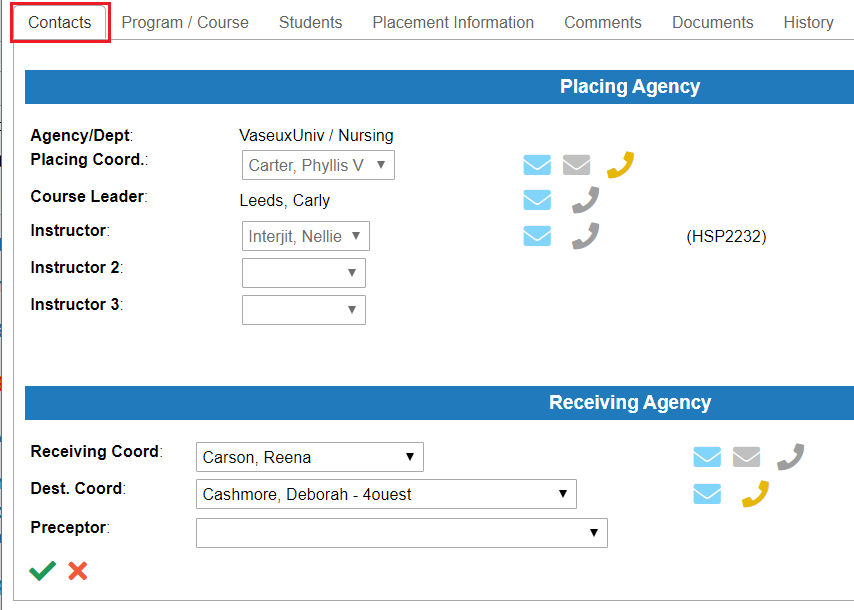
Contacts Tab in the Placement Request Details Screen
The Contacts tab allows you to communicate with contacts at the educational program and your site:
 Hover your mouse cursor to view phone number ; a grey phone icon indicates that no phone number is entered. Hover your mouse cursor to view phone number ; a grey phone icon indicates that no phone number is entered.- Click the envelope icon
 or or  to launch an e-mail: when used from the contacts tab, the message will automatically include the placement request reference number in the subject line. to launch an e-mail: when used from the contacts tab, the message will automatically include the placement request reference number in the subject line.
|
|
|
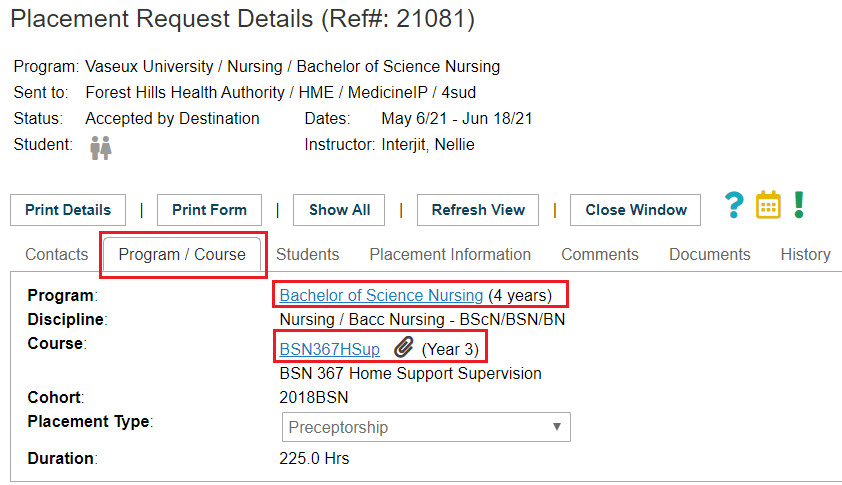
Program/Course Tab in the Placement Request Details Screen
This screen displays the:
- Program (in this example, BSN program)
- Discipline.
- Course.
- Cohort (if Q is the first letter and then a number the request is a quick entry (not a cohort) request).
- Placement Request type.
- Overall duration in hours.
All of the above terms can be looked up under help/support/glossaries.
Programs and Courses that have information entered in their profiles at the placing agency have hyperlinks so you can review more detailed information. The course in this example has a paper clip  icon which indicates there are also documents attached, such as a guide for supervisors. If there are no links the school has never filled in a program or course profile. (They have been taught in our training that if they do not fill in this information they may be declined if a placing coordinator has a lot of requests and doesn't understand what is required in the placement - and has other requests that do have the information filled in. It may be worth noting in the comments field when you decline if that is the reason for your decline). You can also contact them and point this out if you do want to consider the request. icon which indicates there are also documents attached, such as a guide for supervisors. If there are no links the school has never filled in a program or course profile. (They have been taught in our training that if they do not fill in this information they may be declined if a placing coordinator has a lot of requests and doesn't understand what is required in the placement - and has other requests that do have the information filled in. It may be worth noting in the comments field when you decline if that is the reason for your decline). You can also contact them and point this out if you do want to consider the request.
|
|
|
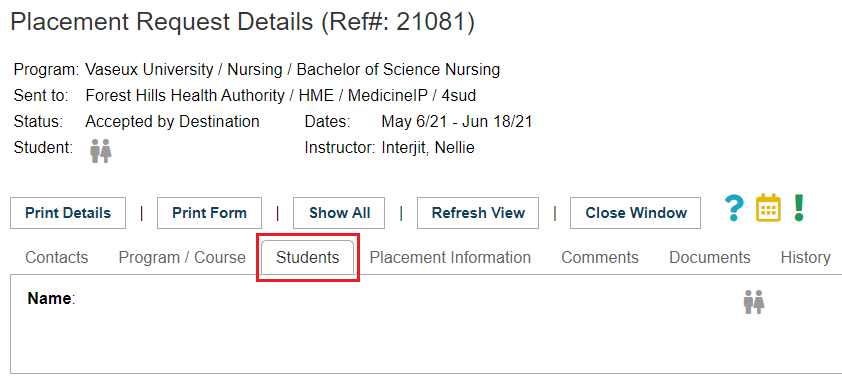
Students Tab in the Placement Request Details Screen
- By default: student names are not released until the placement is confirmed - in most professions - and in most placement request types, as shown in Placement request example 21081.
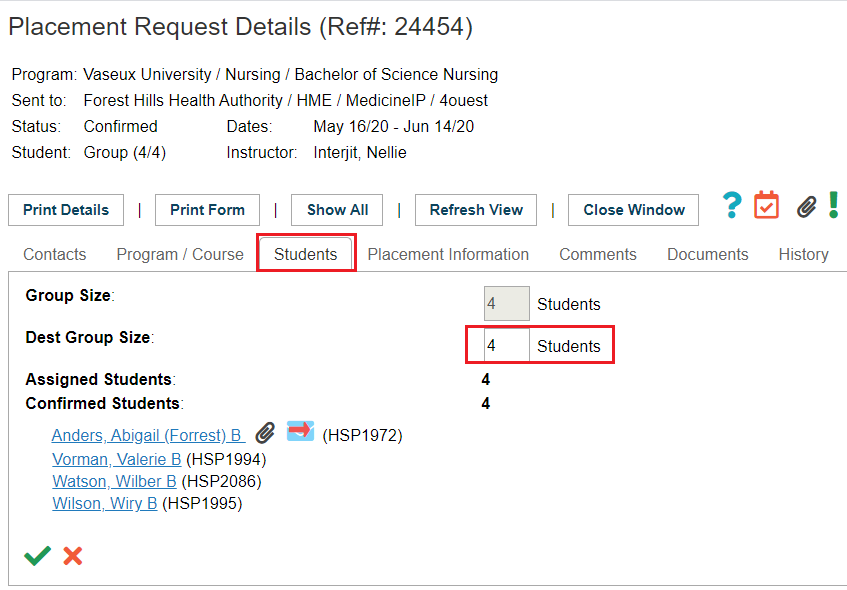
- When the placement is finalized and confirmed the student names are released on the student tab. You can click to open the student profile (but you can only view parts of it, such as when a resume has been attached). In the example of Placement Request 24454, four students are assigned.
- There are two Group Size numbers: Group Size (which is the overall size of the group - generally funded by government and not a number that ever changes), and Destination Group Size which says how many of the students will attend /on a single shift on this specific unit. You may see 3/4 students entered, with 3 as the Destination Group Size. In this case one of the 4 students is doing an alternate observation at a nearby destination. They take turns, so a different student goes to an alternate destination every week (such as the OR, or a diabetes clinic) but it means you will always only have 3 of the 4 students present for that request and one student will always be going to a different destination (and the split request to the alternate destination will be a Destination Group Size of 1). The only reason for alerting you as to the overall funded government group size is so you know to expect there will be four different students placed through this placement request, and although there will only be 3 at any one time on the unit, the individuals will change as they each rotate between the placement on your destination and another destination.
- In the example of pR 24454, Abigail Anders has a document attached to her profile and she has consented for her e-mail address link to appear on the placement request.
|
|
|
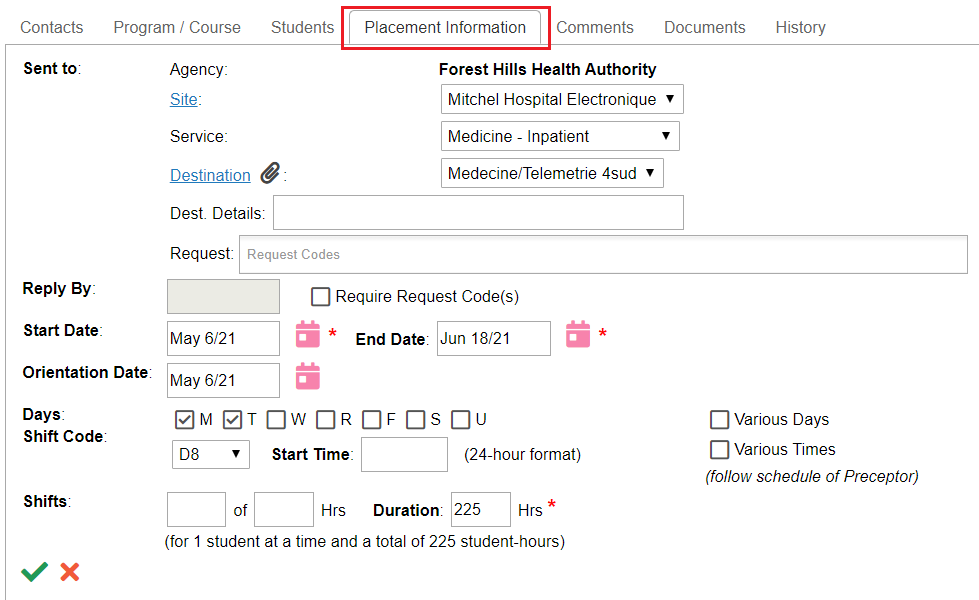
Placement Information Tab in the Placement Request Details Screen
- Links connect to the site and destination profiles that can be accessed by Placing Coordinators, instructors and students, the same way you can access their course and program profiles.
- If you have more than one destination in your access, you can switch the destination to another in your access area: for instance if you couldn't take them on 4 South, you could switch the request at the drop down list to 4 West. You must click the green check mark in the lower left to save any changes.
- The Destination Details is a text field that may or may not have information in it.
- Courses enabled to use Request codes will display the Request field. If any request codes are available for selection, you can see them and select them by clicking in that field.
- The Reply by field if entered is a date the requestor would like to receive an answer by. An "overdue" notice will remind you by e-mail.
- Days of the week are represented as follows: M - Monday; T - Tuesday; W - Wednesday; R - Thursday; F - Friday; S - Saturday; U - Sunday. These days normally appear on group placement requests; Various Days and Various Times usually are on Individual Placement Requests.
- Shift codes, when enabled are simple: D for days, and a number for shift length in hours. These can be selected from the drop down list. You can even enter the start time. Save the changes with the green check mark in the lower left of the screen.
- The Shifts field may have incorrect shift lengths for your unit as the default information in these fields are entered in the course profile before placement requests are made. The overall duration of hours is the most important figure there, so if you have a request for 10 eight hour shifts of 80 hours overall duration, in an individual placement that may be 8 shifts if your regular shift length is 10 hours for the same total of 80 hours overall duration.
|
|
|
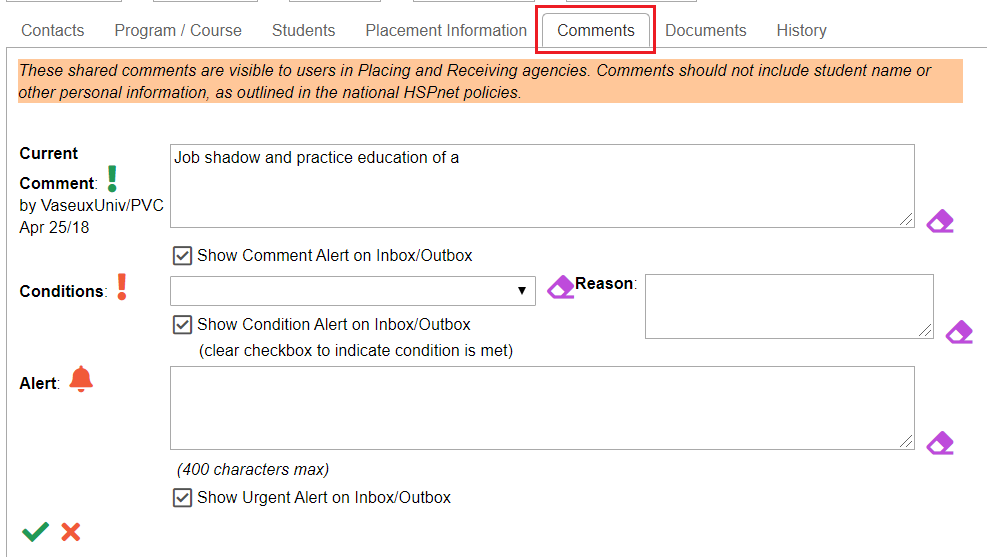
Comments Tab in the Placement Request Details Screen
The comments tab is where the following are entered and displayed:
- The comments field
- Conditions drop down list and reason text field for a additional information.
- The Alert text field.
Entering any text into the comments or Alert fields will clause the associated icon to display inside the details icon or outside of it when viewed in the inbox. Save these comments or conditions by clicking the green check mark in the lower left hand corner.
To clear these fields:
- Click the clear fields icon

- Save the changes with the green check mark before leaving this tab.
|
|
|
Documents Tab in the Placement Request Details Screen
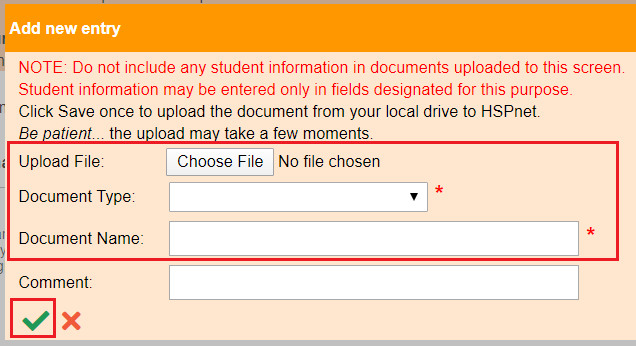
Documents are seldom uploaded on this tab by schools, but can be uploaded by them or, if you wish to upload a document specific to this placement:
-
- Click the add icon

- When the Add new entry window opens, click Choose File.
- Select the document type from the drop down list
- Enter the document name in the document name field.
- Save the changes with the green check mark.

|
|
|
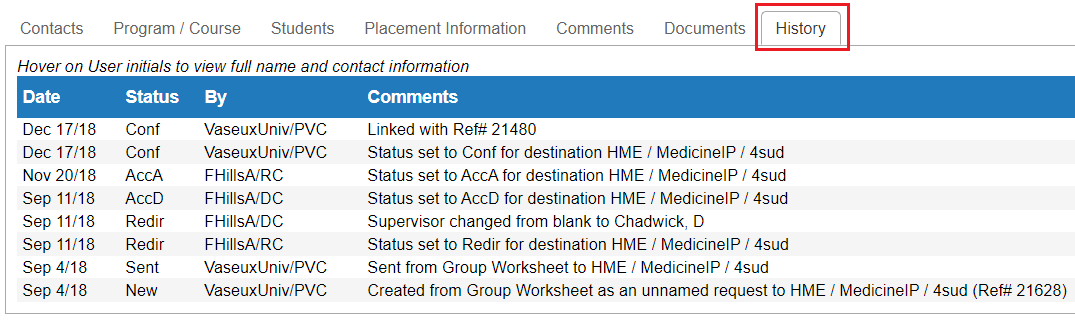
History Tab in the Placement Request Details Screen
History tables should be read from the bottom up. The left column shows the date an action happened. The status of the request is the next column - it only changes when there is a status change... so look to the comments column to see what change occurred in that entry, if the status has not changed. The By column indicates who made the change. Hover your cursor over their initials to obtain the full name.
|
|
|
Return to Contents
|
|
|
Schedules and Reports
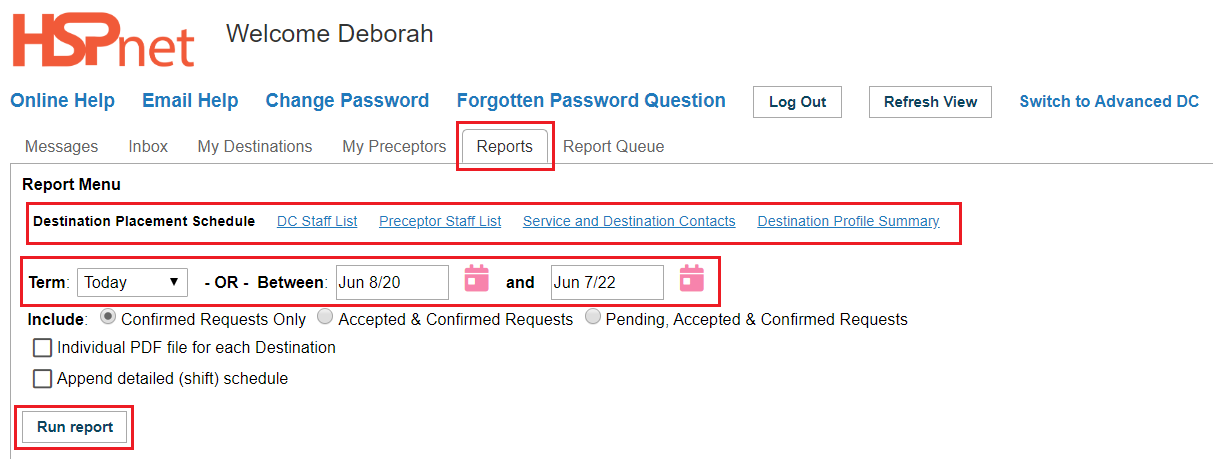
The Reports tab provides a menu of PDF reports that are popular among DC users:
- Destination Placement Schedule: create a report with the upcoming student placement schedule on a unit (you pick the start and end date and which status of requests to include).
- Supervisor Staff List: a list of all the staff in your department that have been or are willing to supervise a student. This report may also be called any of these names but they are all refer to staff you assign to be with students:
- Preceptor Staff List
- Clinical Instructor Staff List
- Clinical Educator Staff List
- Fieldwork Guide Staff List
- Mentor Staff List.
- Service and Destination Contacts (who is your Receiving Coordinator; who are other Destination Coordinators at your organization and what areas do they cover?
- Destination Profile summary: you can print the information entered on your destination profile.
To create a report:
- Select your Reports tab.
- Select the sub link of the report you wish to create
- For Placements and schedules, choose the term or use the two calendar icons (Select a date icon)
 to set the first date and the last date. to set the first date and the last date.
- Choose what status of placement request to include in the report.
- If you have more than one destination choose whether to make the report all in one PDF for multiple destinations, or select a single PDF for each destination. You also have the option to include a detailed group shift schedule (or individual if filled out).
- Click the button: Run Report.
To retrieve PDF reports, you need to select your tab: Print Queue.
|
There is also a 12 minute video: DC- Reports.
|
|
Print Schedules and Reports
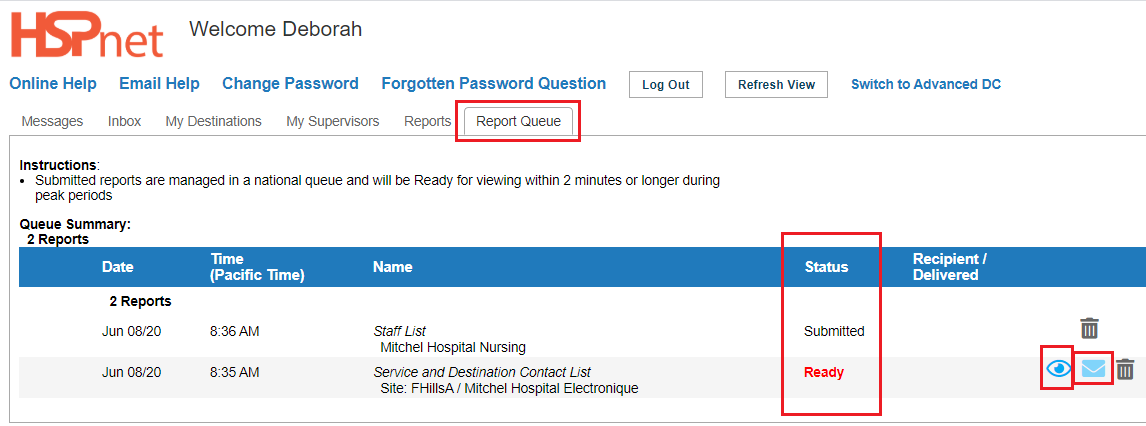
When you click the button: Run Report, above, the report is generated on the Report Queue tab. where it will be generated in sequence according to the time it was submitted. These reports can take up to two minutes to generate. You will need to click refresh view until you see the word: Ready, in red. (or wait a few moments before going to the Report Queue tab).
When reports display: Ready:
Click the Preview icon
-
- to view the report.
- use file save as to save a copy to your computer.
- click the envelope icon to e-mail the report to someone else. Click here to learn more about the E-mail Messages feature (different user guide/document).
- Use the garbage can
 icon to delete the report if desired. icon to delete the report if desired.
|
|
| |
|
|
Return to Contents
|
|
|
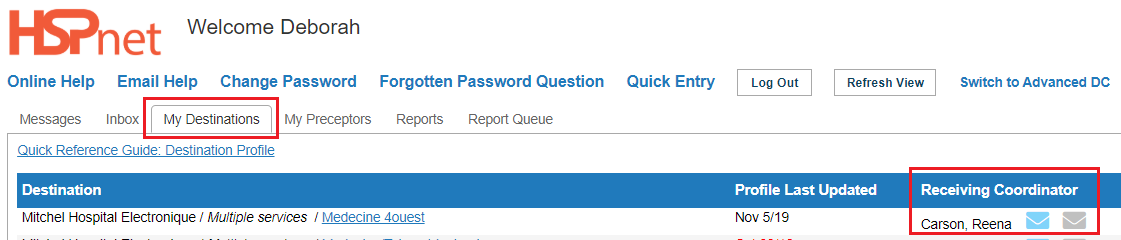
Review Destination Profiles
- A list of the destinations under your responsibility will appear in the tab: My Destinations. The “Last Updated” date will appear in red if the profile has not been updated for more than one year.
- Your Receiving Coordinator will be listed along with contact information.
- Click the link: Multiple services to see the services included.
- Click the link: Medecine 4Ouest to see the destination profile for 4 West; or click the link Medecine 4Sud to see the destination profile for 4 South.
For more information about destination profiles please see these other linked information guides/documents:
Receiving Agency Profiles: Destination Profile
Getting More from Your Destination Profile video.
|
There is also a 26 minute video: DC - My Destinations (about the destination profiles).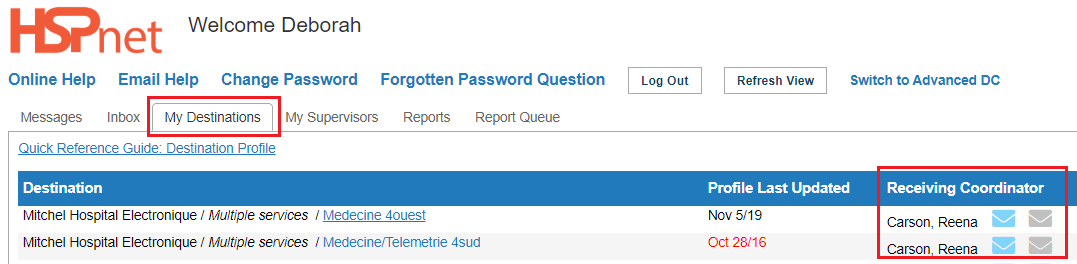
|
|
Return to Contents
|
|
|
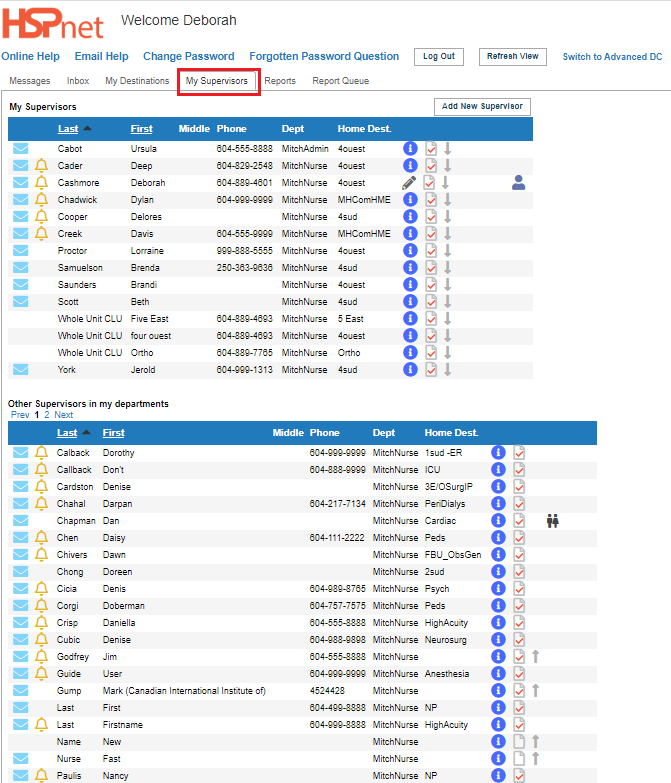
Manage Your Supervisors
Your next tab may appear as any one of the following names: (we will refer to them as supervisors in the directions that follow).
- My Supervisors.
- My Clinical Instructors.
- My Preceptors.
- My Clinical Educators.
- My Fieldwork Guides.
- My Mentors.
Destination Coordinators can add new supervisors on this tab (click the button add new supervisor), or you can add them directly to the drop down list on a placement request.
There are two categories of supervisors on this tab:
- My Supervisors: these should be staff members in the destinations where you are the destination coordinator.
  . The list of My Supervisors have down facing arrows (Remove from My Supervisors) icons on the far right of the column. . The list of My Supervisors have down facing arrows (Remove from My Supervisors) icons on the far right of the column.
- Other Supervisors in my Departments: these are staff in your larger site or agency wide department department(s)(Nursing, Physio, etc) but at a destination where you are not the destination coordinator.
  or: . The list of Other Supervisors in my Departments may have arrow keys pointing up (Move to My Supervisors icon) or there may be no arrow at all. or: . The list of Other Supervisors in my Departments may have arrow keys pointing up (Move to My Supervisors icon) or there may be no arrow at all.
Staff profiles that do not identify a home destination for the supervisor have an up facing arrow beside them, which enables a DC to “adopt” the supervisor into the category: My Supervisors.
To adopt a supervisor:
- Click the up arrow .
- When the edit window opens, select the staff member’s home destination from the drop down list. If the staff works in more than one destination, you will need to choose one destination, as only one destination can be entered per staff member.
- Save the home destination by clicking the save button (Green check mark).
- The home destination will now be listed in the staff profile . The red check mark in the profile indicates there is information entered in the profile now.
- Profiles with home destinations entered, do not show an up or down arrow to other DC users who do not have access to your destination(s); this means no other DC can adopt your staff member, unless you release that staff record back into the general pool in your department.
- To release a staff record to Other Supervisors in my Departments: Click the down arrow . You may need to contact one of your colleagues (another destination coordinator) to do this for you, as only the destination coordinator who currently has the supervisor in their department can click the down arrow. If you don't know who that is, please contact your local HSPnet Administrator/Receiving Coordinator/Service Contact.
- When the down arrow is clicked, the home department is removed from the profile . Other DC users can now adopt these supervisors for their listing of My Supervisors by clicking the up arrow .
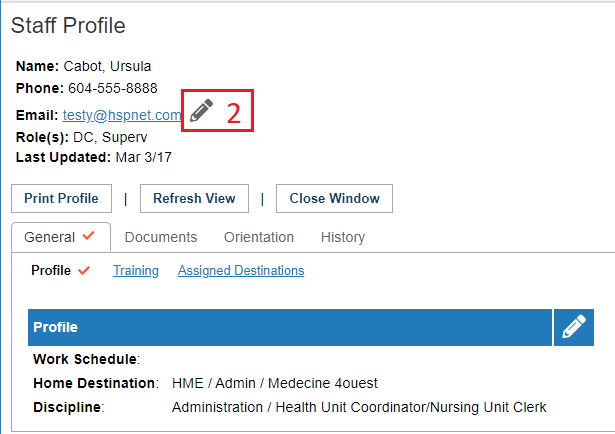
The details icon on this screen is view only . The fields visible include name fields, title, e-mail, telephone and HSPnet role.
The staff profile icon can be edited to update an e-mail or telephone address; you can also upload documents, track training and orientation.
Other Icons:
 Indicates this individual has an HSPnet user account and receives automated messages regarding Placement Requests. Indicates this individual has an HSPnet user account and receives automated messages regarding Placement Requests. Student names are hidden (This preceptor is assigned to students and the student names are hidden as this profile is not in your destination. Student names are hidden (This preceptor is assigned to students and the student names are hidden as this profile is not in your destination.
|
There is also a 16 minute video: DC - My Supervisors Tab.
|
|
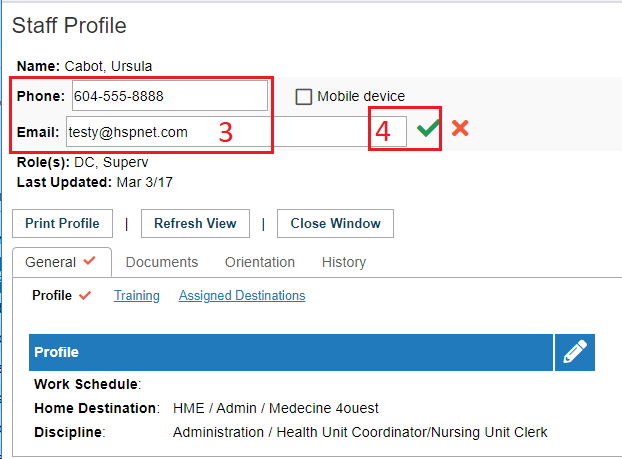
To update the e-mail address or phone number on a supervisor profile:
- Click the staff profile icon:
- At the top of the page, click the edit icon
 . .
- Update the – e-mail address and or phone number.
- Save the changes with the green check mark .
|
|
| Return to Contents |
|