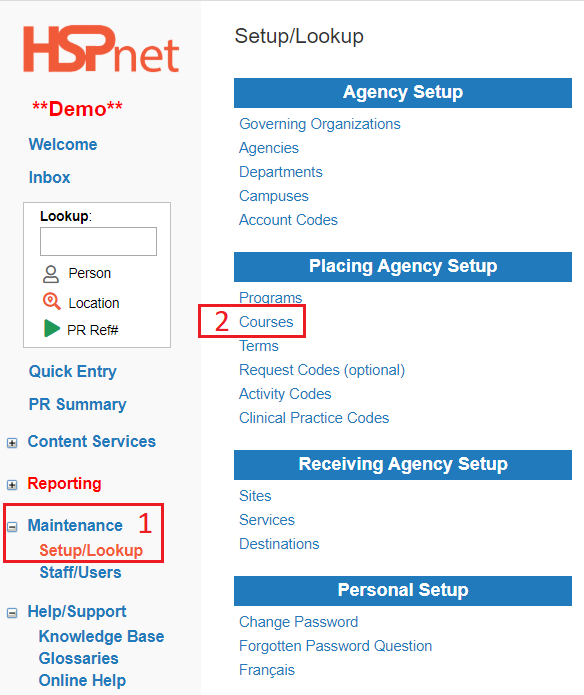
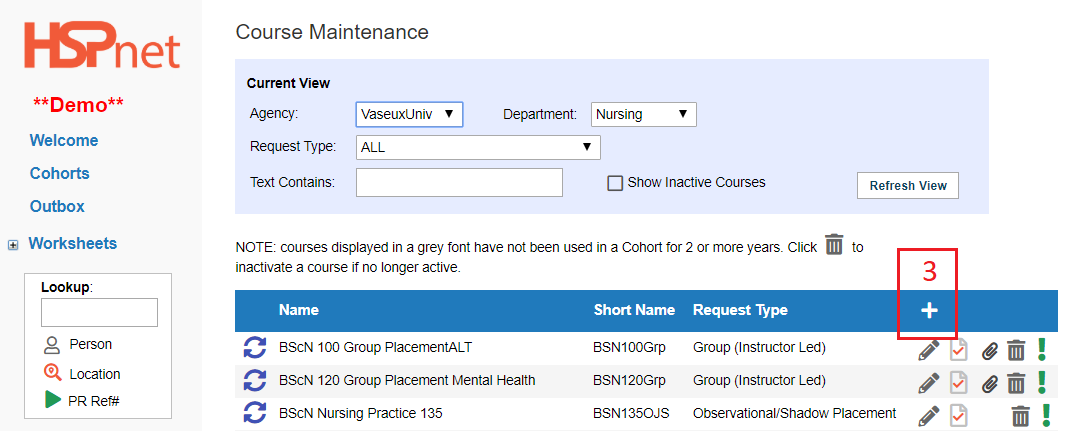
- Click: Maintenance / Set up / Look up.
- Click: Courses.
|

|
|
3. Click the add  icon . icon .
|
|
|
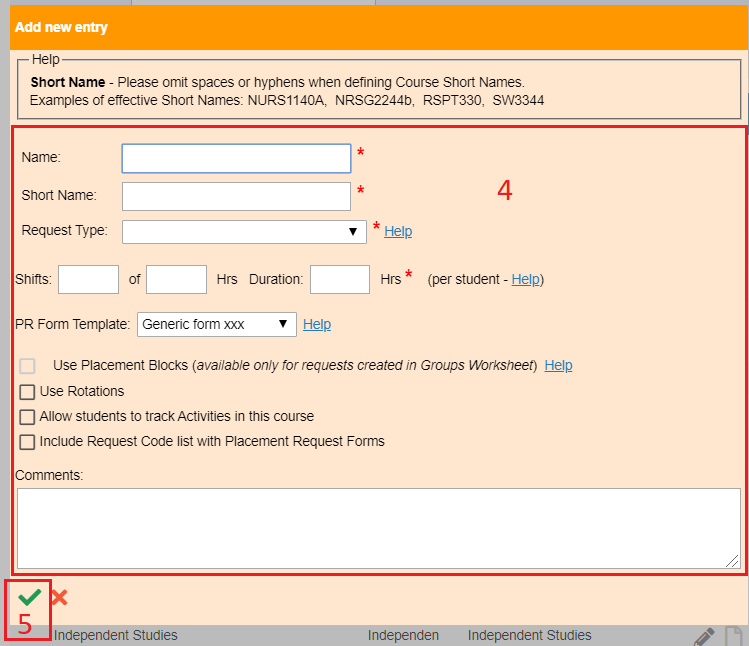
4. Give the new course:
- a full name.
- a short name (max 10 characters).
- choose a Request Type from the drop down list. To see the definitions of each course type please click: Glossary - Placement Request Types
- enter total duration hours for the placement. The over all hours/duration is the only mandatory field in this line. While there are fields for the number of shifts and hours per shift -- the true number of shifts and length of shifts could vary depending on where the placement is accepted. The fields are provided as in some areas the information may be conveyed that way, and entering both those numbers will automatically calculate and autofill the Duration field for you.
- click to place a check mark in the box in front of Use Rotations if you want to use rotations.
- click to place a check mark in the box in front of Allow students to track Activities in this course if your students have HSPnet user accounts and you want them to track their activities.
- click to place a check mark in the box in front of Include Request Code list with Placement Request Forms if you want to be able to list specific request codes.
5. Save the changes with the green check mark  . .
Click the sub-links in the text above to learn more about those features.
|
|
|
|
|
|
Populate the course profile:
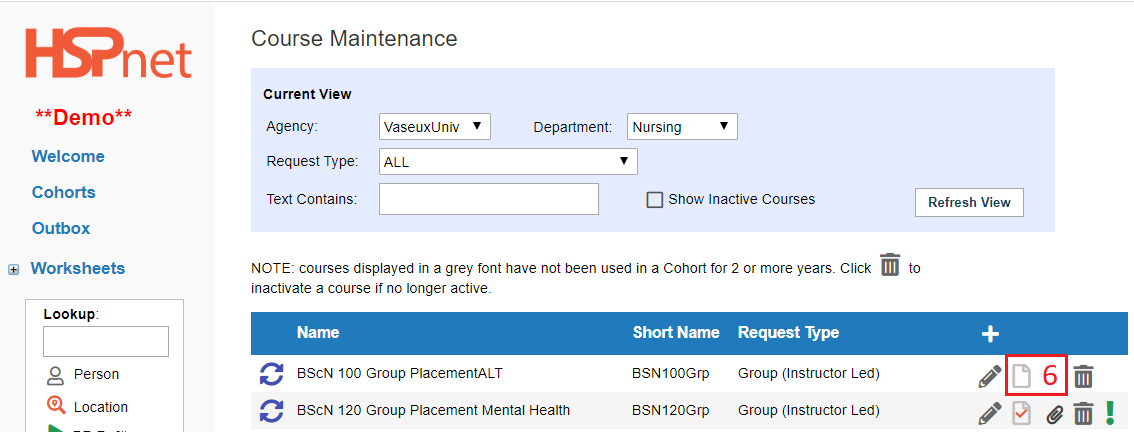
6. Click the profile icon adjacent to the new course to enter details about the course.
This information is important to fill out
Every single Placement request you make has a link to this information. When this information is not entered, the Receiving or Destination Coordinator may decline your request if they do not understand clearly what the course is about, particularly if they have more requests than they can accept and the other course placements they are considering do provide this information.
This information will also be accessible to any course leaders and instructors you have assigned to the placement request, if you issue HSPnet user accounts to course leaders and instructors.
Additionally, Receiving Agency supervisors with HSPnet user accounts will also be able to see this information.
|

|
|
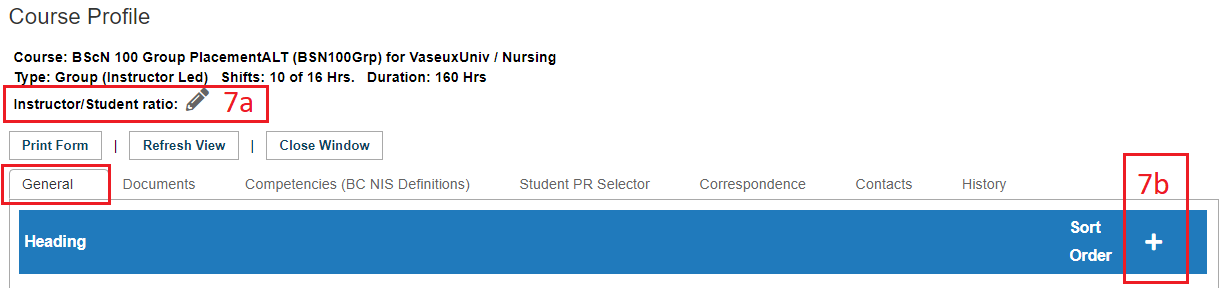
7a. Click the edit icon  to enter an instructor to student ratio and save the change with the green check mark . to enter an instructor to student ratio and save the change with the green check mark .
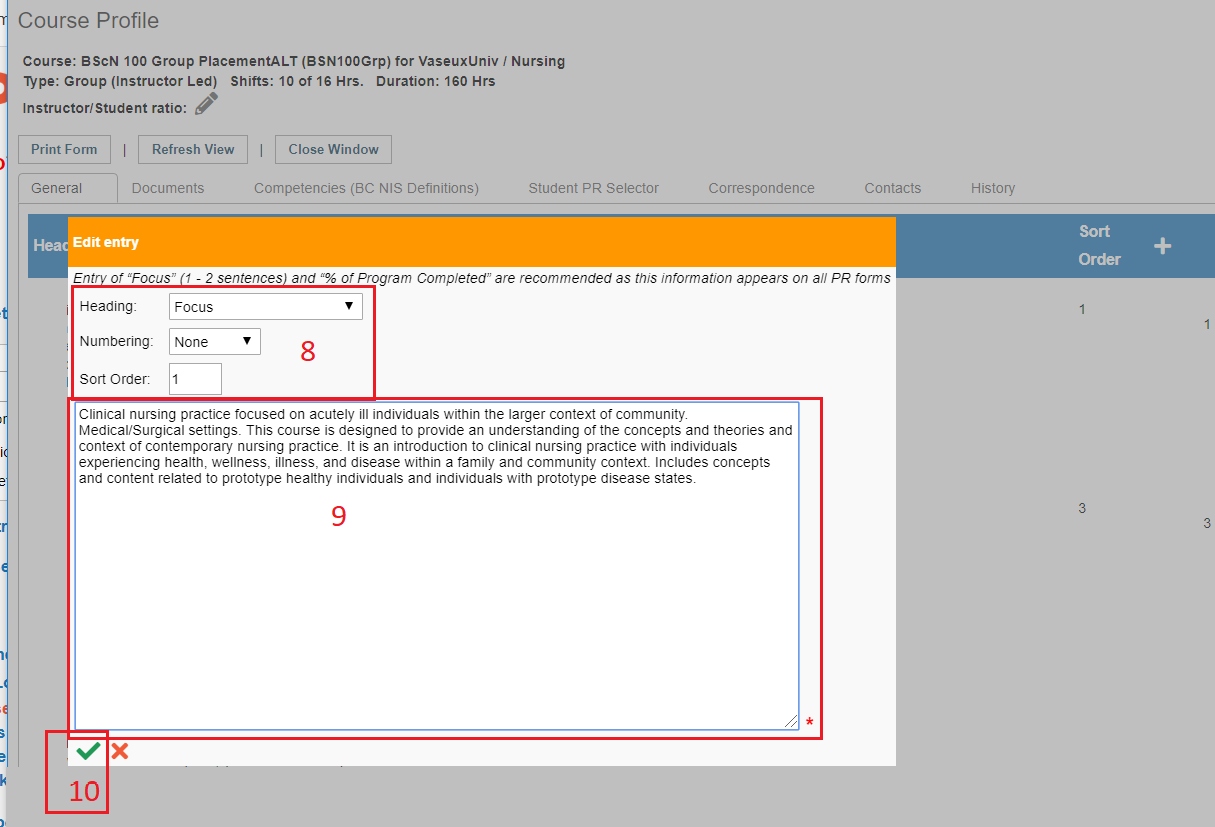
7b. In the "General Tab" Click the add icon  to initiate adding a course description. to initiate adding a course description.
|

|
|
8. Select headings from the drop down lists if desired (Heading/Numbering) and enter a number in the sort order field to determine how the information should display.
9. Enter text.
10. Save the changes with the green check mark and click the button Close Window.
|
|
- When you have saved any information entered under a course profile tab, a small red check mark
 icon (data exists) appears beside that tab, alerting all users that there is information entered under that tab. icon (data exists) appears beside that tab, alerting all users that there is information entered under that tab.
- After you save information with the add icon, a pencil icon allows you to edit the information (save the changes with the green check mark .
- The garbage can
 icon allows you to delete it and start over again. icon allows you to delete it and start over again.
|
 
|
|
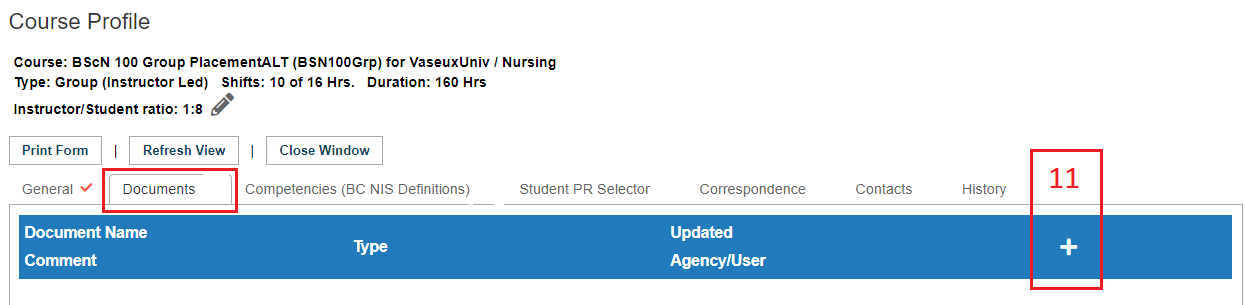
To Upload documents: (EG: Course manuals, assessment forms, Syllabus, instructor or preceptor guides). This information is also linked to every single placement request and can be accessed by HSPnet users: Receiving Coordinators, Destination Coordinators, assigned Course Leaders and Instructors and Receiving Agency supervisors who are assigned to a placement request.
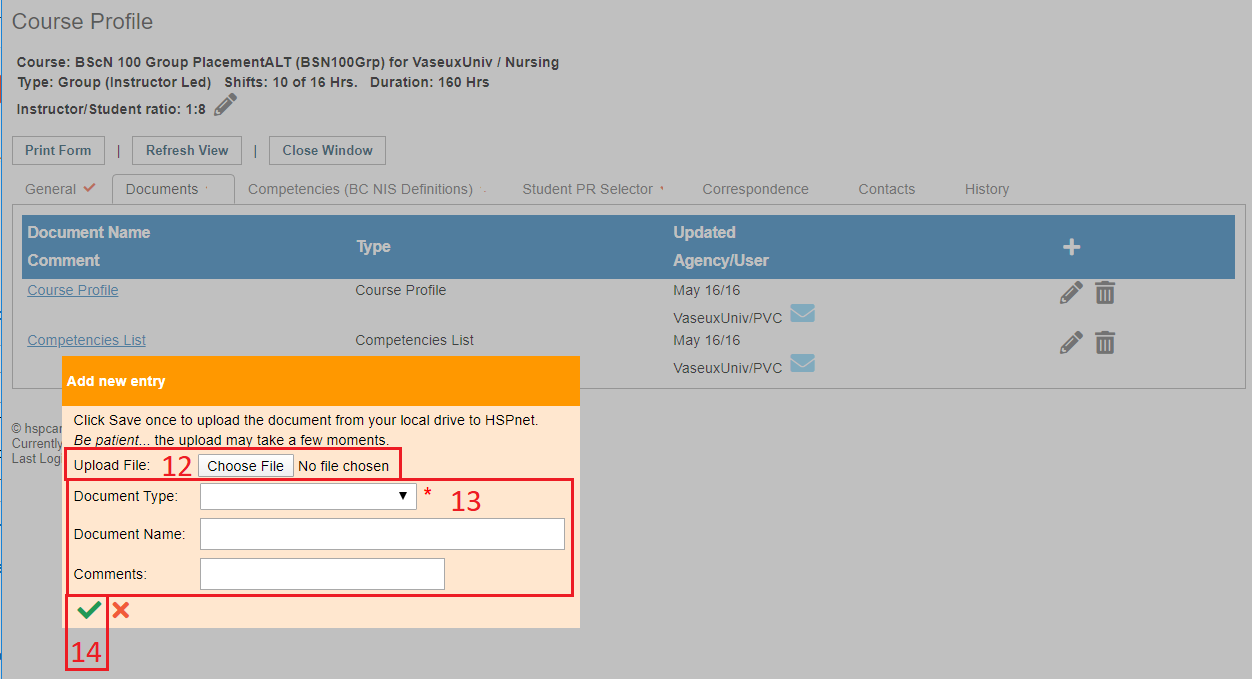
11. Click the add icon 
|
|
|
12. Click "choose file," and locate on your computer
13. Identify the type of document, name and comments
14. Save the changes with the green check mark and use "Close Window."
New courses will appear in light grey font until they are used in a cohort or quick entry; courses not used in the past two years also revert to a light grey font but still may be used.
|

|
|
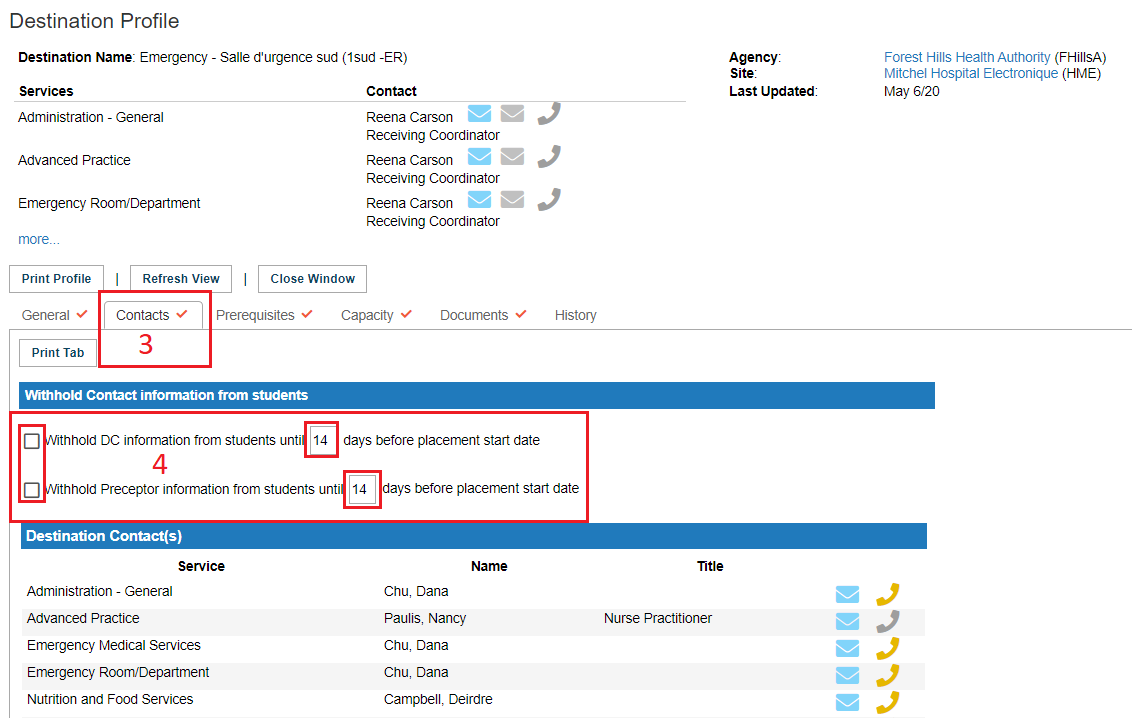
Use the contacts tab to limit student contact with instructors, destination coordinators and supervisors:
- The Contacts tab can be used by Placing Coordinators to enter limits as to when they want the students to be able to access contact information for that placement.
- Click to place a checkmark in the box adjacent to the feature you wish to activate, and enter any number above 14 to set the date when the student can contact the instructor, Destination Coordinator or the assigned supervisor. There is no save button required for this feature.
- This can also be set up by the receiving sites or a PC can set it up at a non user Receiving site: Click the link: Student Admin - Block Access to Instructor, DC, or Supervisor Contact Information for Receiving Coordinators.
|
|
|
Other Useful Links to help you populate a course profile:
- In our example there is a tab for Student PR Selector - student site selector. This is an optional feature, so that tab will only display if that feature has been turned on for the program. (Default template needs to be set up in the course profile once the feature is turned on and also need specific dates added to the default template once the course has been added to a cohort.
- The Correspondence Module tab is another tab that only appears if you use the correspondence module.
- Not pictured in this example is the Student Assessment Module which also requires some set up in Course Maintenance.
|
|