
Correspondence Module - Setup and Use

Placing & Receiving Agency Related Guide (PARG RARG)

Summary:
The Correspondence Module allows you to generate customized documents, with HSPnet data inserted, for distribution as Letters, memoranda, notices, or forms; in limited situations text may be broadcast via email. We also have a recorded webinar on the use of the correspondence module.

image.png

Background

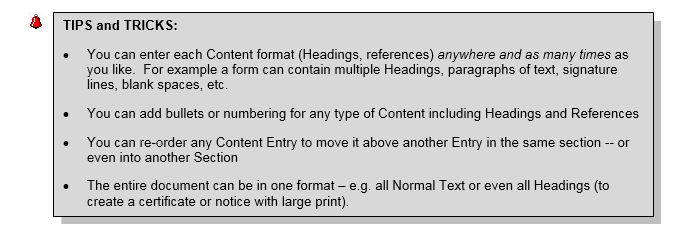
CORR tools allow users to draft document Templates for their own use and by other users in their Department. Document Templates can then be used to generate either traditional Letters (with address, signatory, cc recipients, etc.) or "free form" documents like memoranda, notices, or forms. Documents can be generated from the template for recipients involved with placements (site contact, preceptor, student, instructor), and then distributed in PDF format (with optional logo) for delivery via print or email, in text format for local revision, as data in Excel format, as mailing labels, or (with special setup) as an email broadcast.

Preparation – Department/Program Setup (to enter address and/or logo for letterhead)

  1. Under MaintenanceSetup/Lookup click Departments or Programs to modify setup: 
    • Click the Edit icon  to enter a Department address. If no Department address is entered, then Agency mailing address will be inserted into Letters generated from CORR. 
    • Click the Profile icon  to upload a Department (faculty/school/site) logo. Once uploaded, click to generate a PDF sample of the logo and Department address.

NOTE: JPEG format is highly recommended as this image type can be used in Correspondence and inserted into other forms generated by HSPnet.

Step 1 – Create a New Template

  1. Under Content Services  Correspondence, choose a category for the new letter, such as "Confirmation Letter" or "Preceptor Recognition". Click  to create a new template in that category.
  2. In the Correspondence Template Maintenance window, enter a title for the letter, such as "Confirmation Notice" or "XYZ Project Update" and select at least one Content Author from the dropdown of Placing or Receiving Coordinators in your Department.
  3. Indicator whether the document is to be generated for Placing Agency or Receiving Agency data:
  • Placing Agency – documents will be generated for one or more Courses in a Cohort/Term;
  • Receiving Agency – documents will be generated for one or more Destinations, Sites and Agencies.

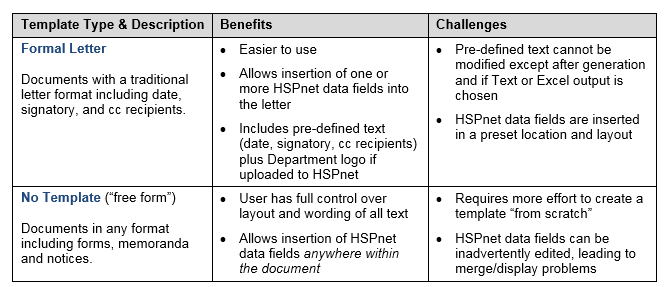
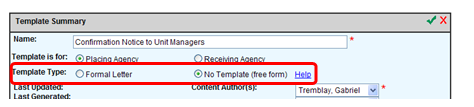
 1. Select a Template Type: see the table below for an explanation of "Formal Letter" versus "free form" templates.

  1. Enter a comment to describe the document Template if needed, and click Save  to continue. Once you save the Template, new Category links will appear after the Summary & Authors link:
  • Content – for entry of the subject, opening/closing paragraphs, and postscript (Formal Letter) or free form text for headings, text and references (No Template).
  • HSPnet Data – the data fields to be included in the middle of a Formal Letter; NOTE - this link is not displayed for No Template documents since HSPnet data is inserted directly within the Content at any time.
  • Generate Correspondence – filters to select courses or sites, addressees and signatory, letterhead contents, and other variables for the letters to be generated

Step 2 – Enter the Letter Content (Formal Letter)


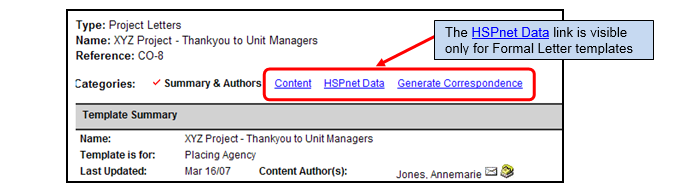
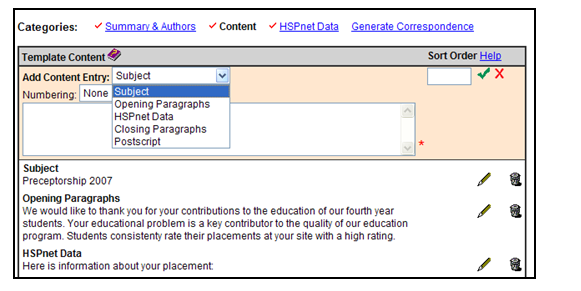
Click Content and build the template for your Formal Letter:

  1. To enter an optional Subject select this option from the "Add Content Entry" dropdown, enter text for the Subject and click Save  .

2. Add an Opening Paragraph as per Step 1 but select "Opening Paragraphs" as the Content Entry type. Repeat as needed to add additional paragraph.

3. If you want to include HSPnet Data fields between the Opening and Closing paragraphs, you may want to insert an explanatory sentence to introduce the data, such as … "Here is information about your placement:"

4, Entering one or more Closing Paragraphs as needed, and an optional Postscript (PS: …)


Proceed to Step 5 to Generate Correspondence using the Formal Letter Template.

Step 3 – Enter the Document Content (No Template)

  1. Select a Content Entry - When using the No Template option you are working from a "blank page" – you must define all text that will appear in the document. You can control the text format and even insert a signature by selecting from one of the following options under "Add Content Entry":
    • Heading – 12 pt. bold font, suitable for form titles and major headings;
    • Large (11 pt) or  Normal (10 pt) text , plus options for Bold, Italics, or underlined text;
    • Blank row – inserts a blank row in the specified location (useful for creating space above a signature line or for separating paragraphs);
    • Signature image – displays a dropdown of Placing or Receiving coordinators in your Department, and inserts their signature image if a signature image is uploaded in their Staff Profile.

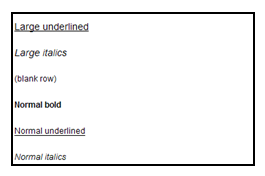
As you enter different content types, the saved text will appear in the selected font/size on the Template screen (blank rows will appear as a caption only).


This display is sometimes referred to as WYSIWYG, or "what you see is what you get".

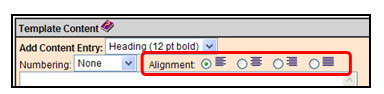
2. Change text justification as needed by changing from the Left alignment default to right, centered or full justification:

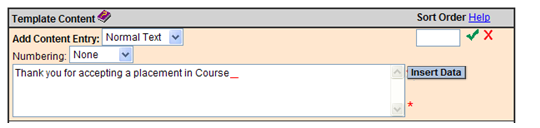
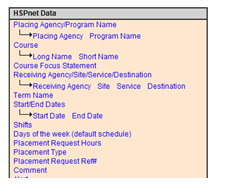
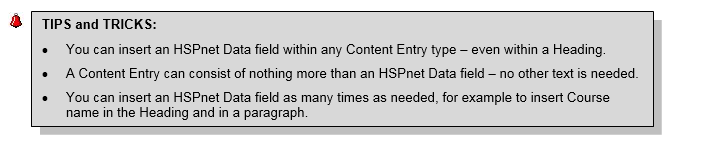
3. Insert HSPnet Data within your text


The No Template option allows you to insert HSPnet data fields anywhere within your Content: - Position the cursor within a Content Entry text field, preceded by a space or colon if needed to separate it from the preceding text. In the example below, the red line indicates a space inserted after the phrase to introduce the course name.

  • Click  to view a popup window listing available data fields for insertion:

  • Select a data field from the list, in this example click Course (long and short names) or click Short Name to display only course number (e.g. Pharm305).
  • This will insert a Data Placeholder such as <<Course>> into the text field (see below). Insert a period to end the sentence, or insert a space before adding more text or another HSPnet Data field.

NOTE: If you insert another data field within existing text (e.g. by placing the cursor between two words) the Data Placeholder will be inserted at the end of the text box, and you will need to cut/paste the Data Placeholder including brackets (e.g. << xxxxx >>) to the correct location within the text box. Ensure that the spaces and punctuation around the Placeholder are correct before saving.

  • Enter signature image if the document is a letter or memorandum requiring signature, by selecting the Content Type "Signature Image" and the appropriate signatory. Note that only one signature image per document can be inserted at this time.
  • View your document before printing by clicking Preview  next to the Content link:

Step 4 – Generate Correspondence


The following steps apply to either Formal Letter (FL), No Template (NT), or both (B).

  • Select the radio button for either Courses (to select recipients based on requests in one or more courses) or for RA Sites (to select recipients for a set of receiving sites):

    •  (B) For Courses, select the Department, Program, Term; select one or more Courses and click to add to the "Included" list; click the checkbox for each Status to be included;
    •  (B) For RA Sites, select one or more Agencies and click to add to the "Included" list;
  • (FL) Enter a letter date or leave blank for today's date.

  • (FL) Enter 1, 2 and so on for the Addressee. For example enter "1" for Dest. Contact to address letters to the unit, and "2" to use Service Contact as the addressee if Dest. Contact is blank.

  • (FL) Select a signatory from the dropdown of Placing/Receiving Coordinators in your Department.

  • (FL) Click the checkbox for any individuals to be copied at the bottom of the letter.

  • (B) Select the output to be generated:

    • Single PDF file – best for producing a single document that can be printed locally for fax or mail delivery;
    • Individual PDF files – best for sending individual documents as email attachments;
    • Text – can be opened in a word processor for formatting or editing;
    • Excel – produces a spreadsheet that can be used for local mail merge with a word processor;
    • Email (1 per PR) (FL only) – due to the high risk of unintended spam, this option is available in limited situations only to PC/RC Local Administrators with the appropriate training;
    • Mailing labels – produces a txt file suitable for column setup in Word for label printing.

NOTE: Logos can be automatically inserted in PDF file output only.

  • (NT) For courses involving Group placements (multiple students per placement) check the "Separate page for each student" checkbox if an individual document is needed for each student in the Group.
  • (B) Click to generate a list of records that match the Course/Site selections made above.

Step 5 – Select Recipients
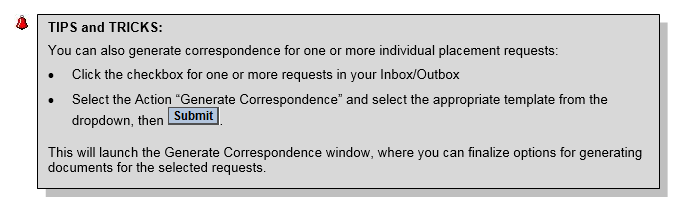
  • For Courses, a list of Placement Requests will be displayed. De-select the checkbox for any record you wish to exclude from the CORR output.

  •  For RA Sites, select one or more sites and click to add to the "Included" list.

  •  Click or to generate the output for each selected record.

    • If a single output file was requested (e.g. single PDF, Text, Excel) the output can be viewed by clicking the Correspondence link that is displayed when the screen refreshes;
    • If multiple documents were requested (individual PDF files) then a message will be displayed indicating that the documents are being added to the Report Queue as they are generated. Click Reporting  Reports Queue to view and deliver the individual documents.

Things to Remember

  • Document templates are shared across a Department, so other users in your Department can use Templates authored by you to generate documents based on their data. The Templates screen defaults to those authored by you; select "All" to view templates authored by other users in your Department. Regardless of the Template author, step 4 would generate correspondence only for the user's allowed data (e.g. a Destination Coordinator could generate Preceptor recognition letters only for staff who supervised students within her allowed Destinations).
  • You can use the Copy icon  to create a new Template from an existing Template (any Author in your Department). The current user will be assigned as author to the new copied Template.