
Student Admin - Automated Student Uploads

Placing Agency Related Guide (PARG)

Summary:
This guide explains how to perform an upload or mass update of demographic information for Students (e.g. name, contact information) by direct upload of an Excel file to HSPnet by either the Enrollment Worksheet in cohorts or the Student Maintenance screen. You can also watch a video on this topic. It is recommended you print these directions if needed (use Landscape setting) and watch the Student Admin - Automated Student Uploads Video.

Background 
All internet transactions via HSPnet are secured with industry standard encryption, and this provides a secure option for adding or updating student demographic information via HSPnet. The ASU feature allows a PC Local Administrator or Student Administrator to:

  • Upload student lists in the Student Maintenance screen, for addition to the student database only, OR
  • Upload student lists in the Enrollment Worksheet, for addition to the student database AND enrollment to a Cohort in a single step.

Supported Uses
Update of student demographic information via direct upload of a data file is appropriate for adding or updating multiple records in the following situations:

  • During HSPnet implementation so an educational Program can populate student data in HSPnet;
  • When creating a new Cohort of students, e.g. the Fall intake of new students;
  • To update contact information  (phone/email) for students, e.g. to add email addresses if the student names were uploaded previously without email or to add a phone number for contract tracing.

Upload File Specifications
You may need to contact your Information Systems (IS) department for instructions on generating a data extract from your student information system. For example, most student information systems allow users to generate an Excel list of students enrolled in an educational Program. In other cases, the IS department will need to generate the extract if your system does not allow you to do this on your own.

Allowed file formats - data can be uploaded directly as an Excel file only. A sample Excel template is available when you start an upload (see Step A). If your upload file is in CSV (comma separated values) format, you will need to open the file in Excel and save as an Excel workbook before uploading it.

Correction of errors – the following corrections should be made before uploading a data file to HSPnet because in most cases the errors will need to be corrected before completing the upload:

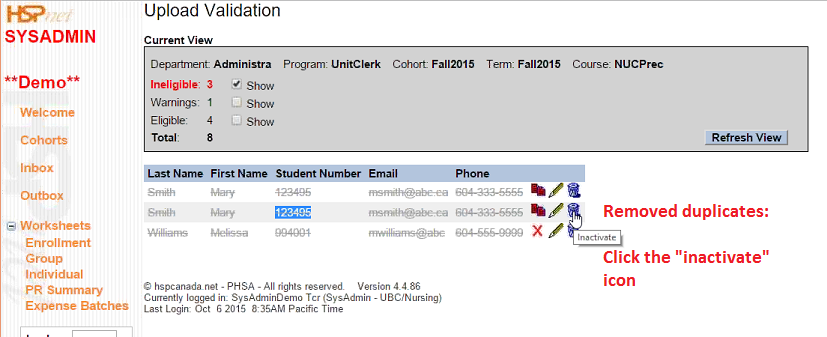
  • Remove duplicate students
  • Remove any non-text characters like brackets or numbers from student names - e.g. "(Smith)" or "Jones2" will be flagged as an error
  • Change names that are all upper case (e.g. JOHN SMITH) or all lower case (e.g. john smith) to an appropriate format (e.g. John Smith).

Mandatory data (in separate columns):

  • Last name
  • First name
  • (primary) Student number

Optional data (in separate columns):

  • Middle name
  • Home phone and/or alternate phone
  • Secondary email address
  • Secondary student number and Placing Agency 1 that issued it (e.g. the College where students completed the first two years of a collaborative or transfer program)
  • Student gender – e.g. M/F, Male/Female, or male/female
  • Primary email address as issued by the Program – e.g. smith@123college.ca
  • Alternate email address
  • Campus This column must contain a value that exactly matches the name (e.g. University of BC) or short name (e.g. UBC) as entered in HSPnet
  • Address – can include Address1, Address2, City, Province, Postal Code, and Country

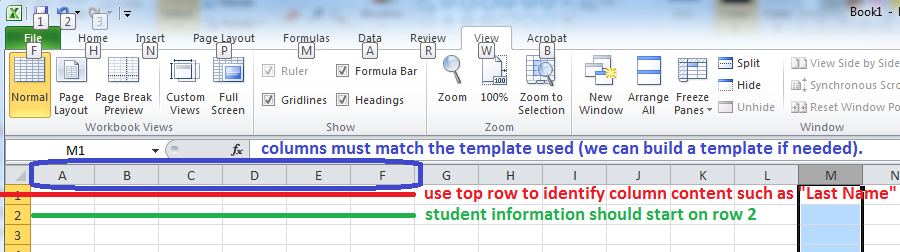
Prepare your Excel Spreadsheet. 


Requirements:

  • Do not use a title.
  • Place the "Header Row" on line one of the excel spreadsheet (This identifies the information that will be in each column directly below, such as "Last Name."
  • Do not have blank lines above or below the header row.

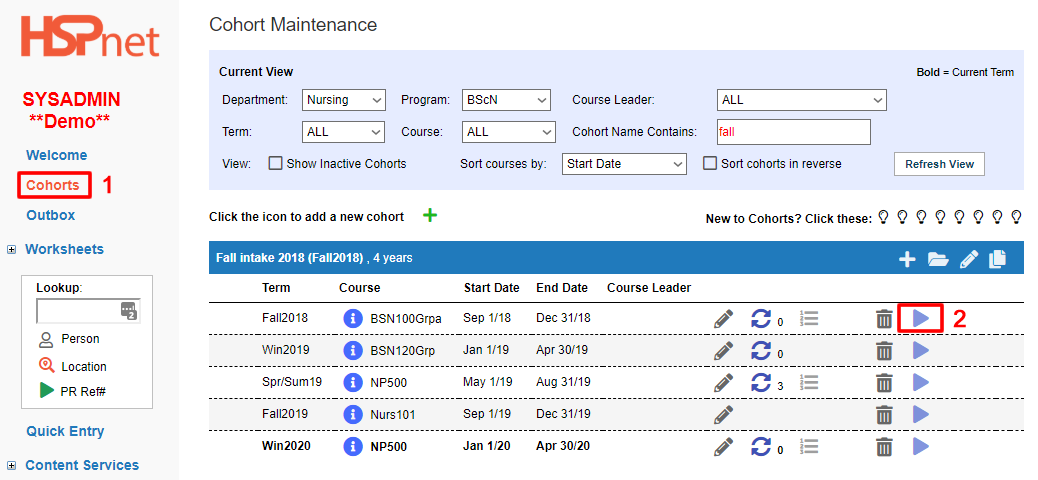
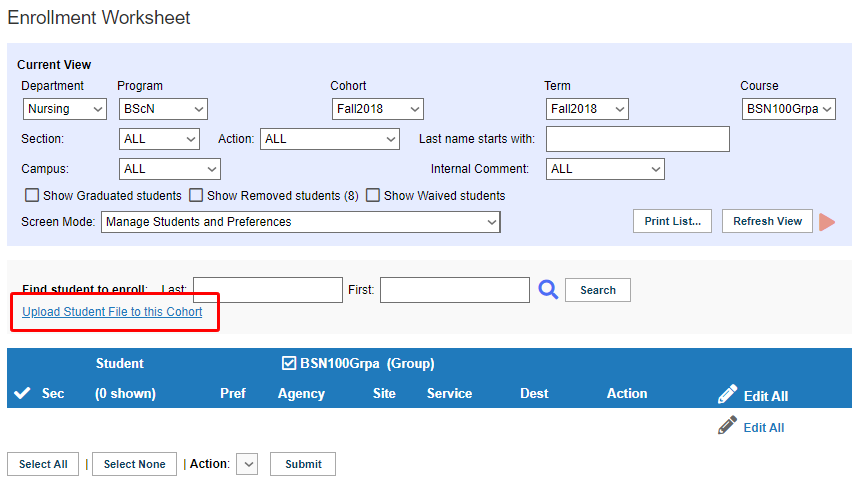
To upload the information from the spreadsheet: 

  • Setup/Lookup / Students – click Upload Student File to database; OR
  1. Cohorts
  2. Navigate to the Enrollment Worksheet  goto enrollment.pngfor a cohort

  1. Click the link "Upload Student File to this Cohort."

**For an unstructured Cohort, students must be uploaded to each Course.

Review the available Upload Templates


Select a template from the "Upload Template" drop down list

  • The top line of the Excel spread sheet should match the template you choose
  • In this sample the Excel spreadsheet needs to have the "header row" in row 1 (Last Name, First Name, etc); student data starts on row 2 of the Excel spreadsheet.
  • Column A on the Excel spreadsheet is Last Name. Column B is first name; Column C is Middle name/initial, etc.
  • If no template exists that matches the top line of your excel spread sheet, click the link to Request a new Upload Template that would be customized to match your extract. This link will launch an email to Help Desk, with instructions for you to attach a sample data extract from your student information system.
  • If you have no data in some of the columns but the columns correspond with the template, then you do not need to request a new template. For example, if your upload is Col A: Last Name, Col B: First Name, Col C: Student Number Col D: email, you would use the standard HSPnet template even though Column E (area code) and F (phone number) are blank. The system will upload the other 4 columns and leave area code and phone number blank.


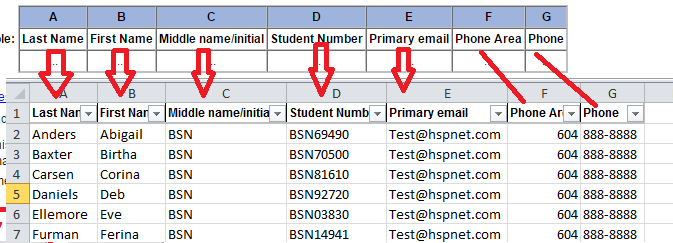
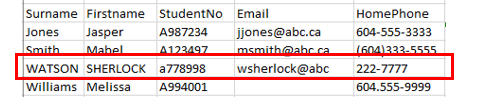
Always review your upload file before starting an upload.


In this example, one student record has a few errors to be corrected:

  • Student name is ALL CAPITALS
  • Student number is not consistent (lower case "a")
  • Email address is incomplete (missing ".ca")
  • If your student id's having leading 0s, you need to format the cells for all the student ids before you add the data as TEXT then it will keep the leading 0s. If you do not, it will strip those before it it is entered into HSPnet.

These errors can be corrected in the Excel file before upload (recommended), or in the validation screen  before processing the upload.


NOTE - the phone numbers in the sample are formatted inconsistently (e.g. mixed use of brackets/hyphens, missing area code) but this will be corrected automatically by the upload so long as either 7 digits (e.g. 222-7777) or 10 digits (e.g. 604.222.7777) are entered.


Upload your student data (using an available Upload Template)


  1. Choose the template

  2. Click to place a checkmark in the box in front of "This upload Files contains Students who have submitted a Consent form authorizing their personal information to be added to HSPnet for their education program of x.

  • Students in the upload file that are already in the database, but consented to a different program, will have their record updated automatically to the consenting program of the current upload if their consent has not expired for the previous program. If you receive a warning that a student with with that ID already exists in the system, but no other information, please contact e-mail help. HSPnet support will need to know:
      • Student number
      • Student names (first and last when available, as some student names may have changed.
      • The new program the student has consented to, and the date of that consent.
      • HSPnet support will unexpire the student consent, update the program of consent and update the name field(s) if required.

    6. Click "Choose File" to select the Excel file from your computer


  1. Click "Upload file."

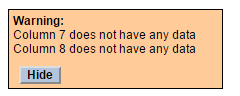
The data file will be compared to the selected Upload Template, and an error will appear if the number of columns don't match the template. In this example, the Upload Template was built for 8 columns of data, but columns 7 and 8 in the upload file have no data. This suggests that the wrong Upload Template was chosen, or a new Upload Template should be requested because the format of your local upload file has changed since the template was built.

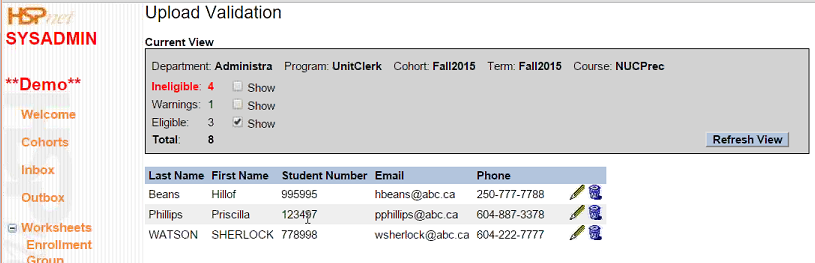
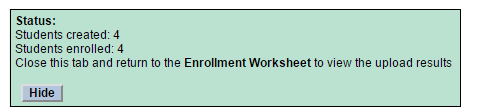
If the data file matches the selected Upload Template, a success message will appear and the Upload Validation screen will open in a new browser tab


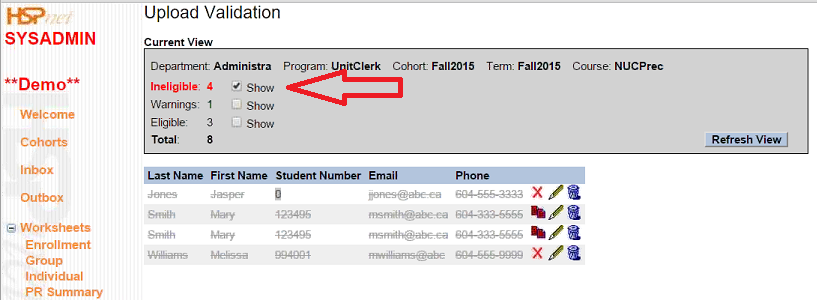
The Upload Validation Screen opens. If all is well, and you see the button: click "Process Upload."
If the button does not appear the upload cannot proceed until corrections are made.

  • We HIGHLY recommend all users review the 9 minute video: "Student Admin - Automated Student Uploads Video," prior to working with the validation screen. This video can be accessed from your welcome screen: Click "Help/Support" Resources/Training Videos.

  • If any records appear Red/Ineligible, the upload cannot proceed until the Excel list has been corrected.

    • Click to remove the check mark in front of "show." Ineligible and warnings.

The validation screen after uploading our sample Excel file of 8 records has:

  • Ineligible records (due to errors that must be resolved)
  • 1 Warning, and
  • 3 Eligible record (no errors or warnings).

It is showing 3 as only the Eligible show has been checked.

  • To work on the eligible records first to correct them. Use the edit icon image.png

    • In this example we are editing the name that is all CAPS
  • Save Changes with the green check mark image.png

  • Click to place a check mark in front of "Show" to bring back the ineligible records.
  • Ineligible records appear as strikethrough to signal that they cannot be processed as is.
  • Place you mouse over red X or other red icon to view the error messages examples below:

 (Warning) - a student with the same name already exists in the database, but with a different student number. This is a warning only and can be ignored if appropriate (e.g. duplicate students may exist with a common name like John Smith). However this may be an error to be corrected – e.g. if the student in the upload file has an incorrect student number and is in fact the same student as the one already entered in the database.


(Error) - a student with the same student number but a different name already exists, and this number cannot be used again.

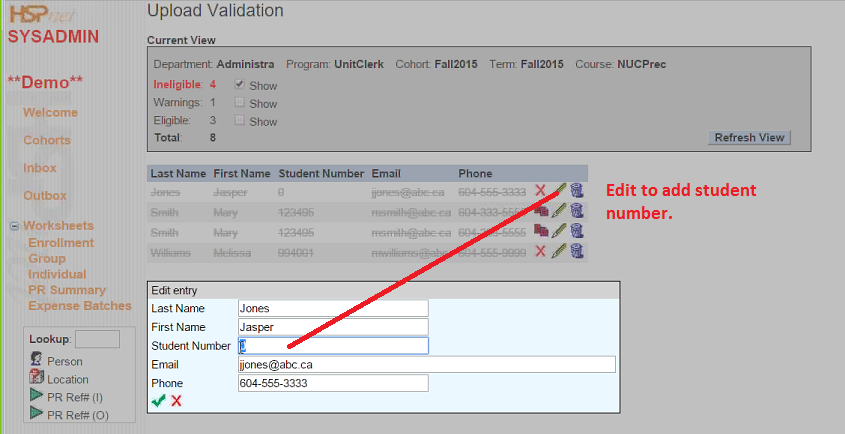
Solution: If the upload file has an incorrect student number, click Edit to correct the student number before continuing. 


(Error) - the student email address is incorrect (e.g. missing ".ca" at the end) or the phone number is incorrect (missing or extra digits). 

Solution: Click Edit  to correct the contact information and save your changes. NOTE - this would also be a good time to fix the problems with upper/lower case in the student name and number.

----

 (Error – not shown in the above example) – a student appears more than once in the upload file. 

Solution: Delete the duplicate records so that one of the records can proceed.


(Warning – not shown in this example) – the student is already enrolled in the Cohort and will be skipped when processing the upload. However their contact information will be updated if you mark the checkbox to "Update contact information for existing students"


  • Save the changes with the green check mark. 
  • After saving the correction, the warning/error icon will disappear and the record would be eligible for upload:


  • Correct all ineligible records.

  • Correct any warnings. You will get the button "Process upload" if your Excel file can be uploaded.

  • Click Process upload. 


When updating Student information that has already been uploaded:

  • If the upload file contains any students that were previously entered in HSPnet, click to place a check mark in the box in front of: Update contact information for existing students
  • click Process Upload.


  • A green window with a message should advise how many students were updated and the number enrolled. 
  • Close the browser tab for the Upload Validation screen and return to HSPnet. If you started the upload from an Enrollment Worksheet, refresh your screen and the upload results will now be visible.

Things to Remember

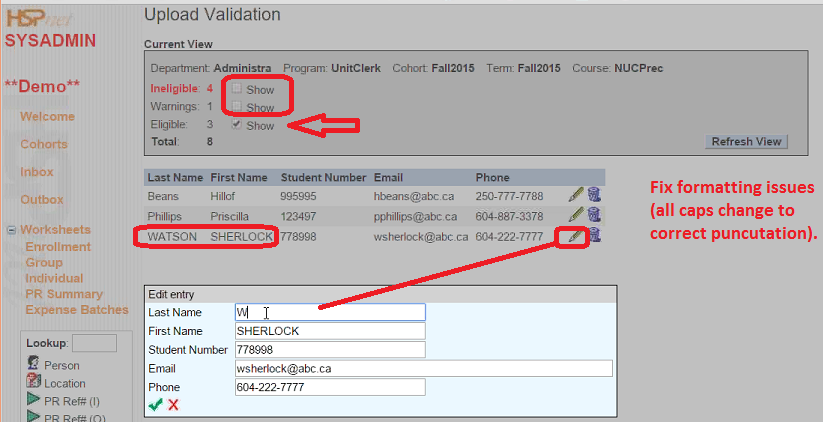
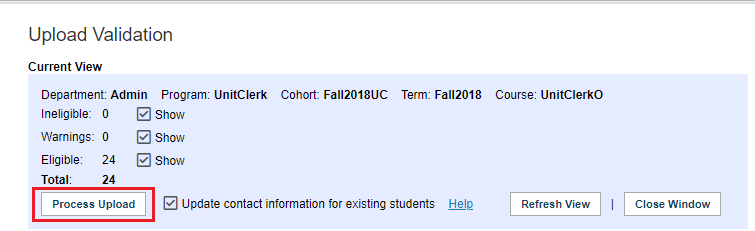
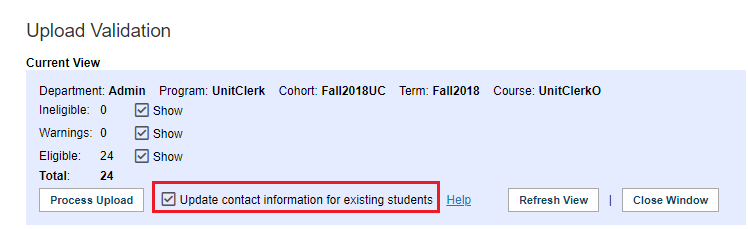
  • Data files of any size (1 student or hundreds) can be uploaded via this feature. For large volumes of students, you may wish to clear the checkbox for Eligible records in the Upload Validation screen to focus on errors and warnings.
  • You can repeat an upload to update contact information only, or clear the checkbox to "Update contact information for existing students" if you aren't confident that the current upload file contains up-to-date contact information.
  • Always double-check the contents of each column in the Upload Validation screen – for example be sure that the First and Last name columns are not reversed. If you notice a problem, do not process the upload, instead try a different template or contact Help Desk for assistance.
  • Whenever possible, students should be uploaded to a Cohort in the Enrollment Worksheet, because this adds/updates their record in the student database AND enrolls them in a cohort at the same time. Uploading students from the Student Maintenance screen will add their record to the student database only, and you will need to repeat the upload in the Enrollment Worksheet (or enroll them manually) to add them to a Cohort.