Placement Requests - Tracking Replacement Placements
Placing and Receiving Agency Related Guide (RARG RARG)
Summary:
How to ensure that all placements created as replacements for cancellations or partial cancellations are tracked for reporting purposes consistently with postponed placements.
Background Background
- When the action
of of postponing or or partially cancelling cancelling a placement is submitted, a label is attached to the placement
- When a placement is postponed, the label identifies it with respect to the original requested dates
- When a new placement is created to replace a cancellation, by default, the new placement does not reference the original one
- New placements can be labelled in the same way as postponed placements for consistency
Creating Replacement Placements (Placing Agencies)
There are several ways to create replacement placements, depending on the nature of the original cancellation:
- If a placement
was was cancelled, a new placement may be created on the the worksheet in either the same or a new course
- If a placement
was was partially cancelled, a replacement placement for the missing hours can be created either as a new placement in a new course, or as a a split placement in the original course
- if a placement
was was postponed, the original placement information is retained automatically
|
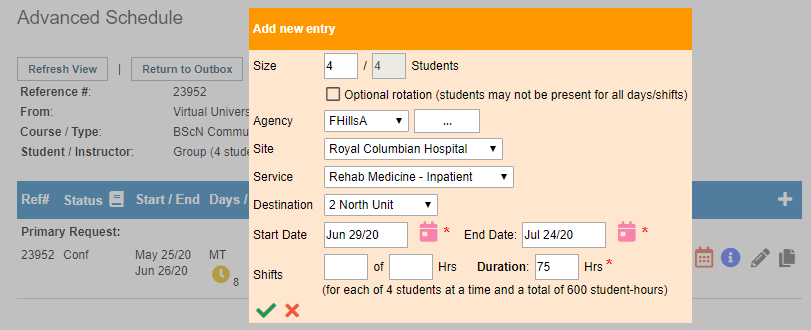
Creating replacements as a splits
Note: The same students assigned to the original placement will be assigned to the replacement split.
- Locate the existing placement in
the the Outbox
- Click the Advanced Schedule icon
- In the Advanced Schedule screen, click
the the Add icon to add a new placement
- Enter the
new new destination, dates, and duration duration or the new placement and save
Click Click Return to Outbox
Refer to the the Placement Requests - Splitting, Linking and Merging Requests and and Placement Requests - Advanced Schedule guides for more details.
|
|
|
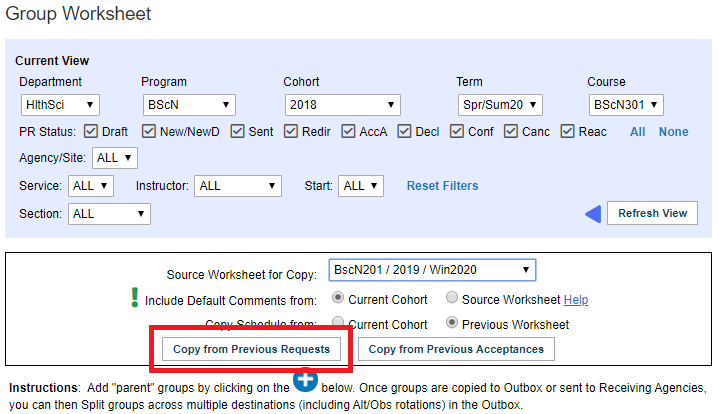
Creating replacements as new entries on a Worksheet
Note: if entering a replacement for a a partial cancellation, ensure to enter the replacement placement in a new course to allow for student assignment.
- Go
to to Cohort
- Locate
the the Course, identified by its its Term and and Dates, in which the replacement will be entered
- Open
the the Worksheet
- Create a placement with
the the Add icon icon and enter the new dates and scheduler copy existing placements
- Select the placement and submit the Copy to Outbox action
Note: it may be useful to use the the copy from previous feature in the worksheet of a new course to copy all existing partially completed placements in a previous term, then delete any unnecessary copied placements
|
|
|
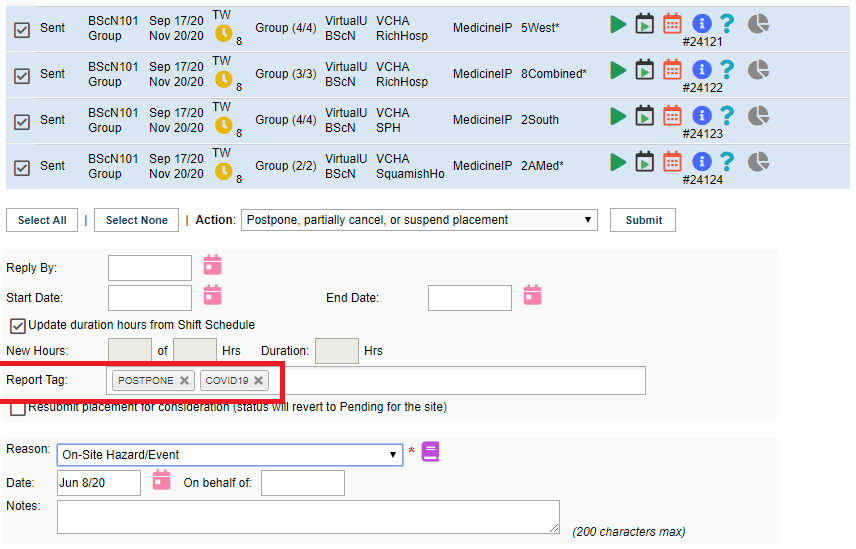
Marking replacements in Outbox
- Locate new placements in Outbox
- Select new placements
- Select the Postpone, partially cancel, or suspend action
- Leave dates and duration as entered when placement was created (either as split in on worksheet)
- Click
the the Report Tag box to add the the Postpone tag, and any additional identifying tags such as as COVID-19
- Enter the reason
- Enter notes (e.g.
This placement is a replacement for interrupted placements in the previous winter term)
Click Click Submit
|
|
|
Things to remember
- The Postpone, Partially Cancel, or Suspend action can be submitted multiple times on the same placement, to update the status or labels without making any other change
The The COVID-19 label can be applied to placements for tracking and reporting reasons. This label conveys no HSPnet-specific meaning
|
|
