Instructor Role - Workflow Guide
Placing Agency Related Guide (PARG)
Summary:
This guide on Instructor Access explains how to:
- Login to HSPnet for the first time
- Access online orientation before using HSPnet
- View upcoming placements, Shift Schedules and placement details
- Communicate with key contacts and students
- Print a Schedule on a local printer
Background
HSPnet is a web-based system for coordinating student placements. It was introduced in 2003 and is now used in eight provinces across Canada. Instructors can access HSPnet in their province to communicate with site contacts and students, and to view or print placement details and schedules. Your account was created and is managed by your local HSPnet Placing Coordinator (HSPnet local Administrator. Please contact your Placing Coordinator for any issues you have with your access. Access will time out and become disabled after 180 days of non-use for security reasons.
First Login to HSPnet and other log in information.
- Once your user account is created, you will receive a "Welcome to HSPnet" email message with your user ID and temporary password.
- Visit the HSPnet website at www.hspcanada.net and click inside the borders of your province on the map of Canada (You can book mark the site on your web browser (your local IT department could assist with that if needed). If you try to log into another province, your user ID will not be recognized.
- On the login page, enter your user ID and temporary password. You have 4 attempts to log in before the system will lock you out and disable your user account. If that happens you need to contact your placing coordinator to reset your password. You can avoid this by clicking the cancel button prior to making your fourth log in attempt. Clicking cancel sends you back to the map of Canada and also resets your login attempts to 0, providing you with a chance to start over again.
- When you log in for the first time, follow the instructions to enter a new password and forgotten password question, and to accept the user responsibilities for Instructors as per the National HSPnet Policies.
- Visit the eLearning site to complete a 5-minute orientation that is mandatory for all new users.
- If you do not see any placements under your current placements tab - your local HSPnet Placing Coordinator makes these assignments, so please contact that individual. You can also try changing the term filter, described below.
|
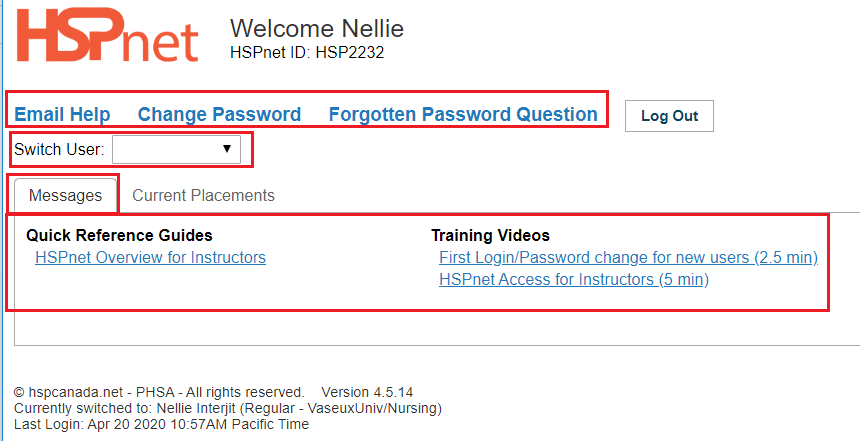
View Your Welcome Screen When you login again after completing the eLearning orientation, you will be greeted by your Welcome screen. It is organized by tabs. It also offers these links:
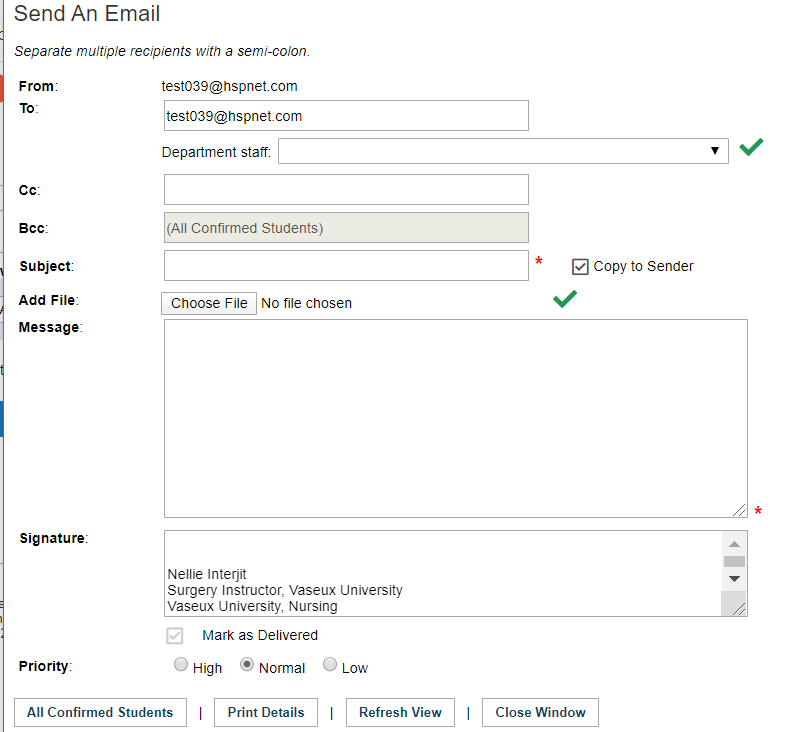
Email Help – launches a new email to the HSPnet Help/Support Desk from your regular email system, with a subject that to a degree, allows us to identify you and the screen you are using. It always assists us if you could indicate your province, agency (school), and role (Instructor) when contacting us.
Change Password
Forgotten Password Question – allows you to change the question to be answered when requesting a new password via the automated feature: help with forgotten password. This feature can be accessed if you are locked out by clicking on the link below the log in field that says: help with forgotten password. Click that link, enter your User ID and respond to the "security question," with what ever response you entered under Forgotten Password Question. This will not work if your account has been disabled due to 180 days activity, and you will need to contact your Placing Coordinator at the post secondary institution that issued the user account if your account becomes disabled.
Switch User Drop down: most users will not have this drop down. It is designed for instructors who work at more than one post secondary institution, and have user accounts at more than one agency. HSPnet support (Email help) can link your user accounts under a single user ID if you contact us and ask. We will need to know which account you consider to be your primary account, as that is the account that we would add the switch user drop down selection to.
Messages Tab – Contains links to guides such as this; or short training videos. |
|
|
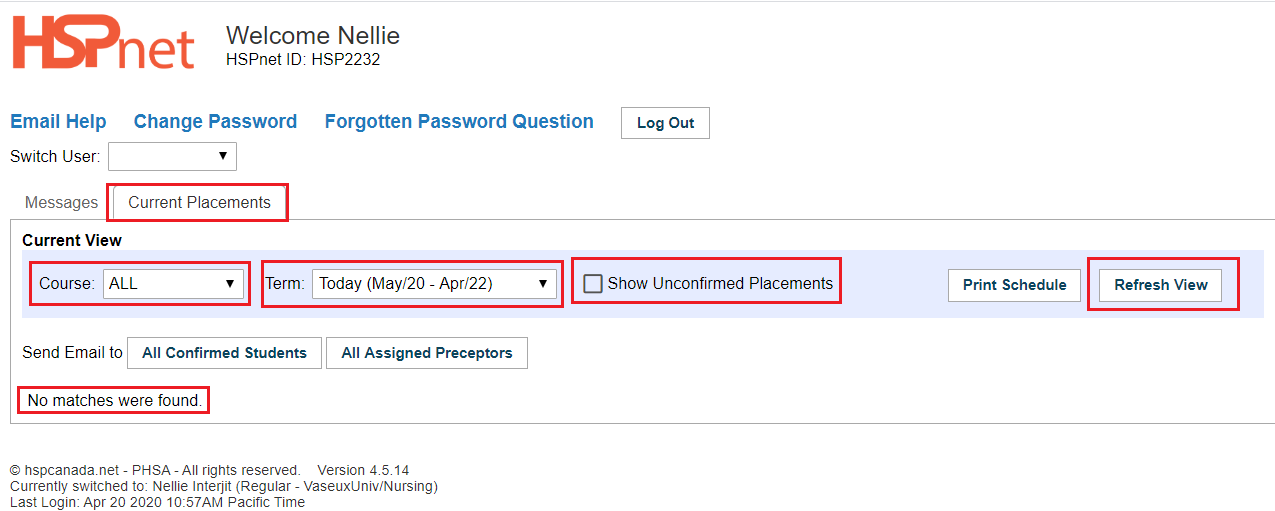
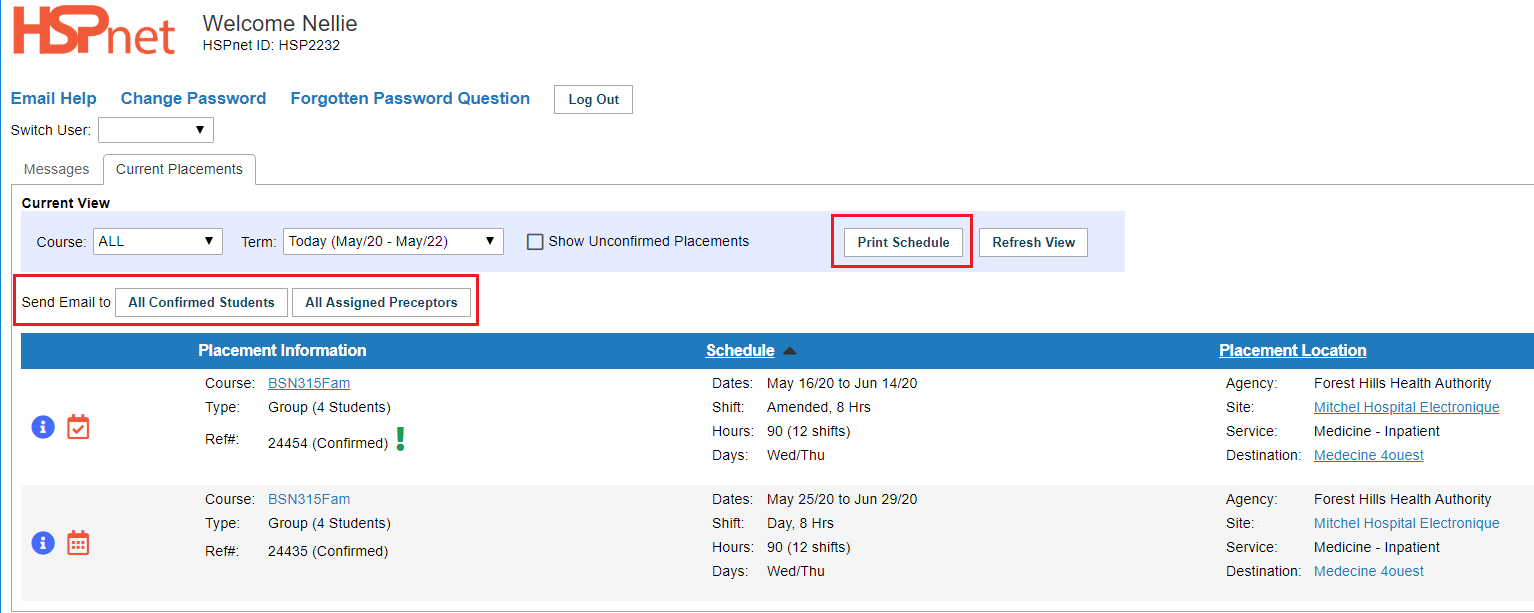
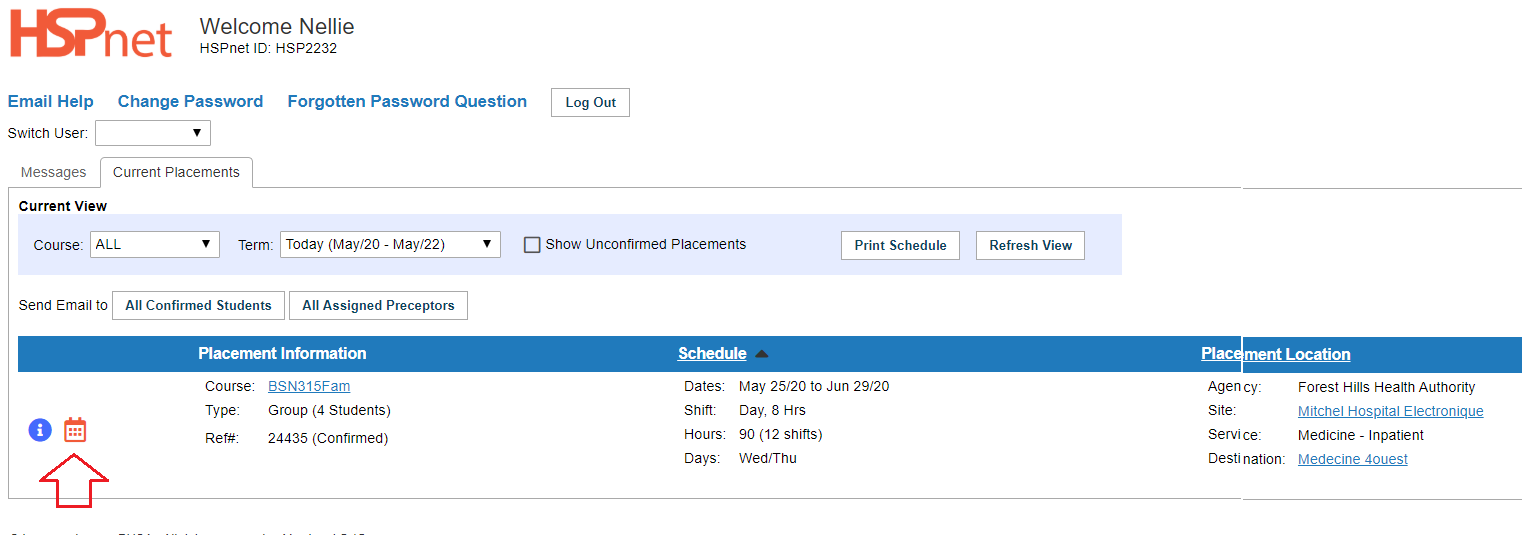
Current Placements Tab.
Course: the default view is to show all courses. You can select specific courses from the drop down list. The Refresh View button can be clicked if the system does not automatically refresh (it can take a moment or two to display on your computer.
Term: Today is the default. It will show placements from today's date for a two year period. Most of the time, your placing coordinator will not be making assignments that far in advance. You can select any of the bulleted terms below from the drop down list and may also need to click the button: refresh view. Standard Terms on HSPnet are:
Your agency or program may also create custom terms to suit your program/Agency. Show Unconfirmed Placements
No Matches were found: this refers to placement requests that you are assigned to. Either you are not currently assigned or you may need click the box to show the unconfirmed placements, or use the term filter to go backward to access the placements in the previous term. |
|
|
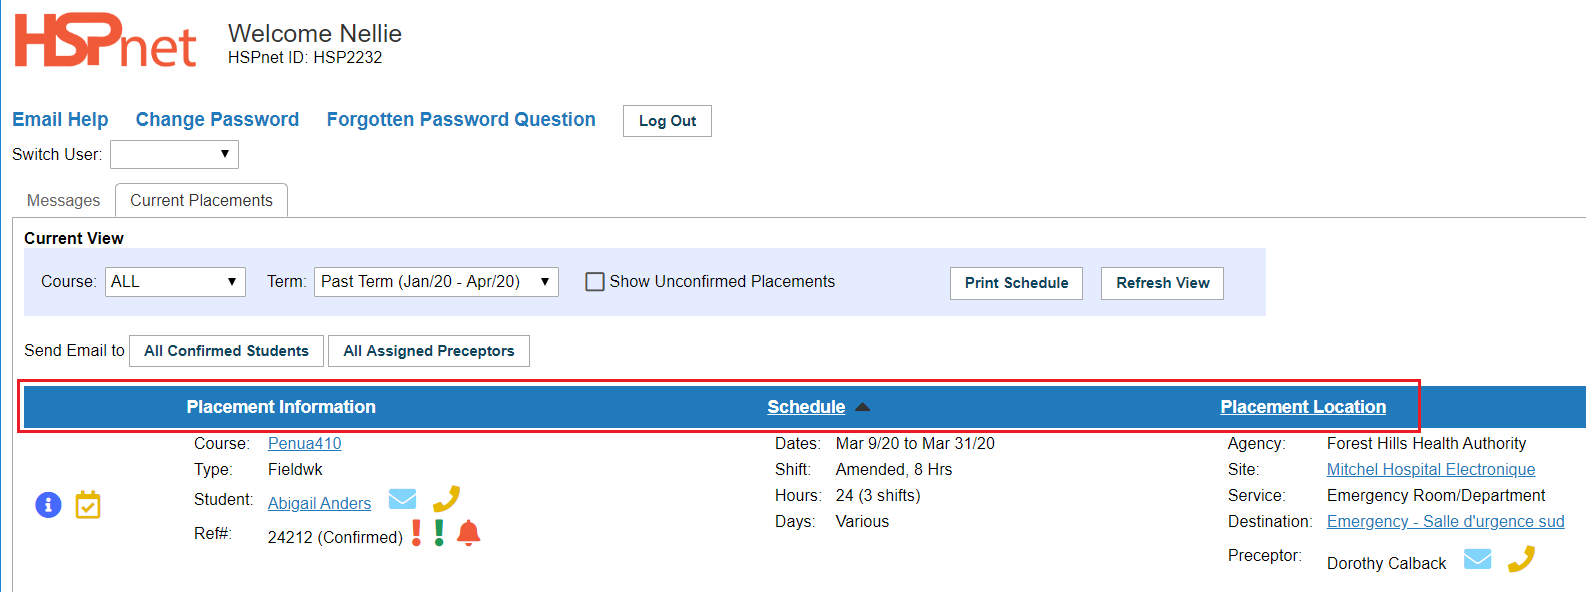
View Current, Future or Past Term Placements
When you are assigned to a placement request a dark blue line will appear where it said "no matches found" in the previous screen sample. The blue bar has three columns:
|
|
|
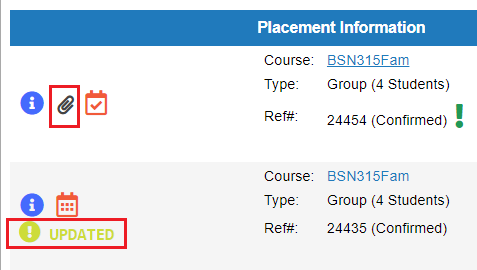
Placement Information
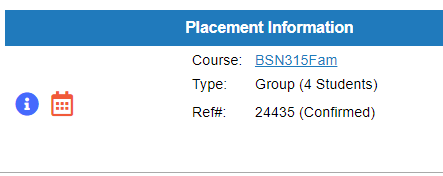
The top screen capture shows an individual placement (Ref #24212). The Second screen capture shows a group placement (Ref# 24435). In the individual placement the student name is displayed. To see the students in the group, open the Placement Request details icon and select the student tab. Icons:
Links:
|
If you open the details icon:
|
|
Schedule
|
|
|
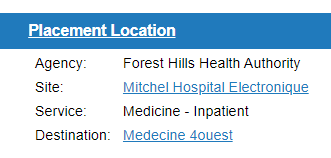
Placement Location
|
|
|
When there are assigned placement requests displayed:
|
|
|
|
|
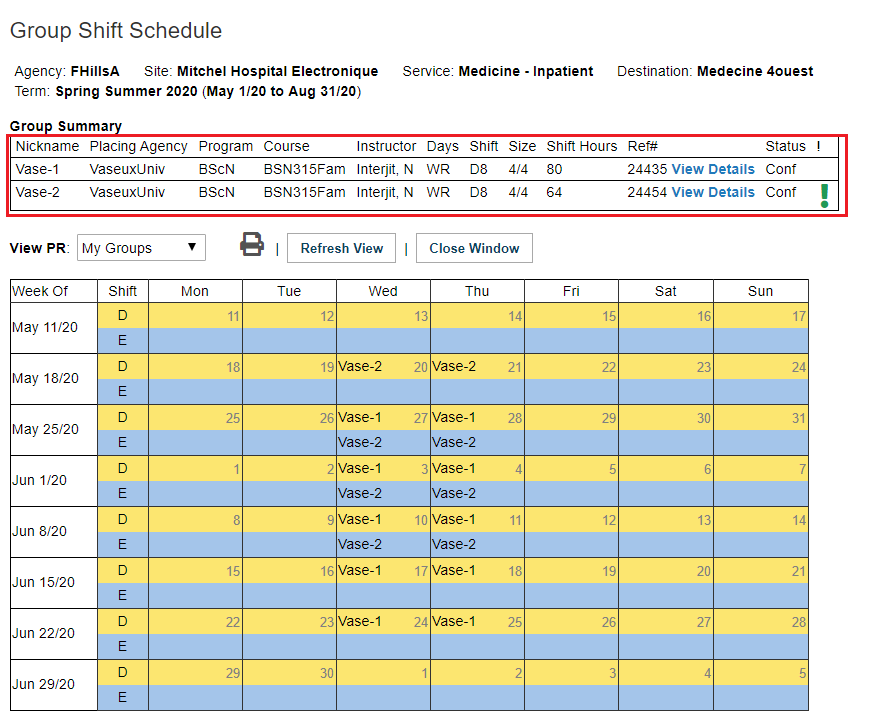
View or Print a Shift Schedule The Group
|
|
|
A group shift schedule is automatically populated to the days of the week the students will be on site, however the individual schedule will only show the information if it is entered individually. The yellow bands show daytime, and the blue is for evenings. The calendars start on Monday and go through Sunday, with the date of the week on the left of the calendar.
A "Nickname" table at the top provides a key to identify each placement request for the unit. Nicknames contain a few letters of the school name plus a number for each request (e.g. Vase-1 for Placement Request 24435 and Vase-2 for Placement Request 24454).
|
|