Course Leader Role - Workflow Guide
Placing Agency Related Guide (PARG)
Summary:
This guide explains how to:
1. Login to HSPnet for the first time and access online orientation
2. Monitor the placement cycle from course and placement planning, to assignment of students.
The course Leader role is a view only role within HSPnet, meaning they can see the placement cycle but can not enter data or assign students or instructors.
Below is the normal placement cycle and most of the functionality is what a Placing Coordinator can do.
Background
HSPnet is a web-based system for coordinating student placements in a province. It was introduced in 2003 and is now used in several provinces across Canada. Course Leaders can access HSPnet in their province to communicate with site contacts and students, to monitor the status of placement requests and assignment of students and instructors, and to produce reports.
First Login to HSPnet
- Once your user account is created, you will receive a "Welcome to HSPnet" email message with your user ID and temporary password.
- Visit the HSPnet website at www.hspcanada.net and click your province on the map of Canada.
- On the login page, enter your user ID and temporary password. Follow the instructions to enter a new password and forgotten password question, and to accept the user responsibilities as per the National HSPnet Policies. You will then be directed to the eLearning site to complete a 5-minute orientation that is mandatory for all new users.

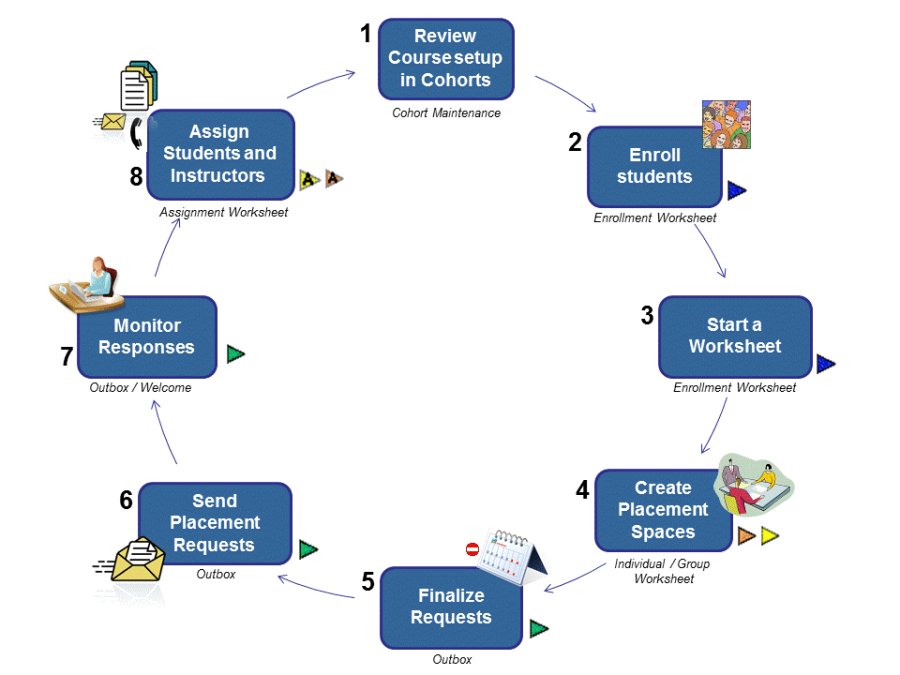 Overview of the Placement Cycle
This diagram shows the eight steps of the HSPnet placement cycle:
1. In the Cohort Maintenance screen, track practicum courses for each cohort of students (e.g. 2015 Entry).
2. In the Enrollment Worksheet, manage student enrollments and view/update profiles.
3. Copy eligible students (if known) to a worksheet that is suitable for the course – e.g. the Group or Individual Worksheet.
4. In the Individual or Group Worksheet, create sufficient spaces for all eligible students in the course. Return to these worksheets later if needed to create additional spaces, for example if a placement request is declined by the receiving site.
5. Finalize placement requests in the Outbox before sending, for example to add an advanced schedule (i.e. to split the placement across multiple locations or dates), to add a comment.
6. Send placement requests from the Outbox, resulting in a status of "Sent" for requests delivered to the inbox of a receiving site that is using HSPnet, or "Sent-P" if delivered as a PDF file to non-user sites.
7. In the Welcome screen or Outbox, monitor responses as receiving sites accept or decline requests. Sites that use HSPnet can accept or decline online, while non-user sites would communicate via email or other means to a Placing Coordinator, who would enter the response on their behalf.
8. Assign students in the Assignment Worksheet to accepted placements, and if needed assign an instructor or faculty liaison.
|
Screen Overview
The Welcome screen serves as a "dashboard" that summarizes the status of all placement activity that is currently underway (for the next four months). Change the Term filter to focus on a past or upcoming time period, or change the Course filter to a single Course. You can return to the Welcome and Cohorts screens at any time by selecting the link in your left navigation bar. |
|
|
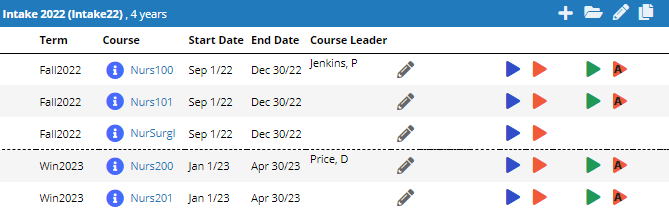
The Cohort Maintenance screen displays each cohort of students (e.g. Intake 2022) and the practicum courses in each Term until the cohort graduates. The screen displays coloured GoTo buttons
|
|
|
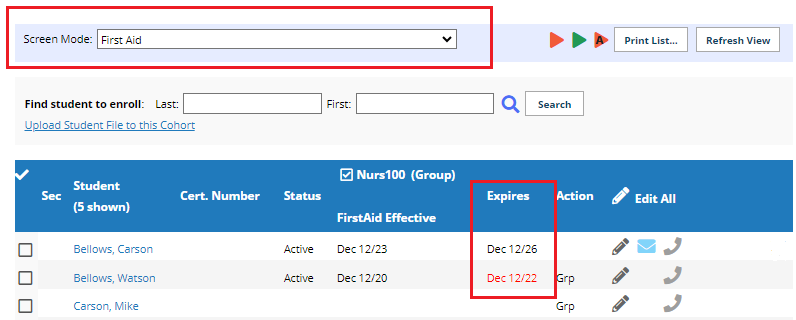
The Enrollment Worksheet displays a list of students who are enrolled or "eligible" for a placement in the course. The screen offers different viewing modes, for example to focus on Confirmed Placements for all students, or to view the status of a placement prerequisite such as First Aid.
Note: that expired certifications appear in red. |
|
|
The Group or Individual Worksheet allows a Placing Coordinator to plan and create spaces sufficient for all students in the course, and to monitor the acceptance, decline or cancellation of spaces over time. A tally of enrolled students and available spaces appears at the bottom of the worksheet – in the example below there are 19 enrolled students and only 17 spaces created (3 are accepted).
|
IS THIS A GOOD EXAMPLE? |
|
The Outbox is provides a summary of each placement request, that is also available to receiving site users in their Inbox. The Outbox also provides various icons or flags, for example:
|
|
|
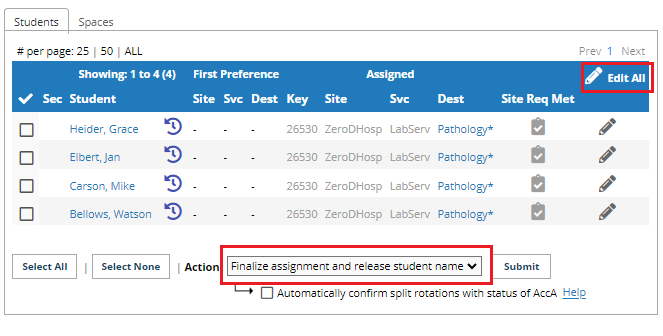
Students are assigned or reassigned in the Group or Individual Assignment Worksheet
NOTE - a warning symbol  will appear if a placement is over assigned (too many students in a Group, or two students assigned to the same Individual placement). will appear if a placement is over assigned (too many students in a Group, or two students assigned to the same Individual placement). |
|


 Click to view the Group Worksheet
 Click to view the Individual Worksheet
 Click to view the Outbox


 provides full information about the placement including contacts, program and course information, links to site and destination profiles, and scheduling details.
 or urgent Alerts


 Linked requests that share an instruct