Receiving Agency Profiles - Destination Profile
Receiving Agency Related Guide (RARG)
Summary:
Each Destination has an online Profile of information to support placement coordination. Most of the Profile can be viewed by all users and can be updated by the Receiving Coordinator or Destination Coordinator, or by the Placing Coordinator if the Service/Destination is not using HSPnet. A survey tool is available for users to obtain the information needed to enter profile information from a non user: Receiving Agency Profiles: Destination Survey Tool for Receiving Coordinators (to send to non-users).
The Contents in this document: (click links in the index below to go to the section you wish to view).
- Access a Destination Profile (various users)
- Navigating a Destination Profile
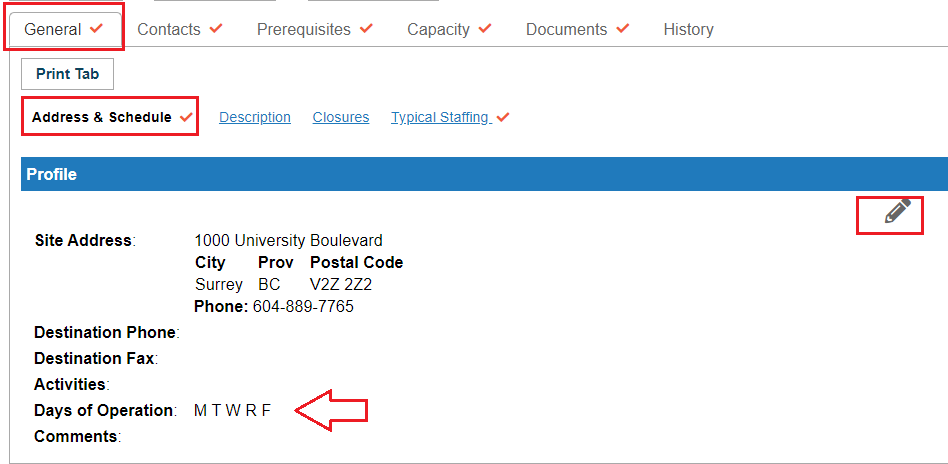
- The General Tab: Address, Description, Closures.
- Contacts Tab
- Prerequisites Tab (This is the designated spot for everything students and faculty need to complete BEFORE arriving to start a practicum placement).
- Documents Tab
- Capacity Tab and Capacity Wizard (This is the most important information you can enter on a destination profile as it allows schools to find where students in various programs may be considered).
- Capacity Utilization tool
- History Tab.
- For Receiving Coordinators only: How to add a New destination.
Icons:
 Destination Profile (empty).
 Destination Profile containing some information.
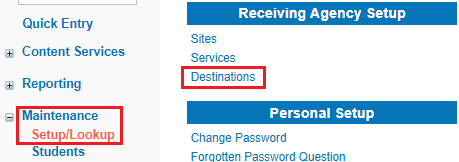
Placing Coordinators, Receiving Coordinators, and Destination Coordinators using DC Advanced:
|
|
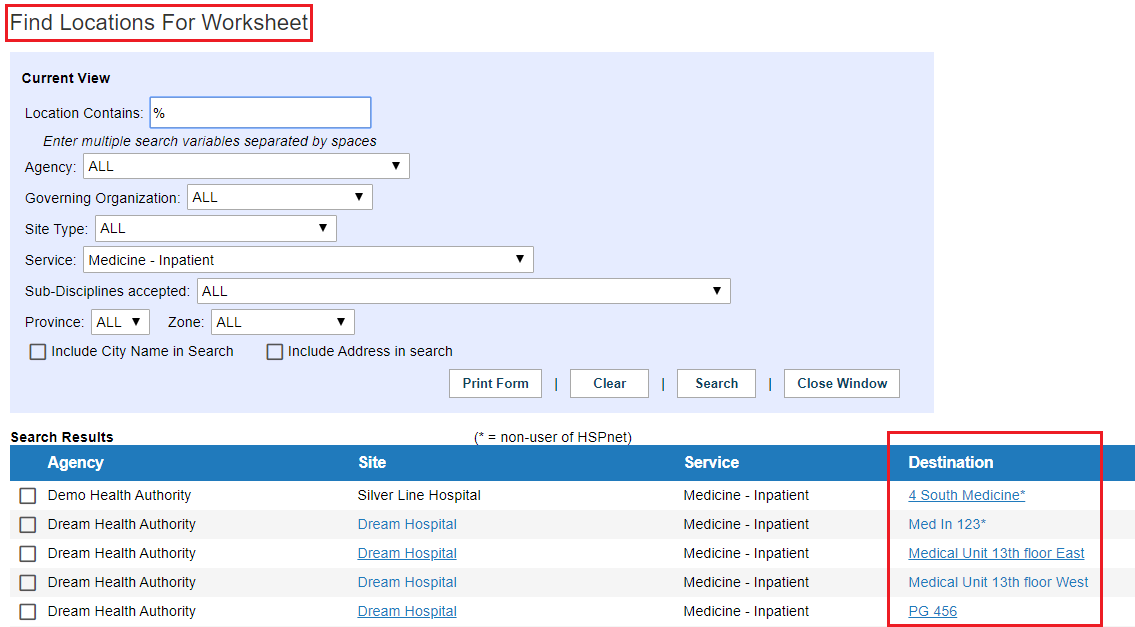
Placing Coordinators can also access a destination profile from the links on the location look up screen: Find Locations for Worksheet. |
|
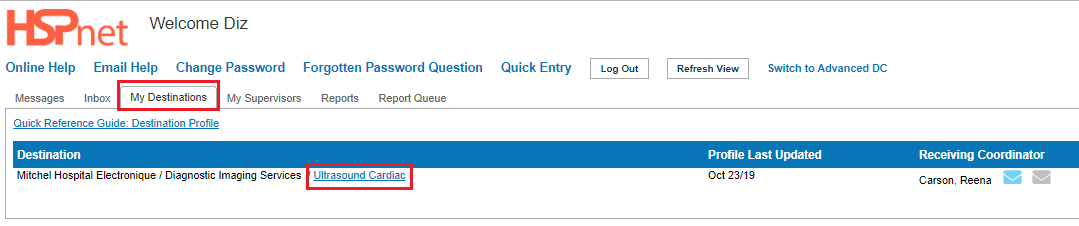
Destination Coordinators using DC View: (default screen): access the destination profile:
|
|
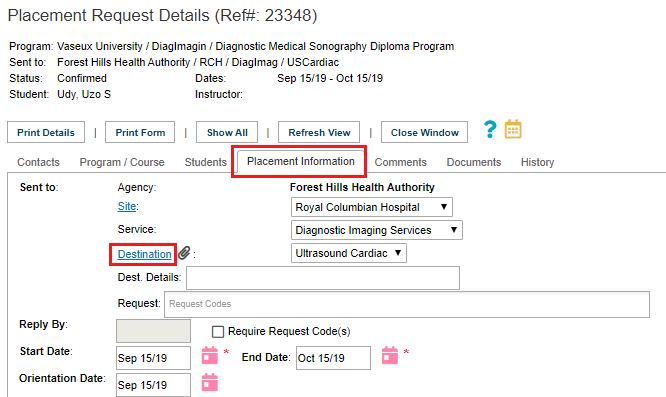
All users, including Students and Instructors
|
|
|
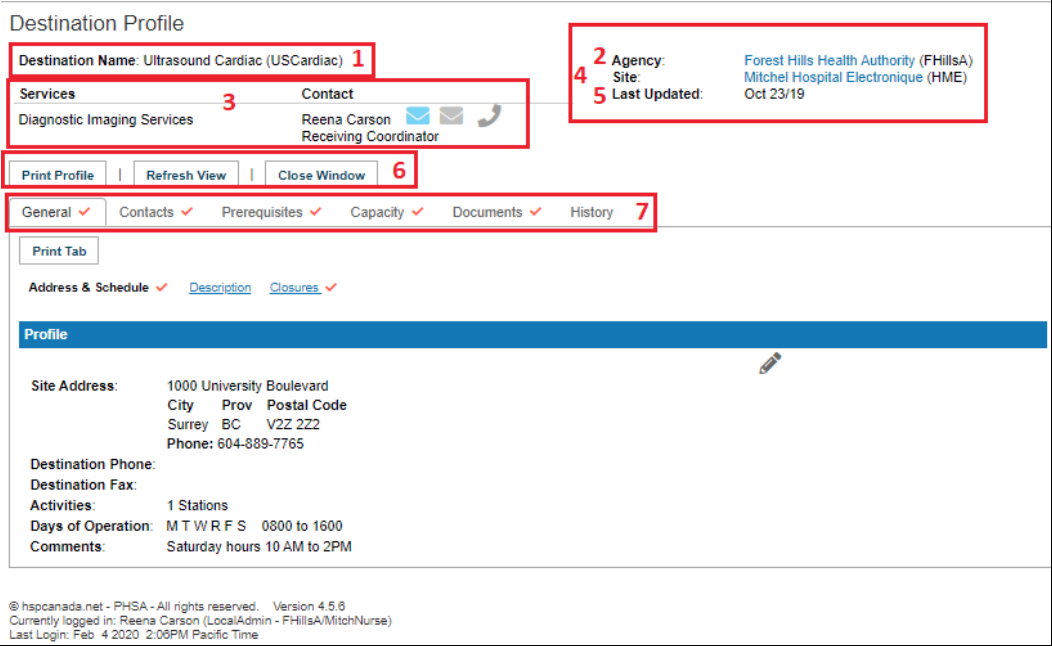
2. Navigating a Destination Profile
Every Destination profile contains the following elements:
|
|
| Return to Index | |
|
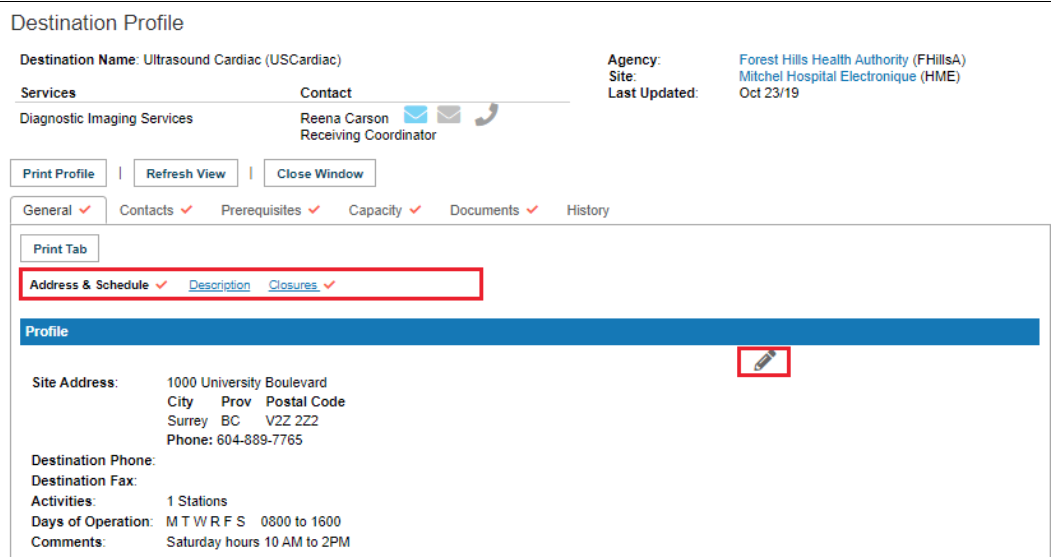
3. The General Tab contains three sub-links:
To Edit the Address & Schedule information:
|
|
|
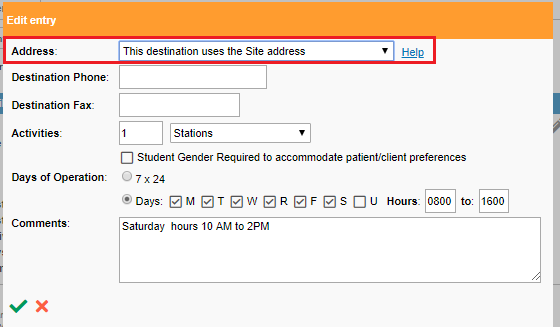
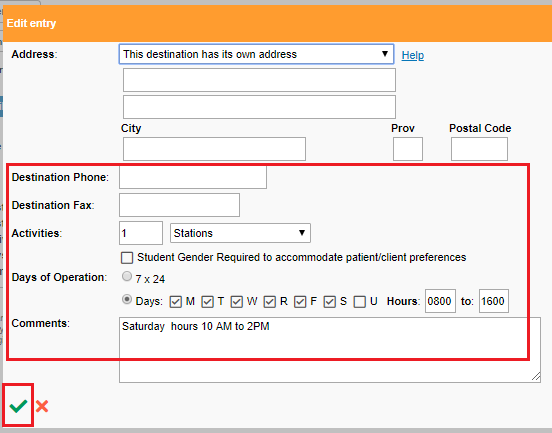
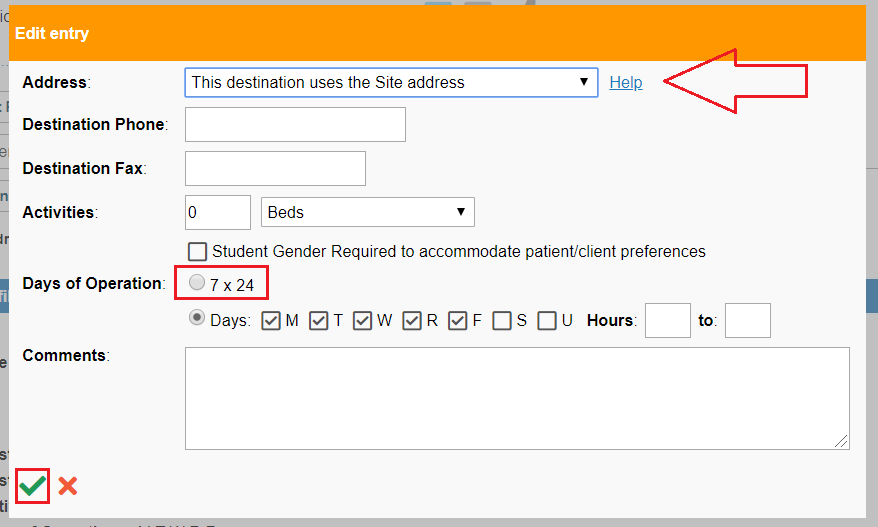
3. On the General Tab, when you are editing the Address and Schedule:
|
|
|
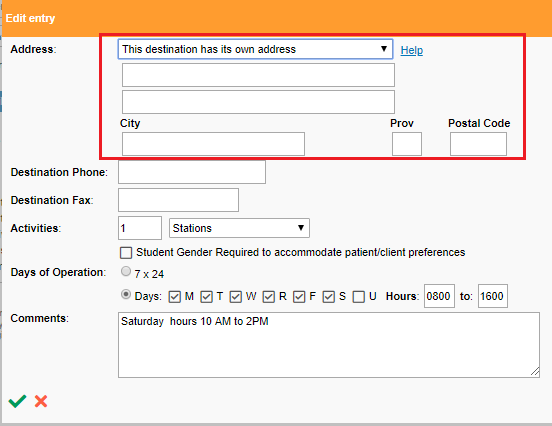
3. On the General Tab, when you are editing the Address and Schedule:
|
|
|
3. On the General Tab, when you are editing the Address and Schedule the other fields that can be entered are:
When you finish editing be sure to save the changes by clicking the green check mark.
|
|
|
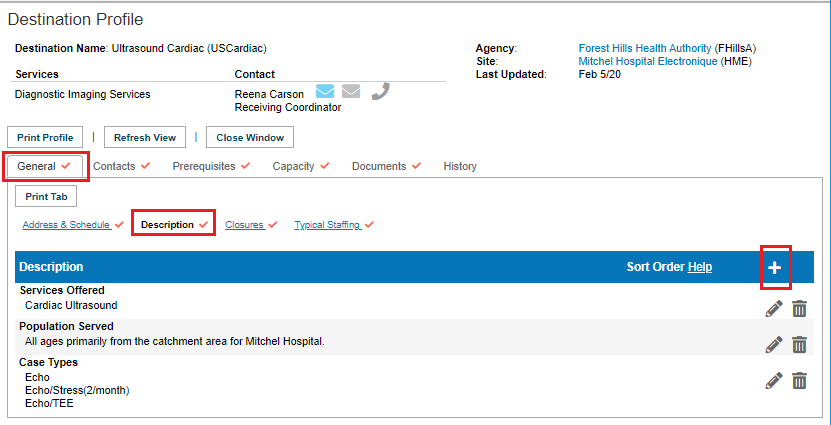
3. On the General Tab, the sub-link: Description allows you to enter more information about the destination. Click the add icon
|
|
|
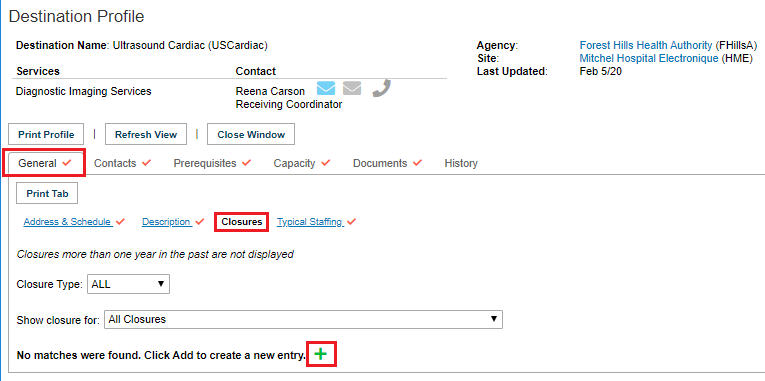
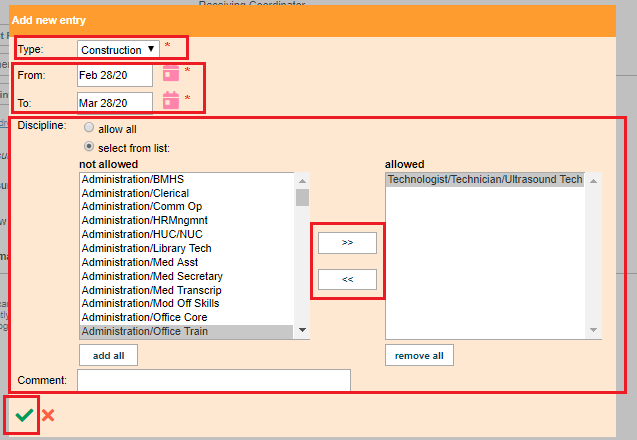
3. On the General Tab, the sub-link: Closures allows temporary closures to be entered. Click the add icon
|
|
|
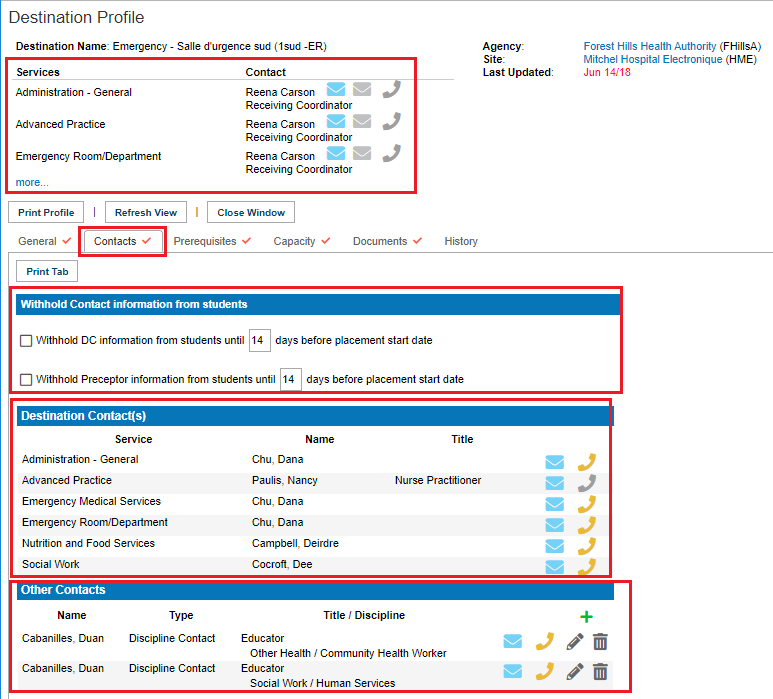
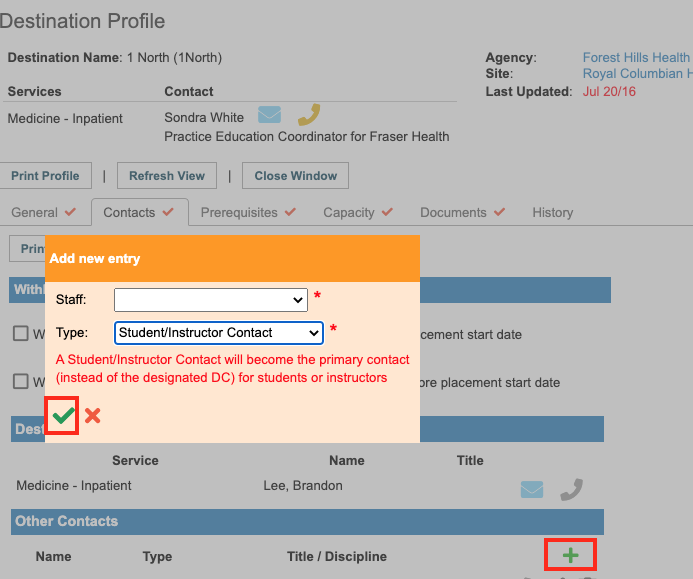
4. On the Contacts Tab, you can:
Display only:
To Use the Withhold information feature:
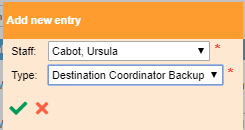
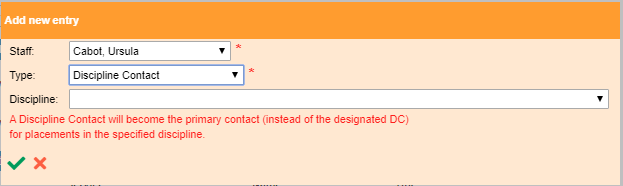
To Add Other Contacts:
One exception is if you select the type: Discipline Contact, a third drop down list opens where you need to specify a discipline. For more information on the role of and how to add a discipline contact please see: Discipline Contact Set up for Receiving Coordinators. Please review the discipline contact information document before attempting to add one to other contacts.
Another Exception: when you select Student/Instructor Contact, this individual's name will appear for students and instructors, instead of the destination Coordinator's name. |
 |
|
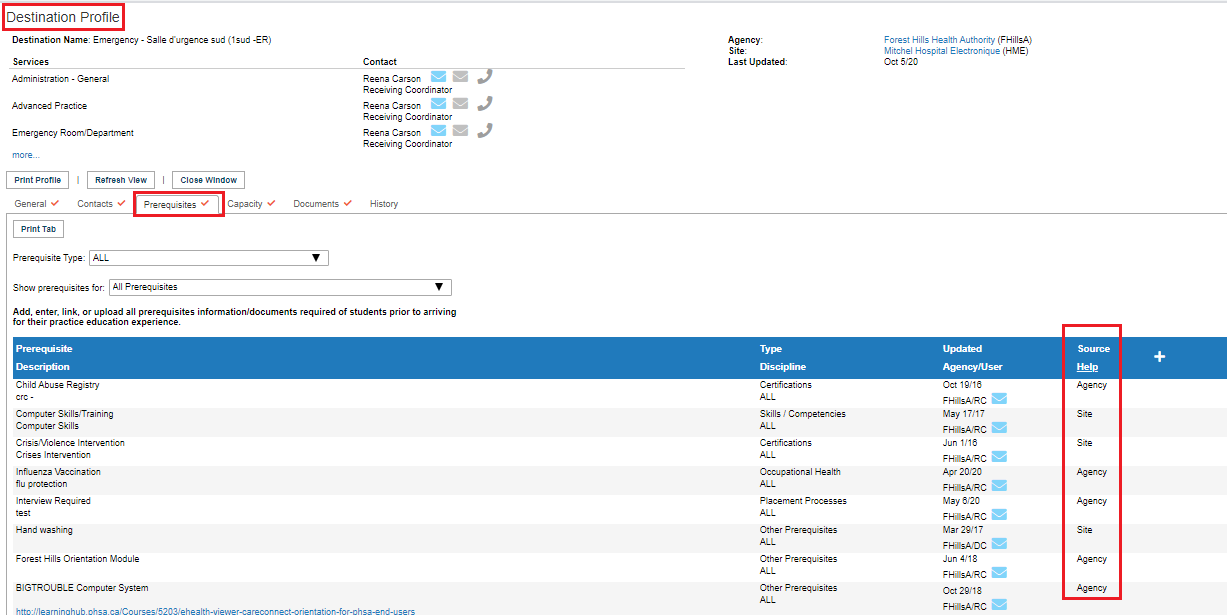
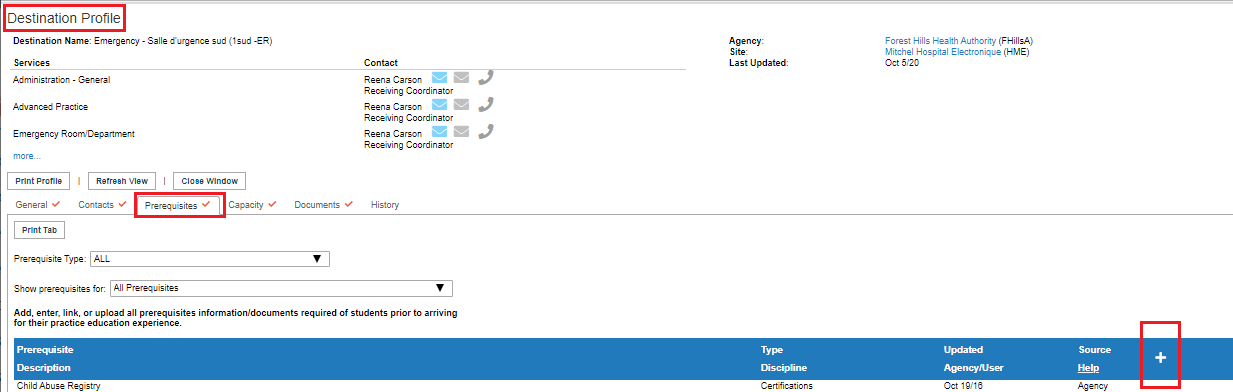
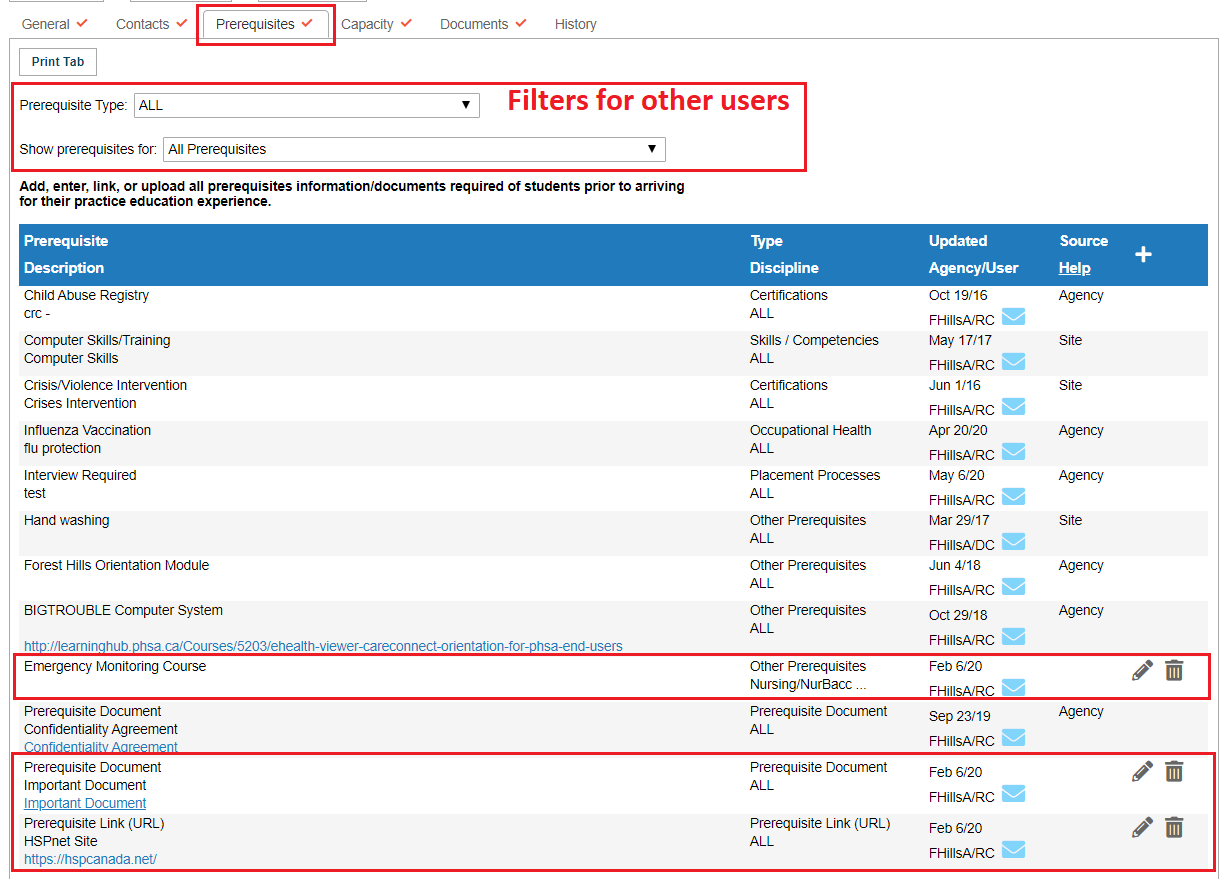
Prerequisites Tab:
Add, enter, link, or upload all prerequisites mandatory/required of students prior to arriving for their practice education experience. Use the Documents Tab for supplemental practice support documents that are not required to be completed before arrival but would assist the students and faculty while on the unit.
Prerequisites may also be entered at the Agency Profile (restrictions in Ontario and Quebec) or Site Profile. Entries made at on those profiles, that have been applied to sites and specific destinations display on the destination profile, and indicate their source, but they cannot be edited on the destination profile, only on the profile where they were originally added (Agency or Site). Prerequisites that are added on the Destination Profile may be edited on the destination profile. Destination Coordinators and Receiving Coordinators have access to edit Destination Profiles; only Receiving Coordinators may edit Agency or Site profiles. Placing Coordinators may edit information on the site profile and the destination profile at non-user sites. |
|
|
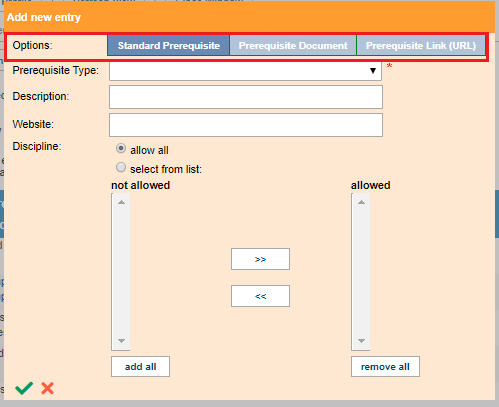
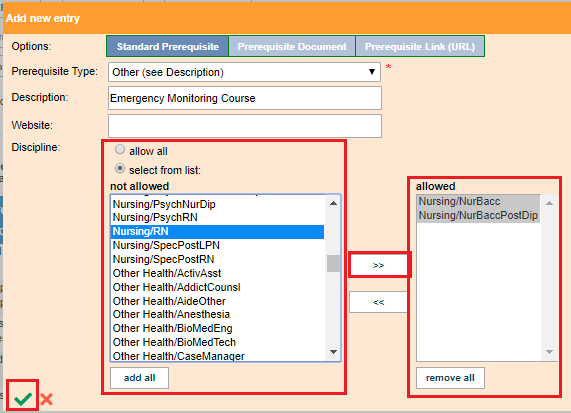
5. To Add a Prerequisite to the Prerequisites Tab of a destination profile:
The Default is Standard Prerequisite. Click document or link to select those options.
|
|
|
5. Prerequisites Tab of a destination profile (continued)
|
|
|
5. Prerequisites Tab of a destination profile (continued)
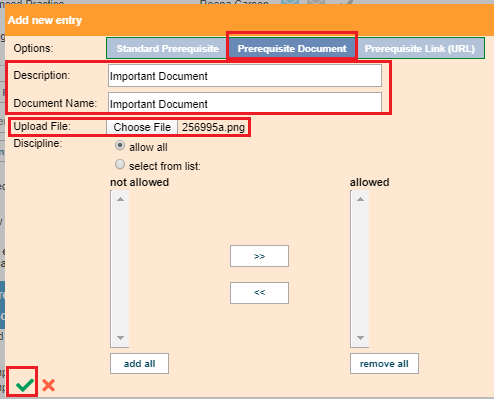
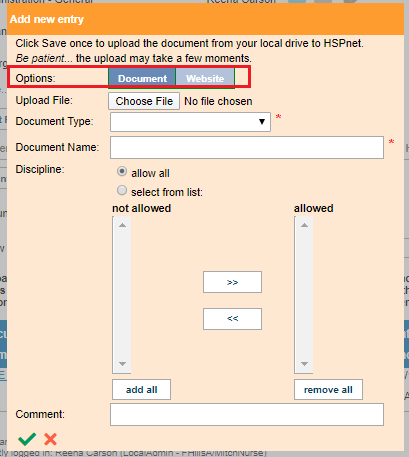
When Prerequisite Document is selected:
|
|
|
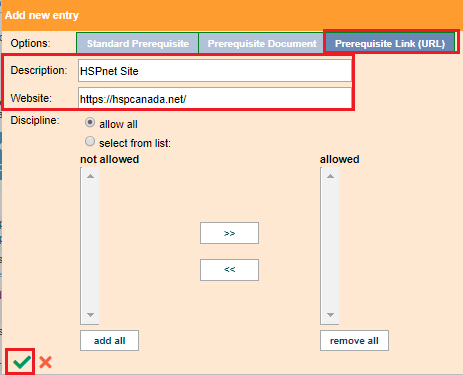
5. Prerequisites Tab of a destination profile (continued) When Prerequisite Link URL is selected:
|
|
|
5. Prerequisites Tab of a destination profile (continued)
|
|
|
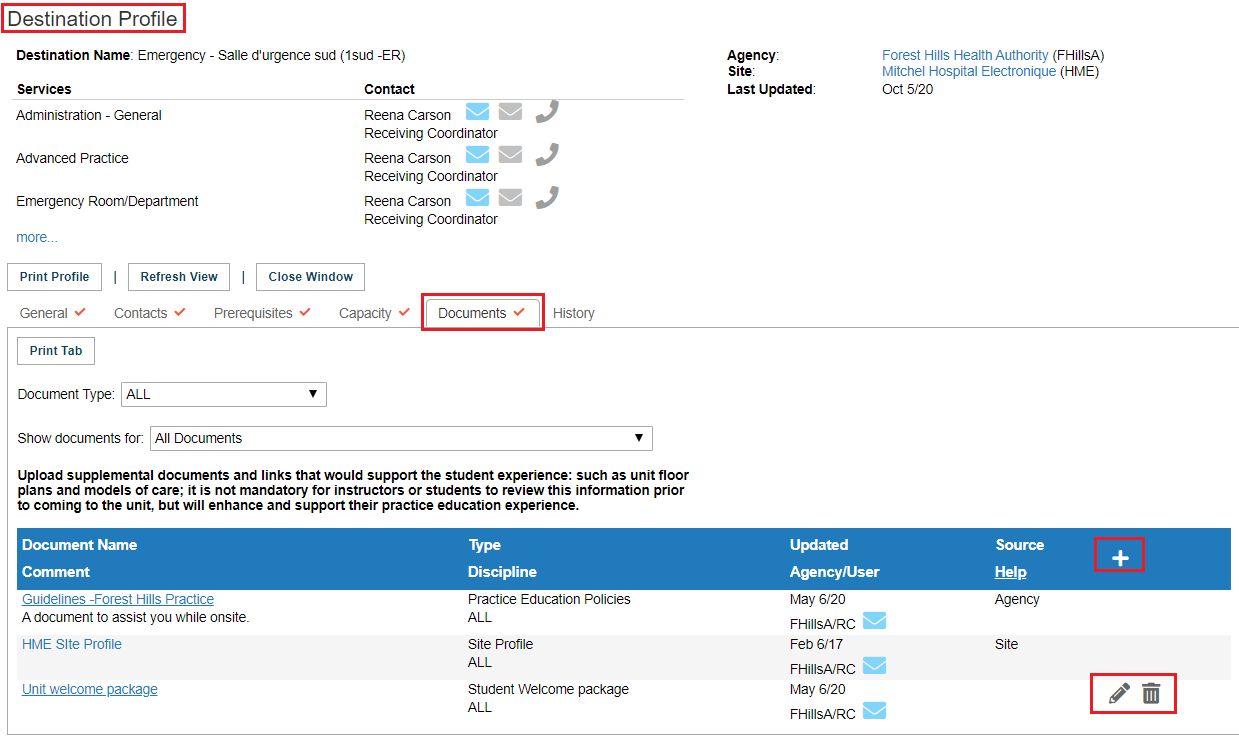
6. Documents Tab:
Use this tab to upload supplemental documents and links that would support the student experience: such as unit floor plans and models of care. Material posted here is not mandatory for instructors or students to review prior (not a prerequisite) to coming to the unit, but will enhance and support their practice education experience.
|
|
|
7. Capacity Tab:
This is the most important piece of information you can enter on a destination profile.
The importance of completing the Capacity Tab is: the location look up uses the entry of discipline/sub-discipline entered here to identify that this destination takes the listed type of students. To facilitate the look up of destinations by sub-discipline of students considered, please complete the capacity tab.
News from late 2021: there will also be a simplified version of the wizard for entering the discipline and sub-disciplines considered only; there will continue to be the ability to also enter shifts and days of the week general availability. |
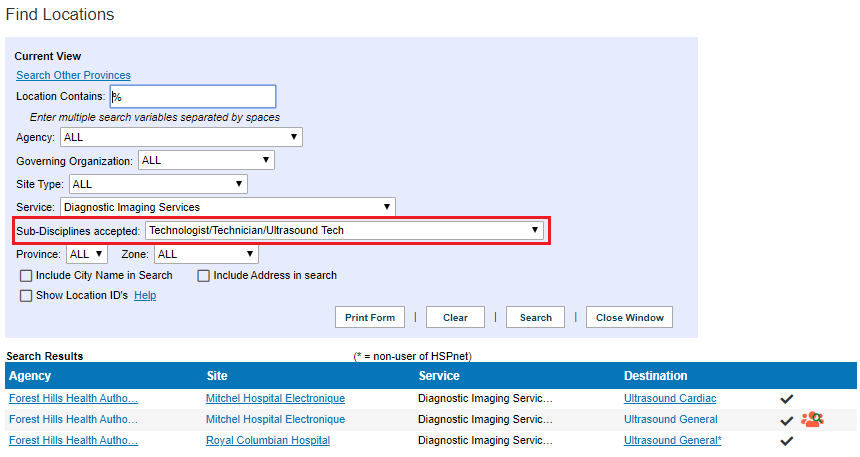
The Capacity Tab is what enables the Look up Feature: (in this case Find Locations):
|
|
7. Capacity Tab (continued)
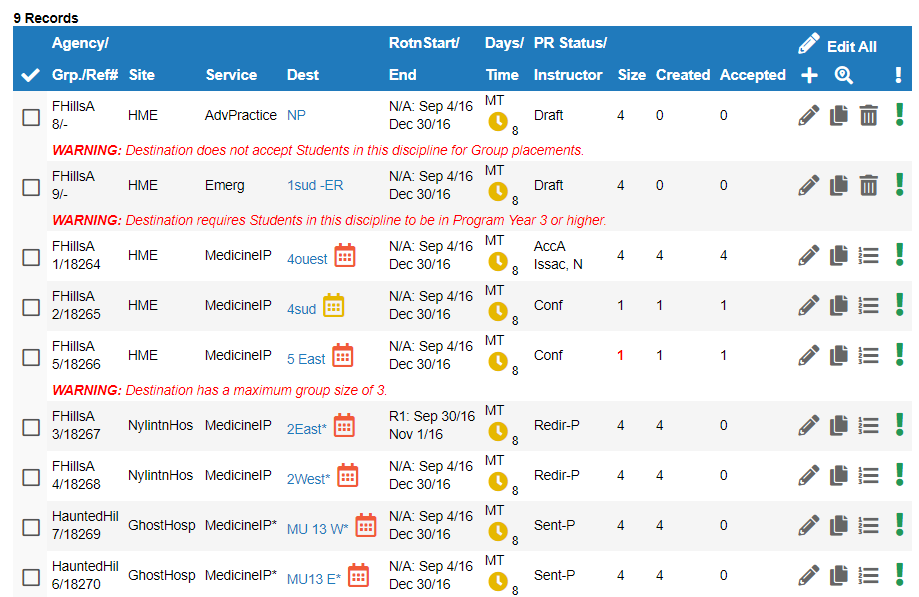
Below and to the right are examples of how the capacity profile interacts with the Placing Coordinator Worksheets to produce automatic warnings. This does not block them from sending the request anyway.
|
Another Individual Placement Capacity example: |
|
7. Capacity Tab (continued)
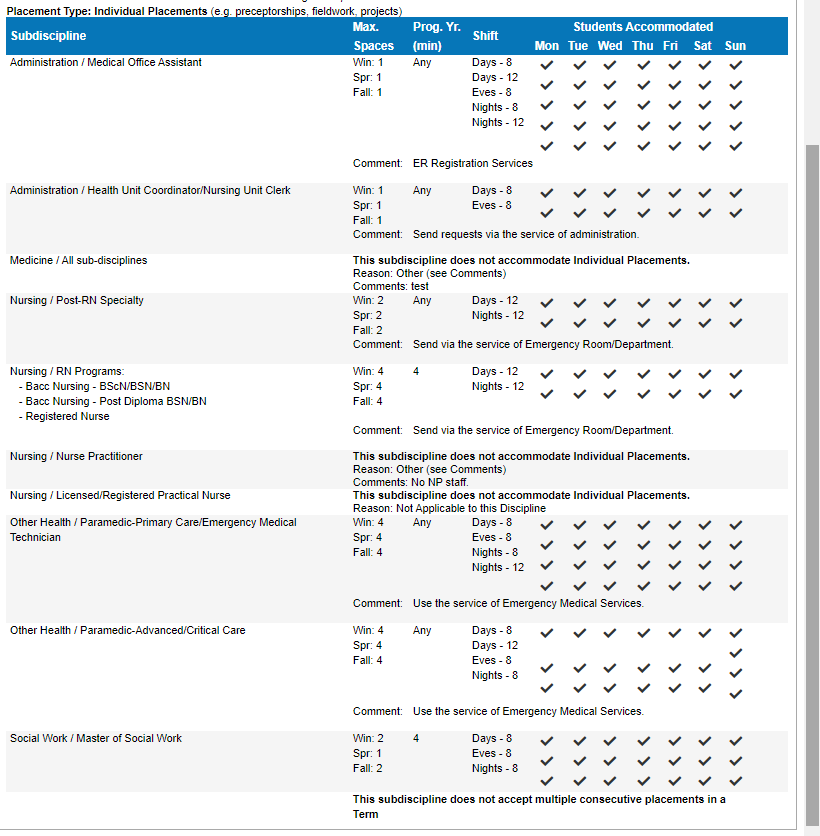
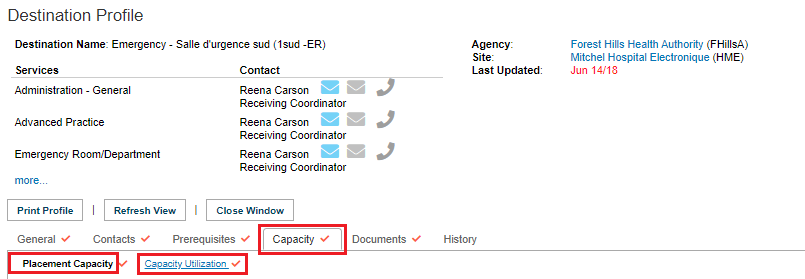
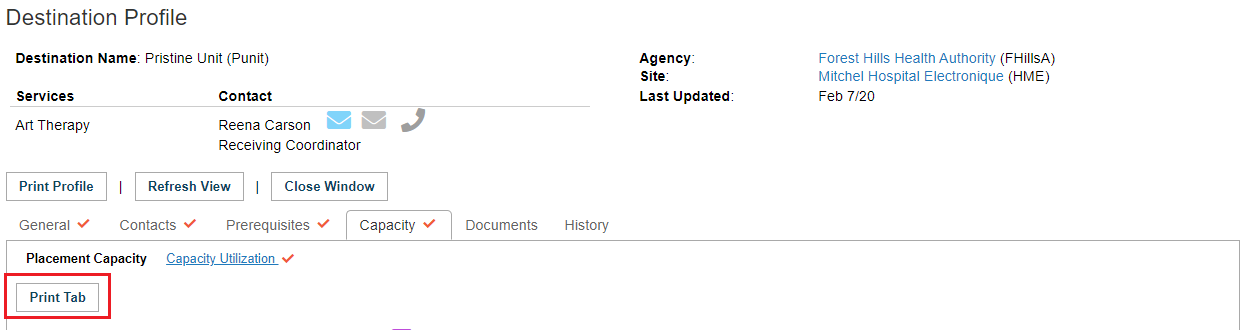
The Placement Capacity tab is a vital piece of identifying placement opportunities and restrictions for each destination; it also provides a tool to review current student placement activity at that destination. There are two sub-links at the top of the tab:
|
|
|
7. Capacity Tab (continued)
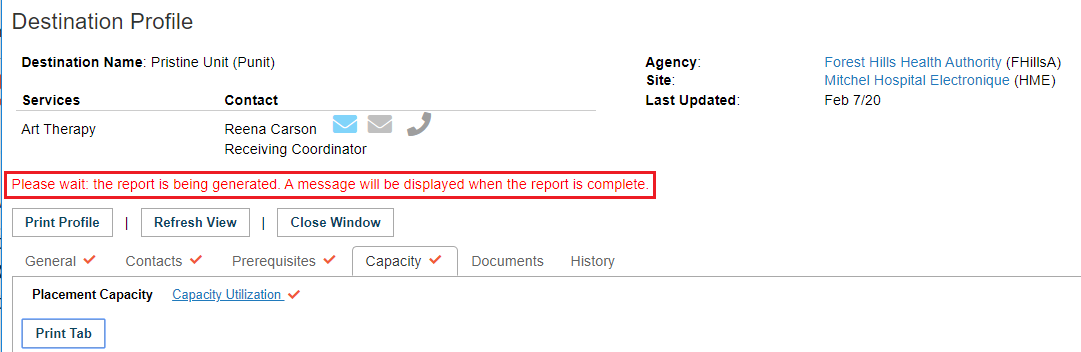
Placement Capacity Sub-link This button allows you to create a PDF printout of the information entered into your profile. Ironically the button on the top part of the destination profile that never changes, there is another button that does the same thing exactly the same way as described here.
|
|
|
7. Capacity Tab (continued)
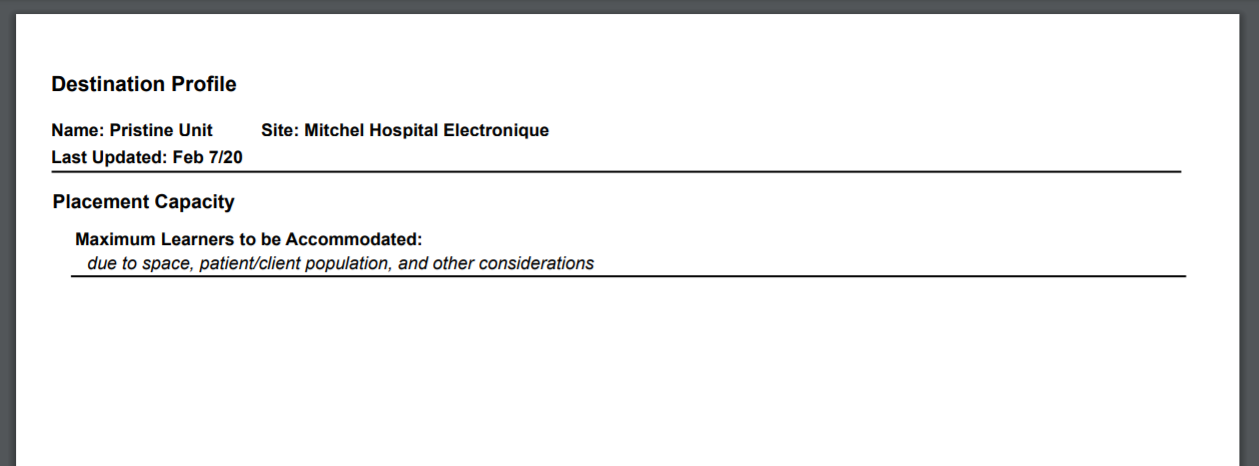
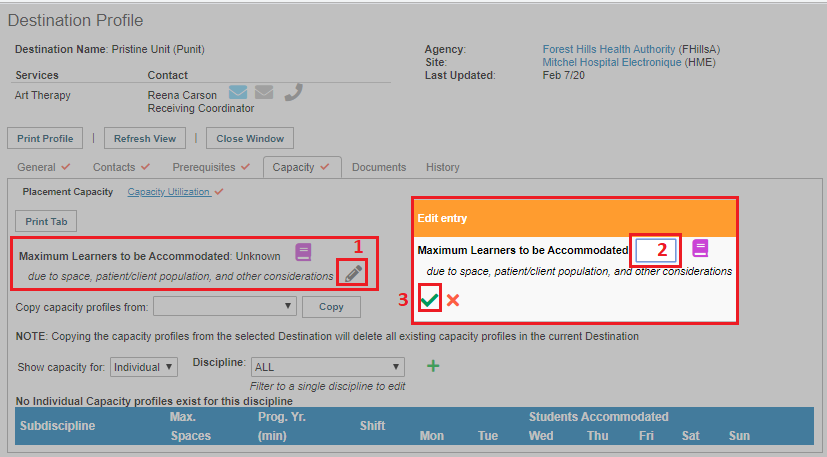
Maximum Learners at this Destination Each Destination Profile has a field to enter Maximum Number of Learners:
The help definition of this number states:
Caution: Many users do not believe this is a useful piece of information, because it is not clear whether this figure takes ALL students into account, such as interns and students outside of nursing.
The above number should not be used to define group size for group placements, that information should be entered by profession, via the capacity wizard. |
|
|
7. Capacity Tab (continued)
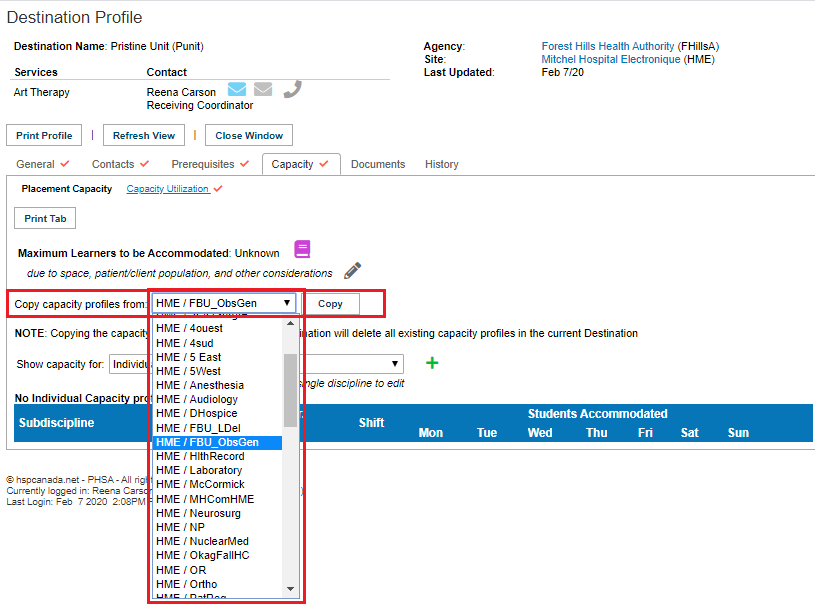
Copy Capacity Profiles From: The next feature down on the capacity tab can be a big time saver. It allows you to copy the placement capacity (entered on another destination using the capacity wizard). from any other destination at your site. If you do this, you can use the edit features of the capacity wizard to customize the information for this specific destination. To use the copy feature:
A warning sign will pop up: Are you sure you want to replace ALL current Placement Capacity entries with those of the selected Destination? This can not be undone. If no capacity is currently entered, the above is not an issue; if capacity is already entered, copying from another destination will overwrite all capacity currently entered on the this destination when you click copy. |
|
|
7. Capacity Tab (continued)
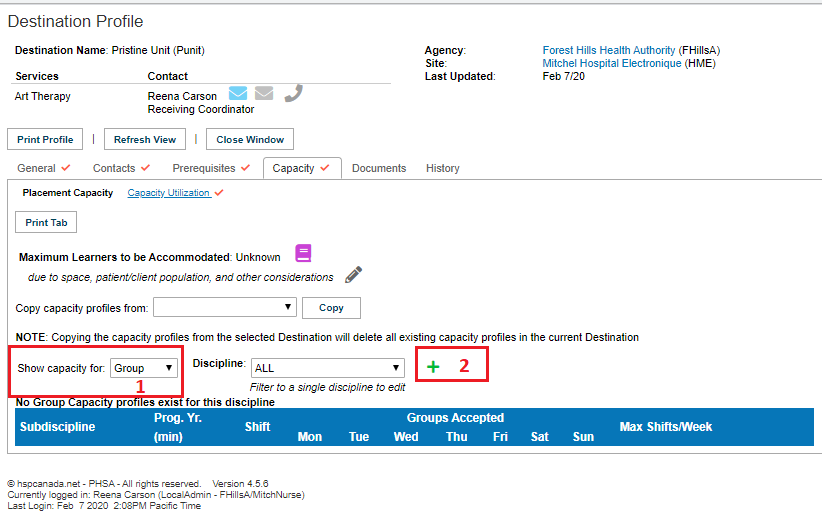
Capacity Wizard: Group Entry (1/10)
|
|
|
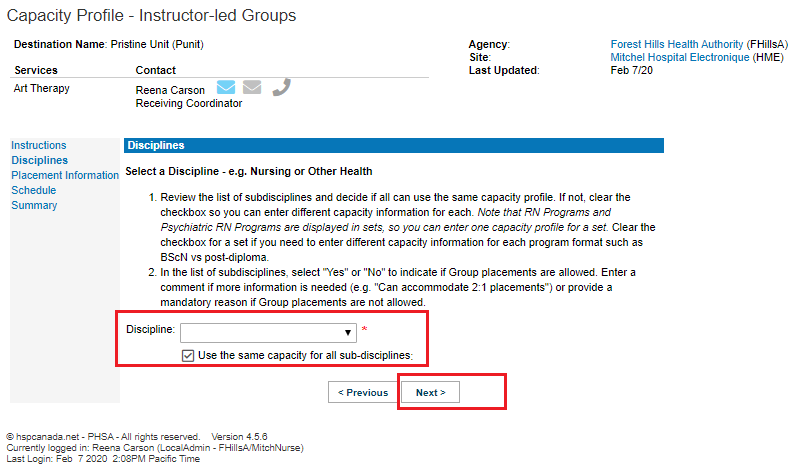
7. Capacity Tab/Capacity Wizard: Group Entry (2/10)
|
|
|
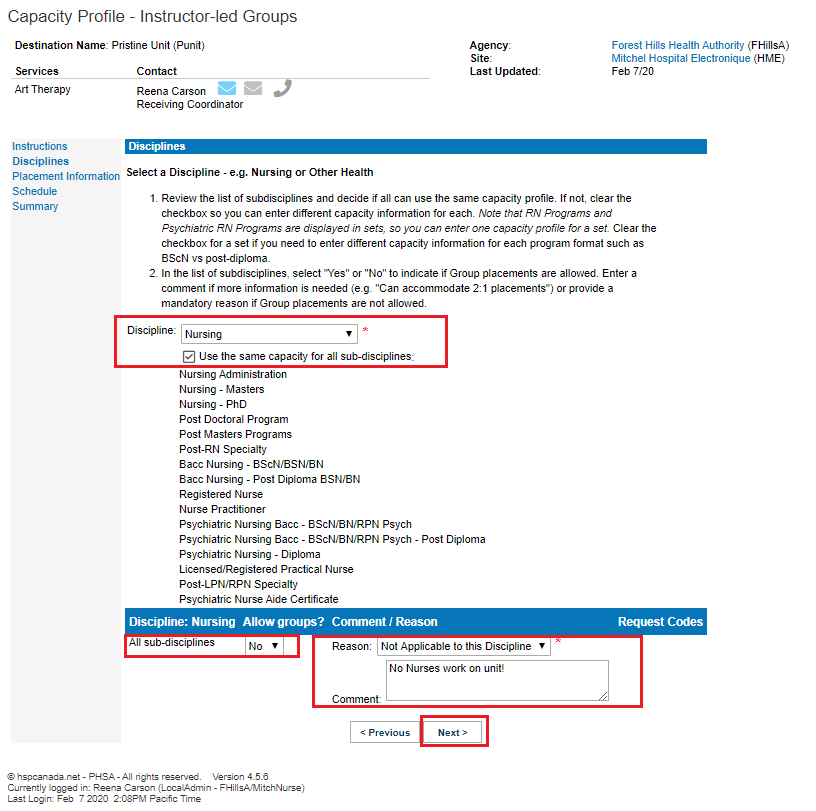
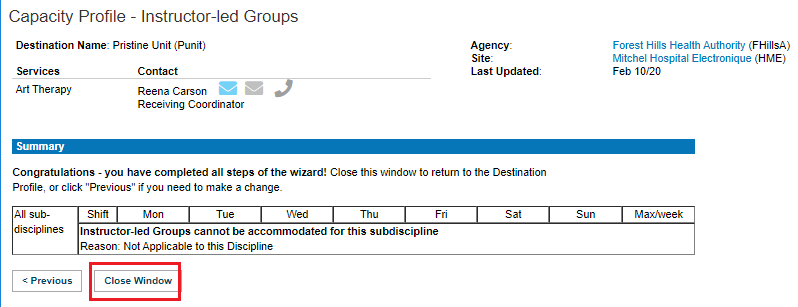
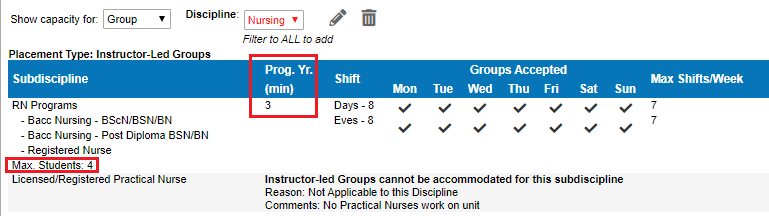
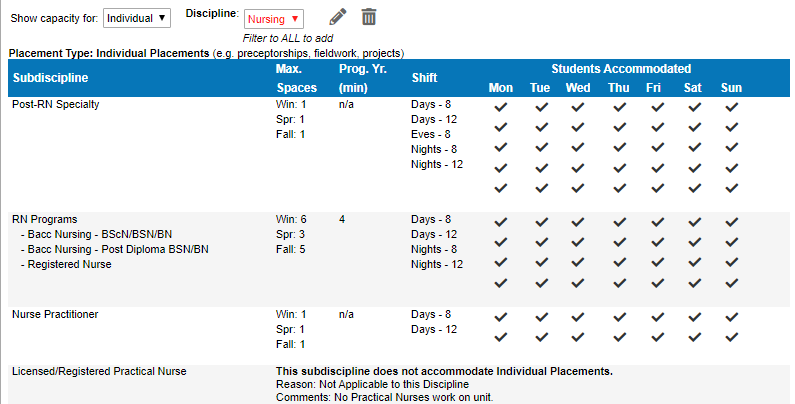
7. Capacity Tab/Capacity Wizard: Group Entry (3/10) - Enter: No Capacity for groups.
In this example, on this unit nursing groups cannot be considered, but individual placements are welcomed. HSPnet should be set up to indicate a type of student is not considered whenever it may not be known by the placing agency. For instance, a unit that has no Practical Nurses working on it, would want to enter they do not consider practical nurses - because entering this on HSPnet will alert the placing coordinators so no more time is wasted on either end sending or receiving requests for a type of student that cannot be considered. In this example, the box: Use the same capacity for all sub disciplines has been left checked because we want to enter a group capacity to say: "No Groups of nursing students can be considered by this unit.
|
|
|
7. Capacity Tab/Capacity Wizard: Group Entry (4/10) - Enter: No Capacity for groups.
|
|
|
7. Capacity Tab/Capacity Wizard: Group Entry (5/10) - Enter: No Capacity for groups.
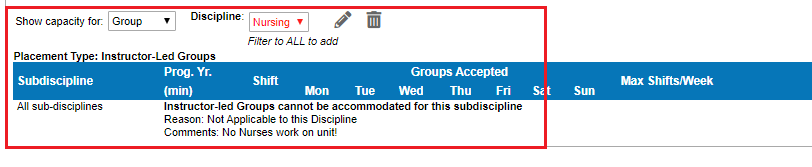
In this example no instructor led nursing groups are considered. Placing Agencies that use the Cohort system of placement will be alerted to this information on the group worksheet as it reads the information from the capacity profile. (This does not block the school from sending a request anyway, but hopefully alerts them there is no point in making a group nursing request at this unit). Below shows how the warning appears on the Placing Coordinator's group worksheet for a nursing course.
|
|
|
7. Capacity Tab/Capacity Wizard: Group Entry (6/10) - Edit and Enter Specific Capacity for groups.
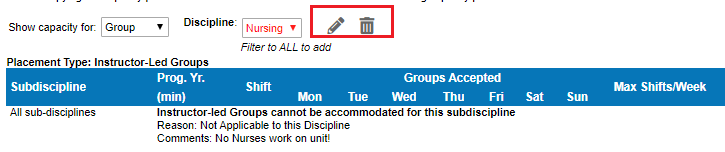
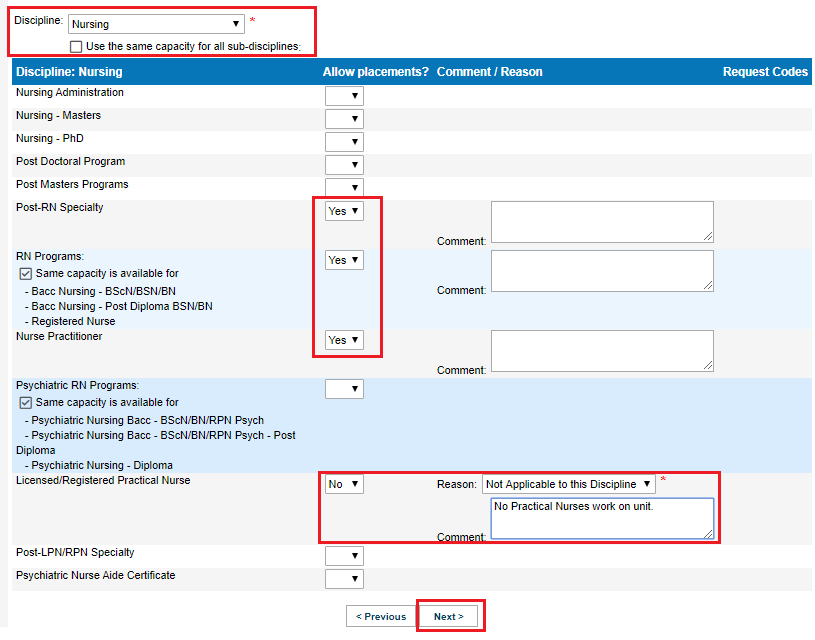
To change the information already entered into a capacity wizard, click the pencil icon to update the information, or if you choose to start over, click the garbage can icon to remove the information completely. To add a different discipline capacity to this destination profile: change the discipline drop down selection to All. Whenever you are filtered to a discipline, the lettering will be red. |
|
|
7. Capacity Tab/Capacity Wizard: Group Entry (7/10) - Edit and Enter Specific Capacity for groups.
If your province uses request codes for a specific discipline, you can add them for any discipline you choose the "yes" drop down for. To see how request codes work: please click this link. |
|
|
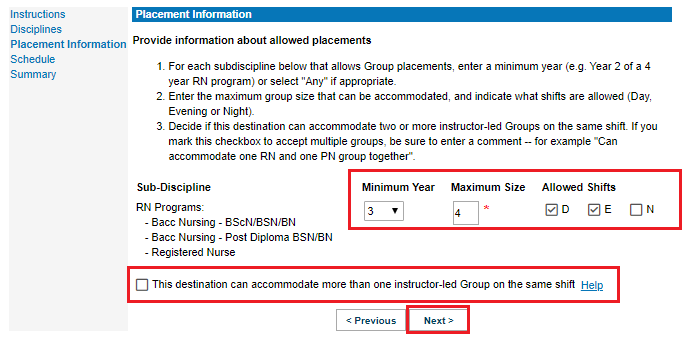
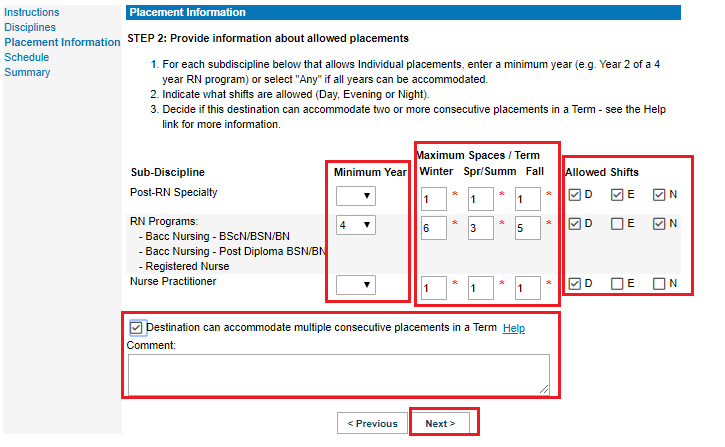
7. Capacity Tab/Capacity Wizard: Group Entry (8/10) - Edit and Enter Specific Capacity for groups. The next step in the wizard allows us to enter:
|
|
|
7. Capacity Tab/Capacity Wizard: Group Entry (9/10) - Edit and Enter Specific Capacity for groups.
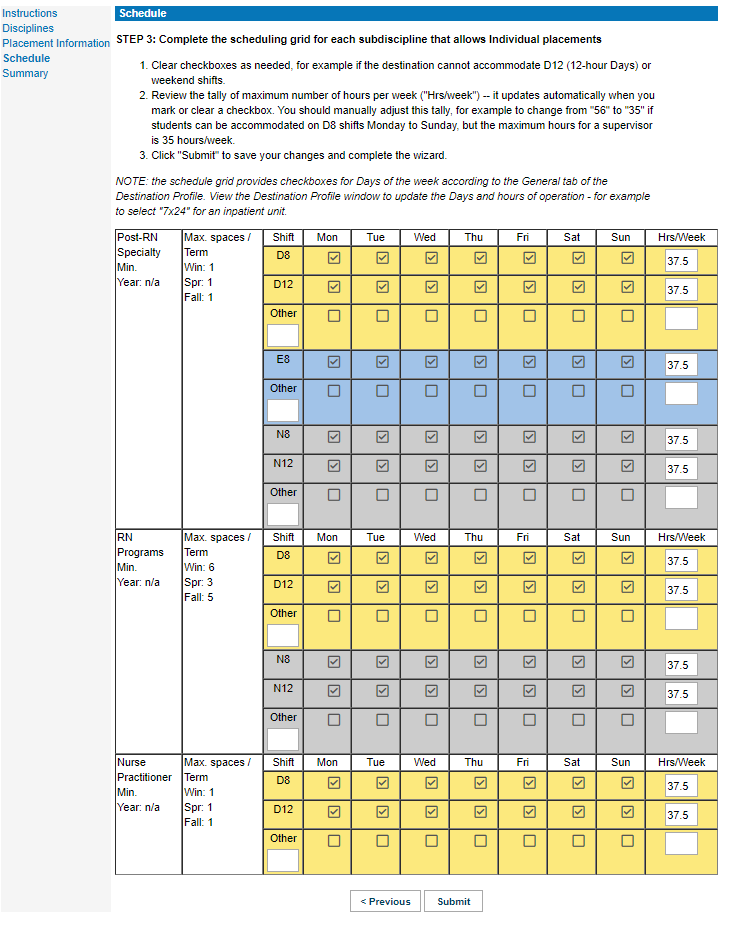
A Schedule page opens. If Saturday and Sunday do not display check boxes for a shift: please check that 7 by 24 has been checked on the General Tab under address and schedule.
|
|
|
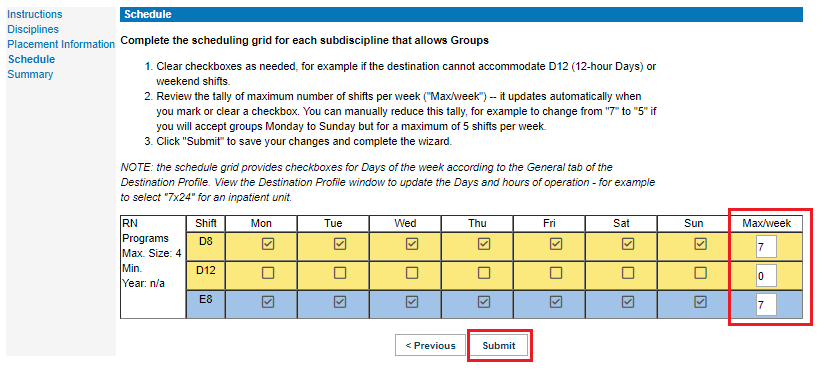
7. Capacity Tab/Capacity Wizard: Group Entry (10/10)- Specific Capacity for groups now entered.
This profile shows:
To enter another group capacity for Health Care Aids, click the pencil icon and select Other Health and begin entering the capacity on the placement capacity wizard. |
|
|
7. Capacity Tab/Capacity Wizard: Individual Capacity Entry (1/4).
|
|
|
7. Capacity Tab/Capacity Wizard: Individual Capacity Entry (2/4).
If your province uses request codes for a specific discipline, you can add them for any discipline you choose the "yes" drop down for. To see how request codes work: please click this link. |
|
|
7. Capacity Tab/Capacity Wizard: Individual Capacity Entry (3/4).
|
|
|
7. Capacity Tab/Capacity Wizard: Individual Capacity Entry (4/4).
A schedule screen opens.
Capacity is now added for Individual nursing placements. To edit: click the pencil icon. To add capacity for another discipline, select: All disciplines and click the add icon.
|
|
|
|
|
|
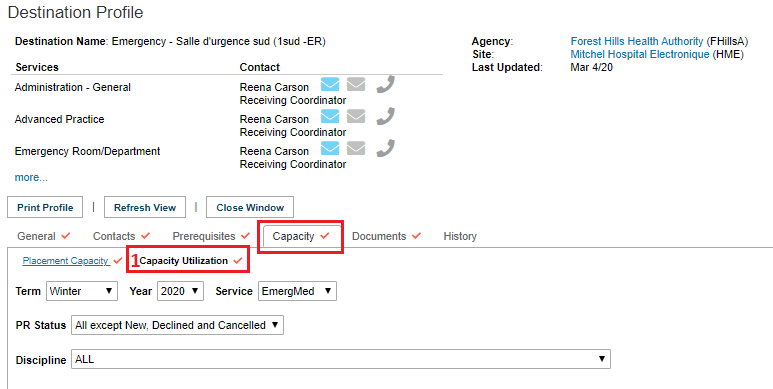
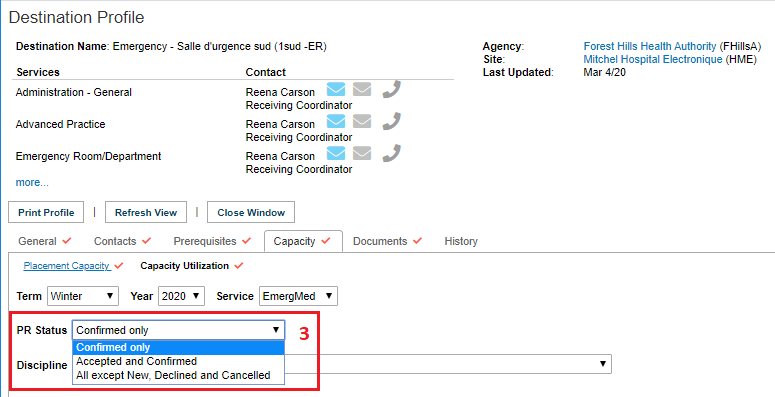
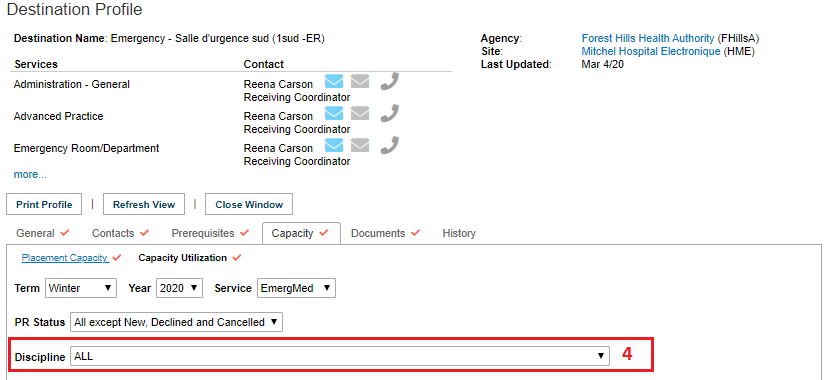
8. Capacity Utilization Tool:
This tool can be used to determine the activity on a unit:
|
|
|
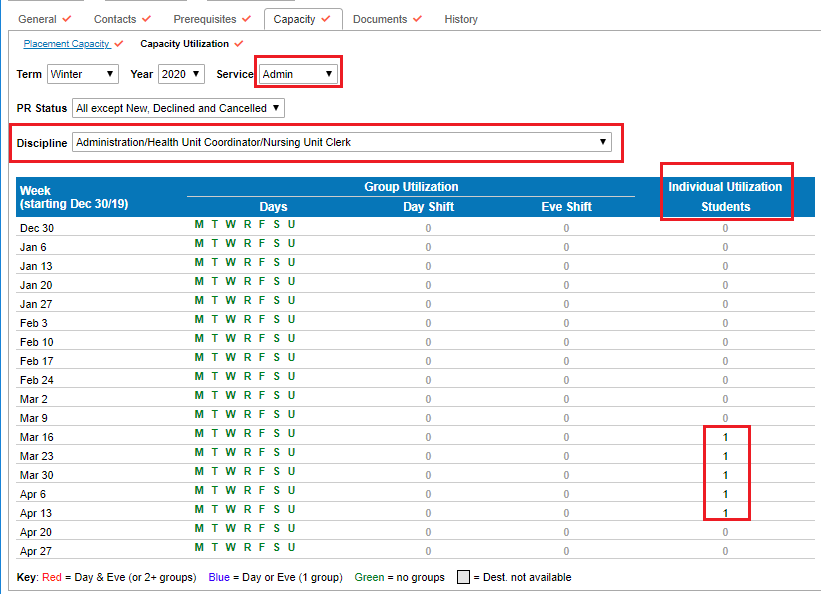
Example One (capacity utilization)
In this example, the filter is to the service of Administration only. We are viewing all statuses except declined and cancelled (or new). We are also filtered to see unit clerk students only.
The system is advising us there are placement requests for one unit clerk student in each of the weeks starting on March 16, 23, 30, and April 6. If we were looking for periods of time where a unit clerk placement request may get considered, we could choose any of the weeks where no students are shown; we also could change the PR status to show accepted and confirmed. If the display now shows no students at all, it means none have been accepted yet and we could submit a competing request for any of the weeks starting March 16, 23, 30, or April 6; however, if we don't want to "compete" we could select a week where there are currently no requests. |
|
|
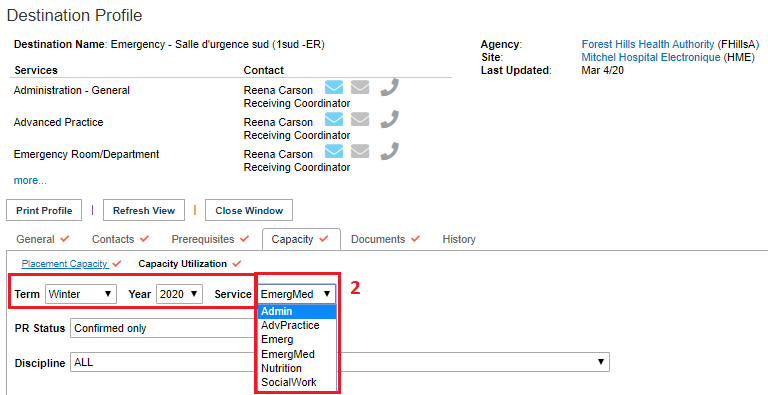
Example Two (capacity utilization)
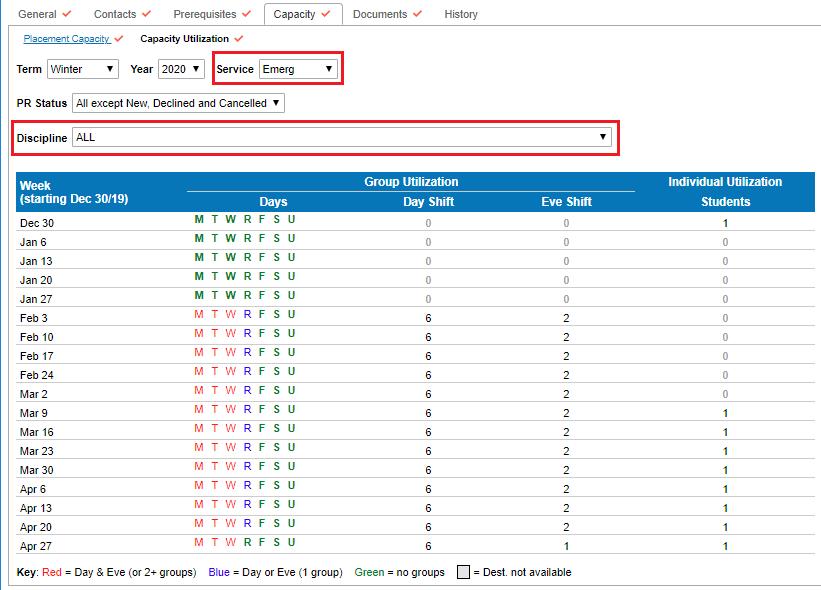
In this example we are filtered to all disciplines, and the service: Emergency Room. We are again viewing requests pending to the destination.
Filtering to the service appropriate to your discipline will help advise you as to the student activity on the unit; it may not indicate all of the factors a destination coordinator may need to take into consideration, such as the number of new hires, training the staff may need to attend during a specific period, etc, however by matching your disciplines and service you will be able to view busy times and times that may be available for student placement. |
|
|
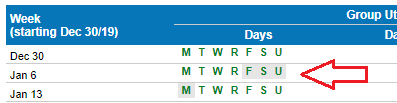
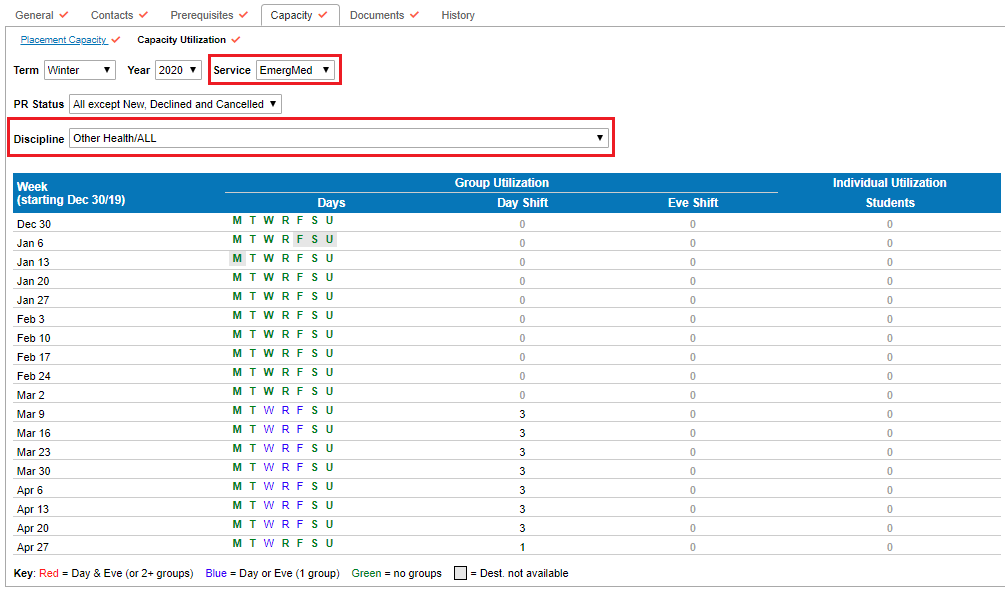
Example Three (capacity utilization)
In this scenario we are now filtered to Emergency Medical Services (Paramedics) and we can see requests to place groups of Paramedical students The Week of March 9 through April 27, on Wednesdays, Thursdays and Fridays. |
|
|
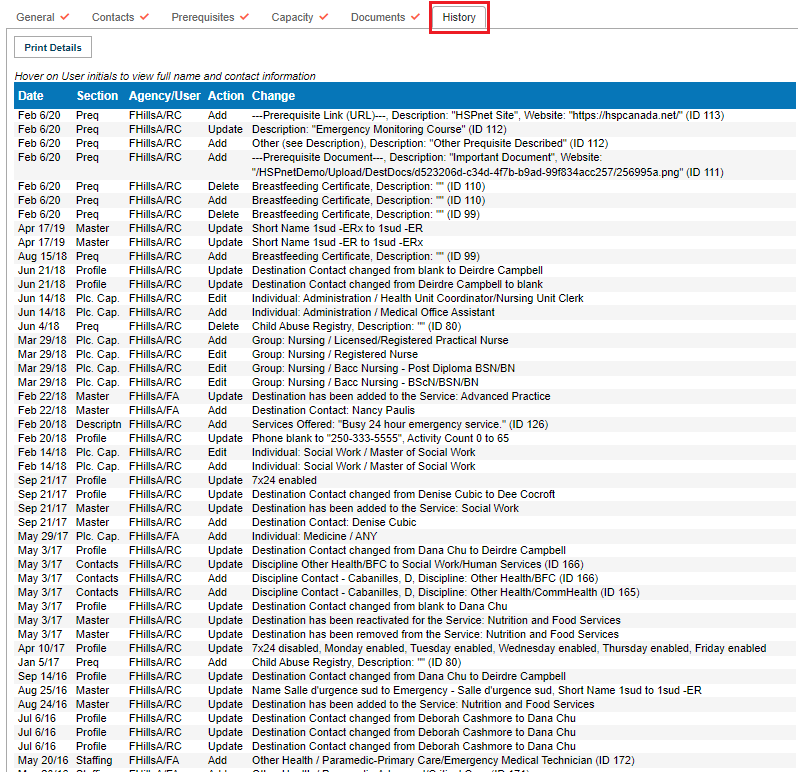
9. History Tab
The history tab tracks changes to the destination profile. Hover your cursor over the initials RC to see Reena Carson made these edits, tracked by:
Students and instructors cannot view this tab. |
|
|
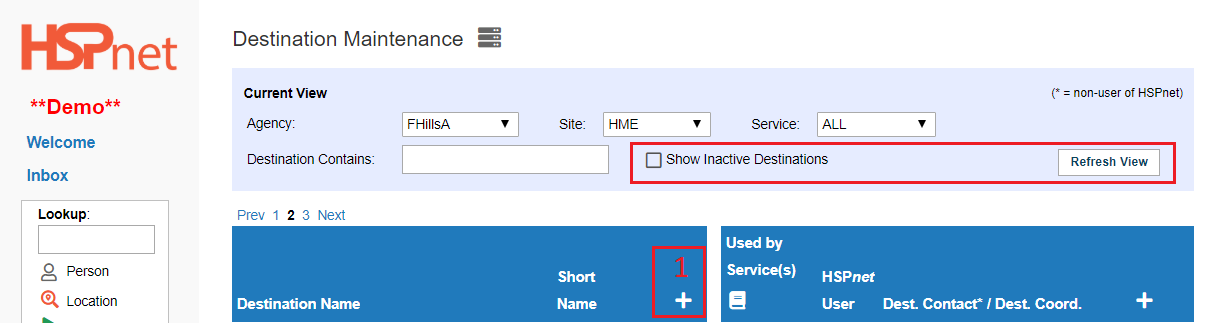
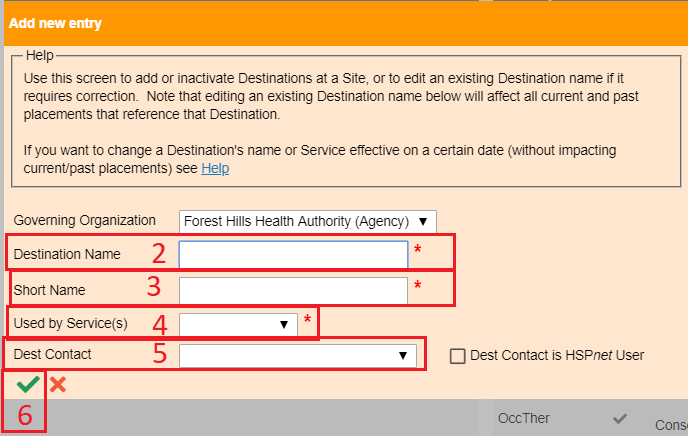
For Receiving Coordinators: How To Add a Destination -
when no destination has been created you need to create a new one. To add a brand new destination:
If you get a message that the destination is already in the database, click to place a check mark in the box beside Show Inactive Destinations and click Refresh View. To see the Show inactive Destinations check box, your service drop down needs to be on All; if a single service is selected that box will not show up. Click the reactivate
|
|
|
2. Enter the name of the new destination. 3. Enter a short name for the destination. Short names have a maximum of 10 letters. Please try to make the short name clear, as often only the short name will be on a drop down list and not everyone may understand local acronyms. 4. You can add one service via this screen and would need to go back to the directions above to add additional services to the new destination. 5. If the destination contact is known and on the drop down list you can add that individual here, or click add new to add them to the drop down list. 6. Save the changes with the green check mark. The pencil icon beside the new destination (left column) can be used to edit the destination name if you made a typo. If you are changing the name of the destination, it will be changed in the past, present and future. You may need to consider retiring the existing destination and creating a new one if the name has changed and you need to track this information.
If you have a unit closing and being replaced by another unit, please see the document: Receiving Agency Maintenance: Managing Services and Destinations. |
|
|
7. By default your new destination will be open Monday to Friday days only.
To change this to a 7 day per week, 24 hour a day operation:
|
|
Other options on this page enable you at the top drown to select: This destination has its own address - and then you can enter an address, town, postal code, etc that is different from the site address. This feature is ideal to use with umbrella sites (a collection of like sites that may be at different locations, such as Home Health, Mental Health, Adult Day Care Centres, etc. You may also need to see the document: Services: Add or Delete a Service from a Destination. |
|
|
Return to Index above Go to the PR Summary tool guide. |