Receiving Agency Profiles - Agency Level, Site Level: Prerequisites and Documents
Summary:
An online profile is available for each Receiving Agency (RA) and its associated Sites, Services and Destinations. This guide provides:
- An overview of Receiving Agency profiles and the appropriate use of each.
- Instructions for adding content in a profile, and then applying it to other profiles as appropriate.
- The main focus of this document is populating the Agency and Site Profiles. More detailed information specific to destination profiles can be found in the document: Destination Profiles.
- Agency and Site Profiles (read only/but links will work) can be accessed by students and faculty, as well as parts of the destination profiles.
- When entering prerequisites, documents, or closures, at the Agency and Site levels, please apply or remove in the destination profiles so that each destination profile will list all prerequisite requirements in one look up/location for the placing agencies on the destination profile prerequisites tab.
- Eg. an agency prerequisite requirement is entered at the agency level, then is applied to the sites that require that prerequisite, and to the destinations that require that prerequisite but is not applied where it is not needed. This information can also be made specific to discipline/sub-disciplines of students. Perhaps all nursing students coming to Labour and Delivery require NRP certification, but it is not a requirement for unit clerk students sent to that destination.
In this document:
- Overview of Agency, Site, and Destination Profiles
- Accessing the profiles
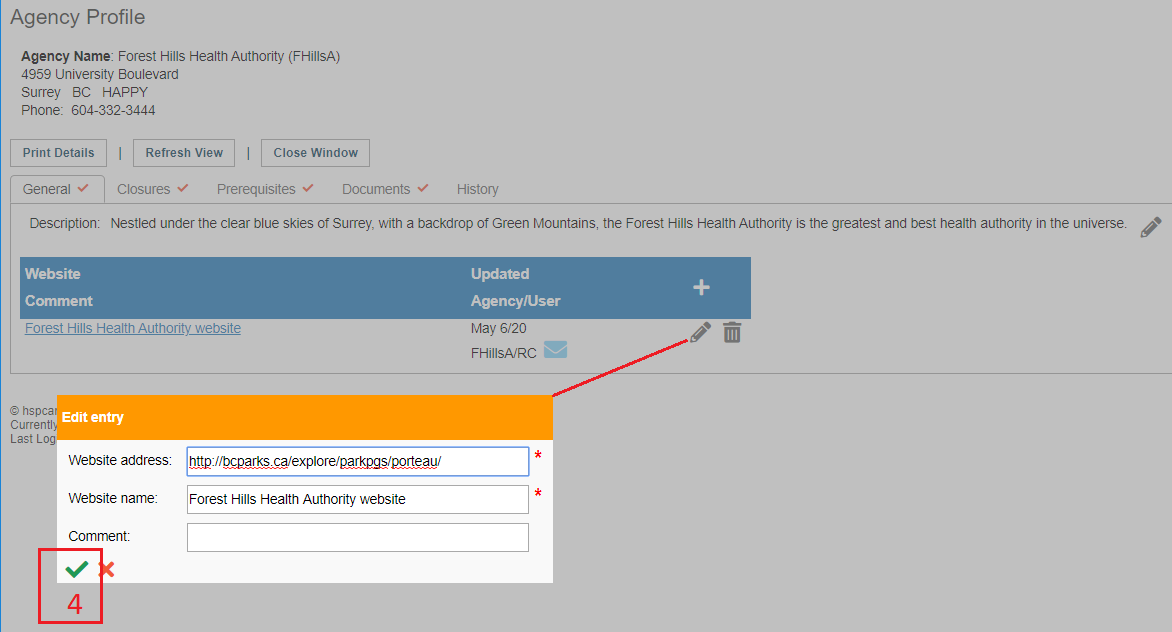
- Populating the General Tab of the Agency or Site Profiles (including web links)
- Closures Tab (run a report for PC's and RC's included here.
- Prerequisites Tab
- Documents Tab
|
Background
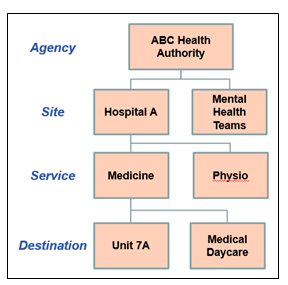
The HSPnet data structure for Receiving Agencies has four levels:
An online profile is available for each level, and should contain content that is appropriate for that level.
For example, content in the Agency Profile should apply to most sites and destinations in that agency. Content that applies only to a single site should be added in the Site Profile, and applied to all or specific Destination Profiles at that site. |
|
|
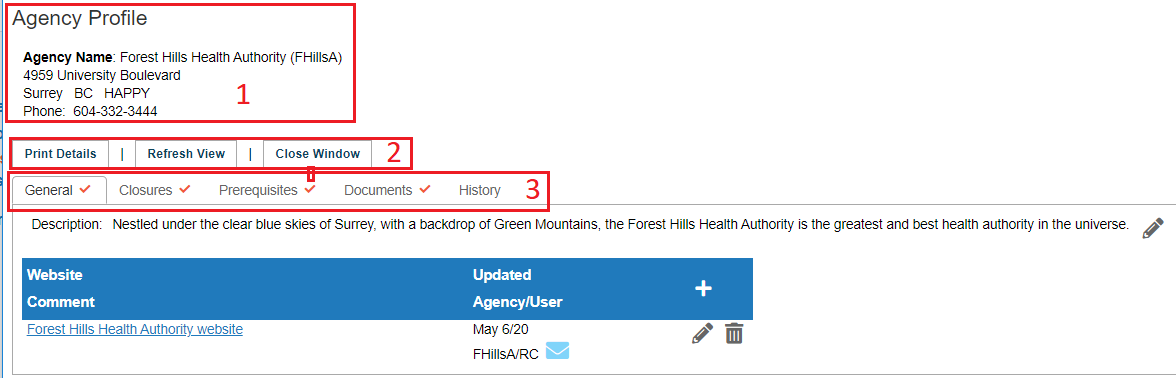
Profile Layout
All profile screens have three features in common:
|
|
|
The following are examples of appropriate content for each level:
{Special note: in Ontario and the Montreal area, and some other regions of Quebec, different legal entities have been grouped into one umbrella site (shared agency profile with other legal entities) based on geographical region, therefore receiving sites in Ontario and some regions of Quebec will not see their specific organization name in the agency profile and in those cases will need to use the Site Profiles, not the Agency Profile. Some of the larger multi-site receiving agencies in Ontario will transition to become their own legal entity: please check whether your agency has its own profile - then RC's can post to it centrally, but please do not post agency specific information if the agency is still an umbrella site. You can look this up under setup/lookup/agencies. A small umbrella icon is displayed on umbrella agencies). |
|
|
|
|
|
|
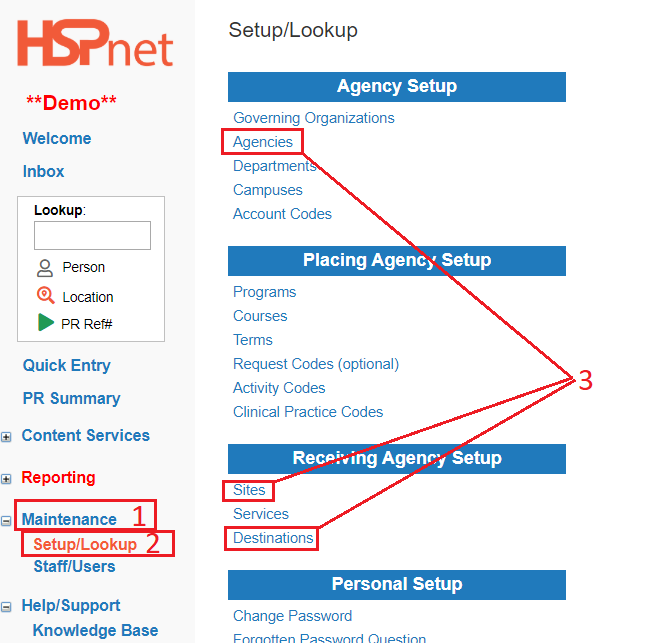
Access the Agency, Site or Destination Profile:
(these directions apply to Receiving Coordinators, Placing Coordinators, Course Leaders & Destination Coordinators using DC Advanced).
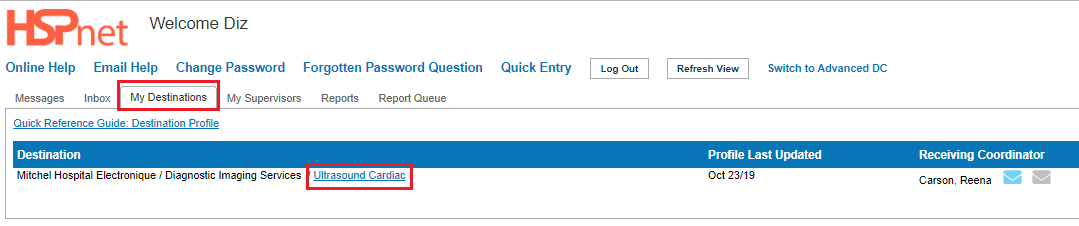
Destination Coordinators using DC View: (default screen): access the destination profile:
|
|
|
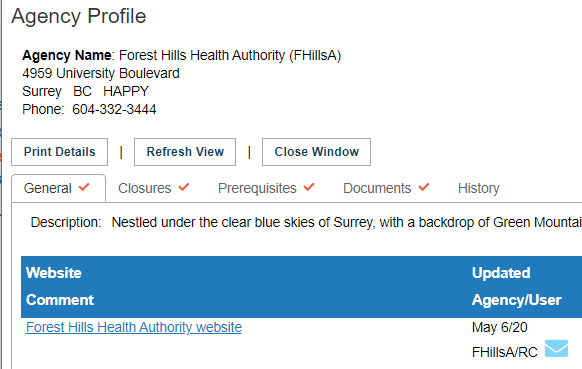
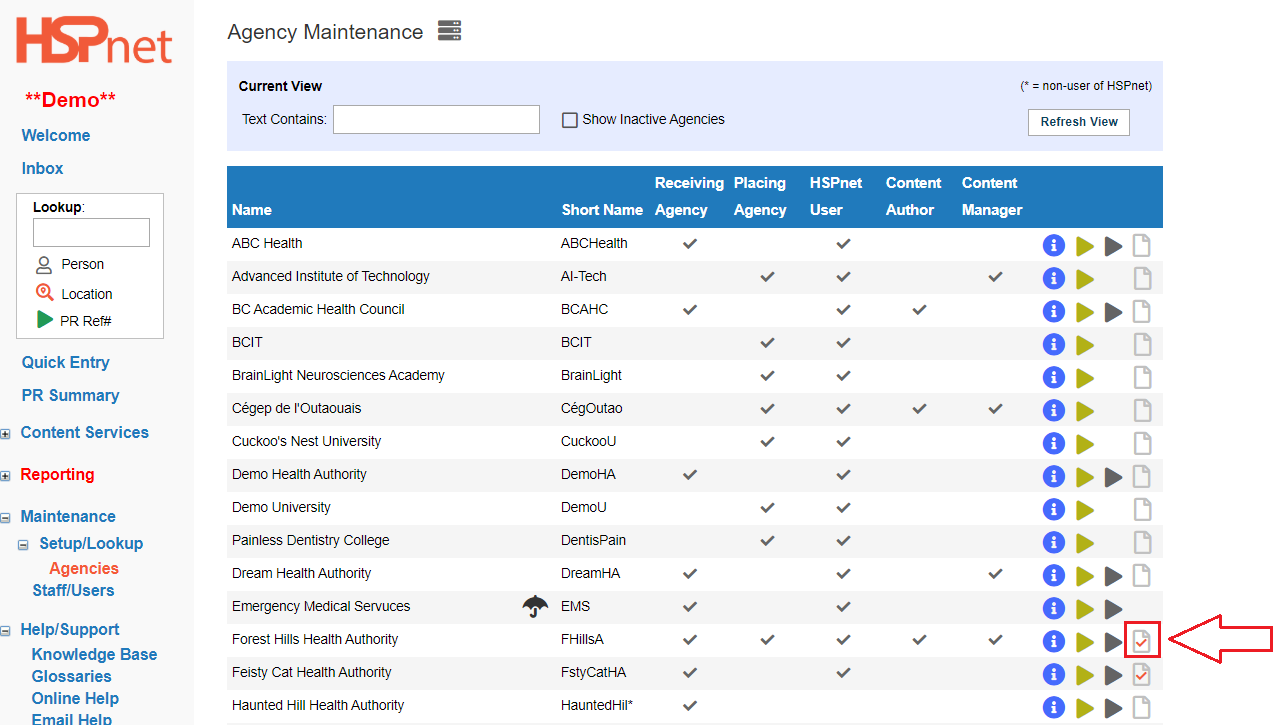
Open the Profile:
Click the profile icon to open it.
The last profile you opened on this page will have a yellow border (to help find the last one you opened).
|
|
|
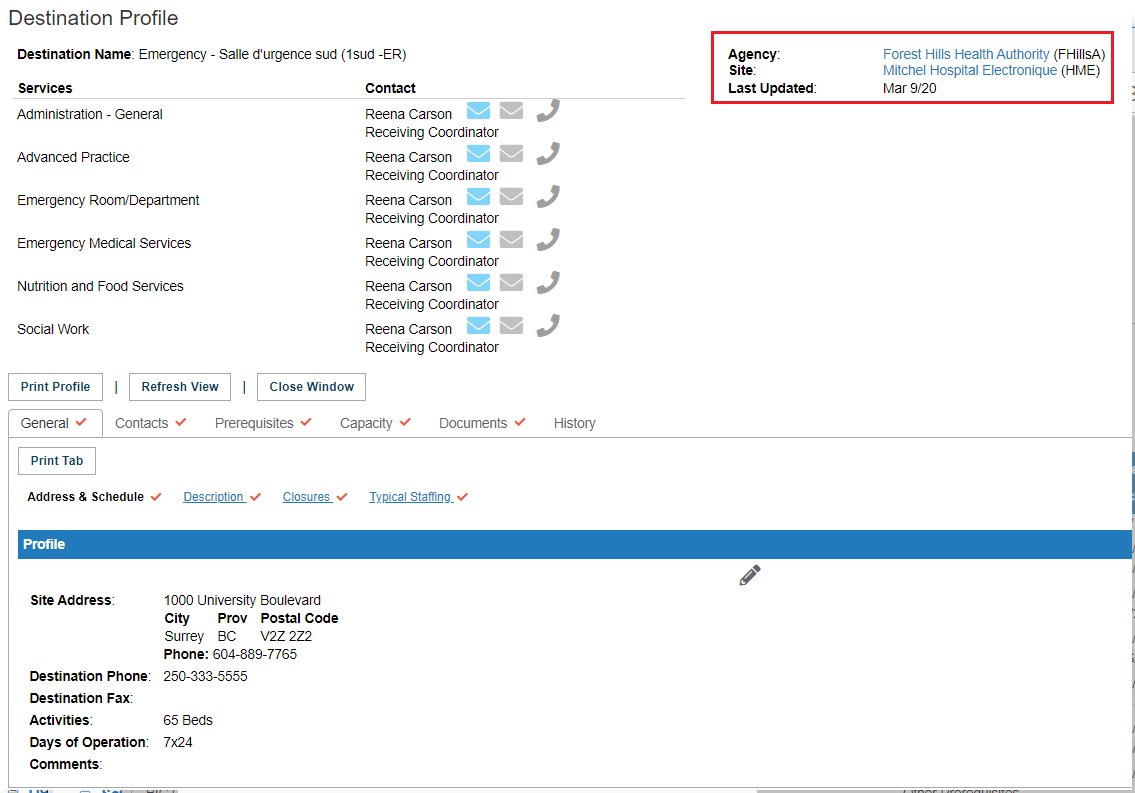
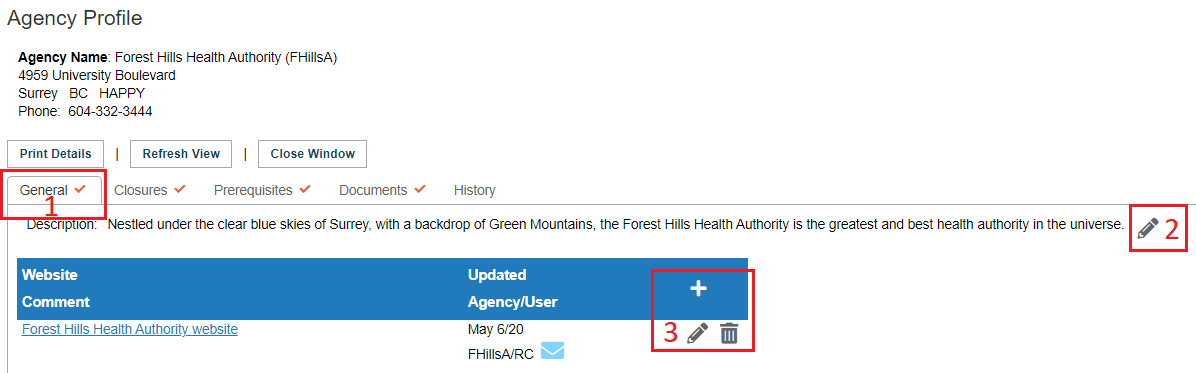
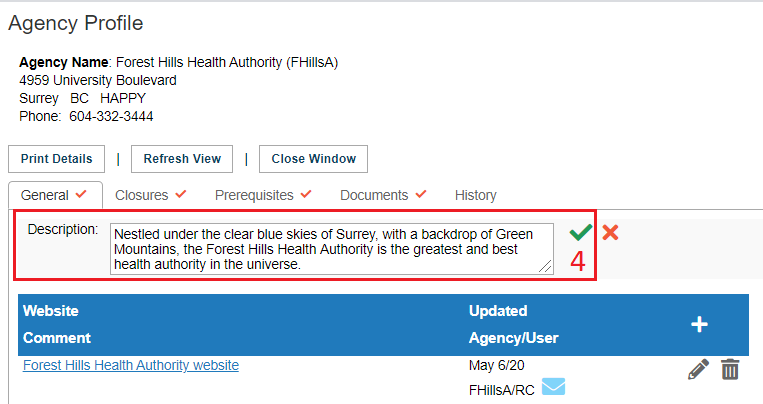
Populating the General Tab of an Agency or Site Profile:
Red check marks inside the tabs indicate there is information entered in those tabs. |
|
|
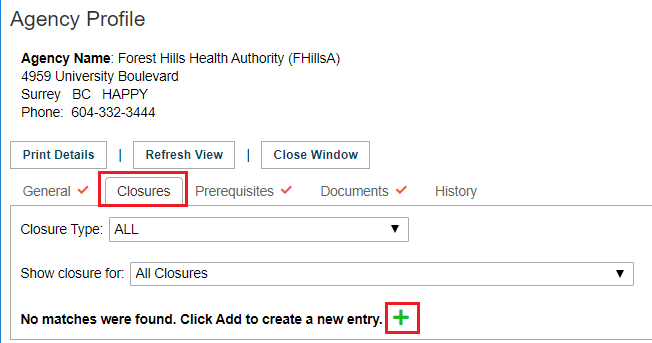
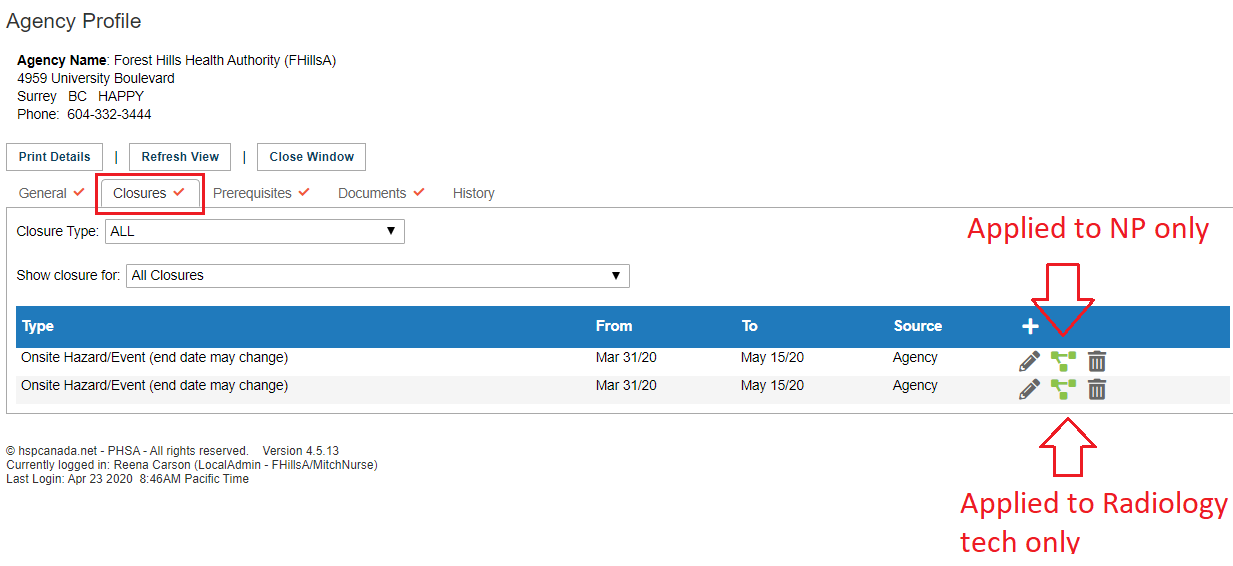
Closures Tab (these directions work for destination profiles as well as Agency and Site Profiles).
NOTE - Placing Coordinators will only be able to view the closures that affect their student disciplines. The Closures tab will show a red checkmark, but no other information about the closure is displayed, if it does not apply to your discipline.
This tab was designed to enter temporary closures only, so a first day and last date of closure must be entered - please see the next boxed section below for On Site Hazard Event closures where the end date is not known.
When you enter a closure, you need to identify the type of closure from the drop down list and indicate the type of students (or all) the closure pertains to.
If you enter this information at the agency level it will be automatically applied to all sites and destinations unless you specifically edit the list to remove any destinations or sites not affected.
If you select only some student disciplines when you create the closure; you may need to enter more than one notice of closure when there are different restrictions for different destinations.
Unless a closure affects an entire agency (such as onsite hazard event), best practice is to enter closures at the appropriate level of site or destination profile.
The closures tab includes two filters (drop down lists) for other users:
To add a closure:
|
|
|
Notes about onsite hazard event closures:
|
|
|
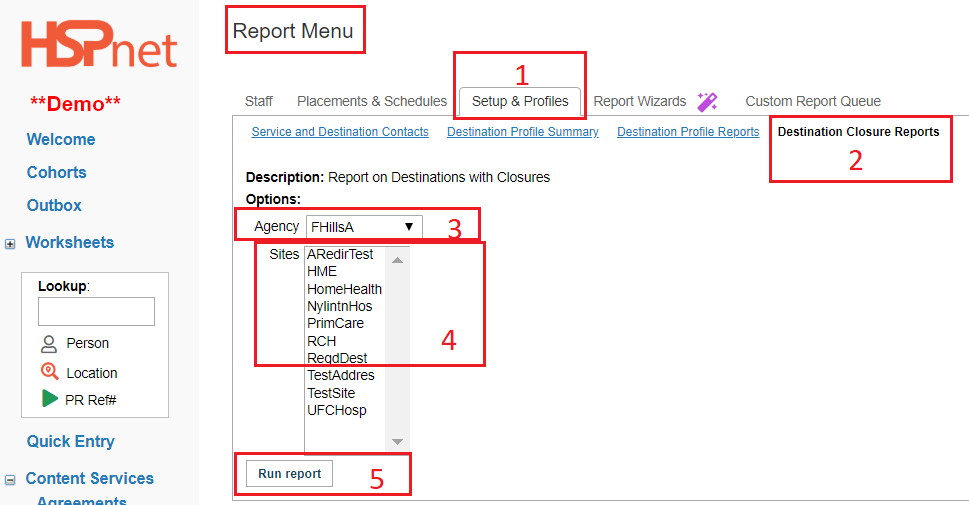
Destination Closure Reports for Placing Coordinators and Receiving Coordinators:
Click Reporting/Report Menu on the left of the Welcome Screen.
|
|
|
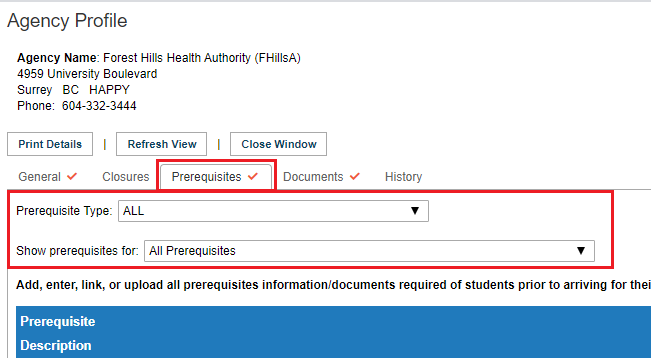
Prerequisites Tab
The purpose of the prerequisites tab is to identify all of the requirements students (and faculty) must complete/mandatory prior to the start of the practice education experience. You can add, enter, link, or upload the prerequisites and accompanying documents at the agency or site level, and apply them to all or to specific destinations for all or specific disciplines/sub-disciplines of students.
Best Practice: ensure all information relevant to a specific destination is included on that destination profile; by default all prerequisites and documents entered on an Agency or Site Profile are applied to all destinations - you can remove destinations or disciplines and subdisciplines through the apply icon - if they do not apply to that destination/type of student.
The Prerequisites tab also includes two filters (drop down lists) for other users to search the entries the RC has made (PC's, Course Leaders, Instructors, Students):
|
|
|
To Add Prerequisites: (on any of Agency, Site or Destination Profiles)
|
|
|
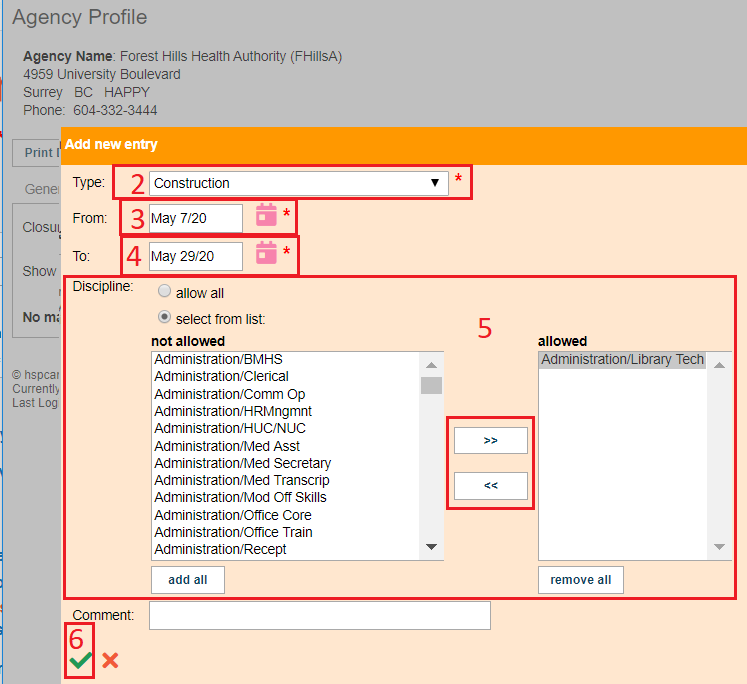
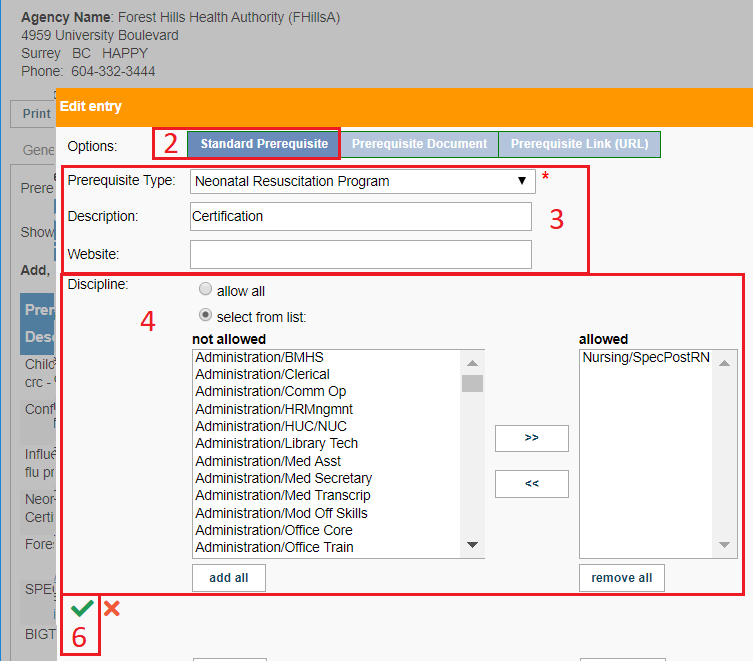
Add a Standard Prerequisite: 2. On the Options line, select one of the 3 blue buttons: Standard Prerequisite, (other options illustrated below: Prerequisite Document, or Prerequisite Link (URL).
3. If Standard Prerequisite is selected in Options, select the Prerequisite Type from the drop down list. There is also a description text field for more information and a text field where you can add a website link (copy the web link and paste it into this field).
4. If the prerequisite applies to all students leave the button "Allow All" checked (default), otherwise click "Select from list," and list only the sub-disciplines of students in the "Allowed" box, who are required to meet this prerequisite. To move disciplines/sub-disciplines from the "Not Allowed" box (prerequisite is not required for those students) to the "Allowed" box (students are required to meet this prerequisite) click to highlight the discipline, and click the right facing arrow to move it to the "allowed" box. 5. Save the changes with the green check mark |
|
|
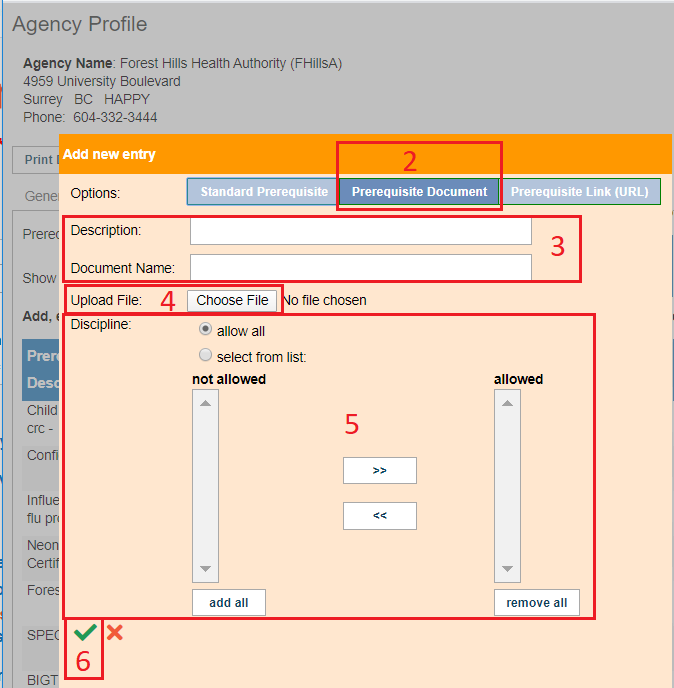
Adding Prerequisites - Prerequisite Document
|
|
|
Adding Prerequisites - Prerequisite Link (URL)
|
|
|
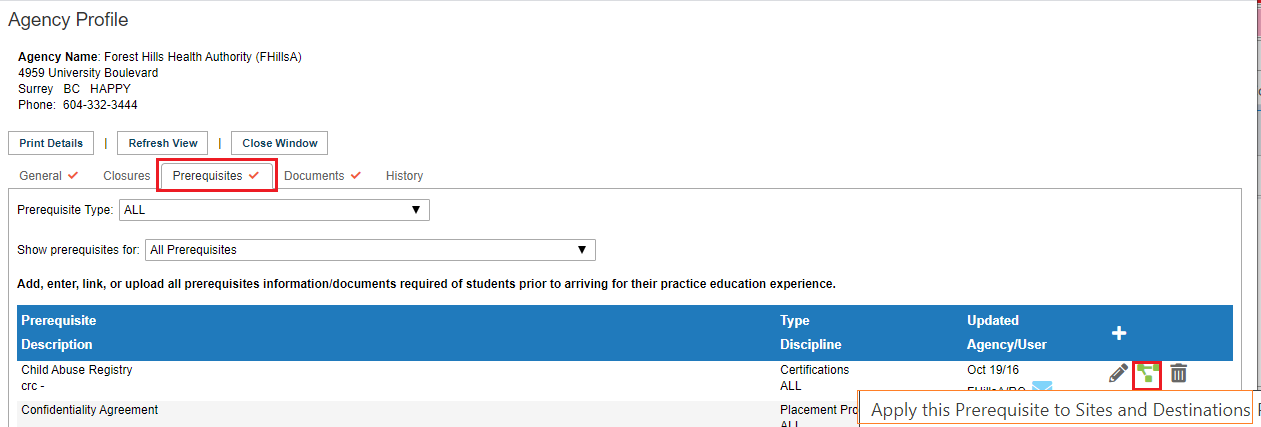
Apply Prerequisites from the Agency Profile or Site Profile to Other Site or Destination Profiles
The above 3 panes described how to add prerequisites. Prerequisites are automatically applied to all sites and services. If you wish to remove sites use the apply icon.
|
|
|
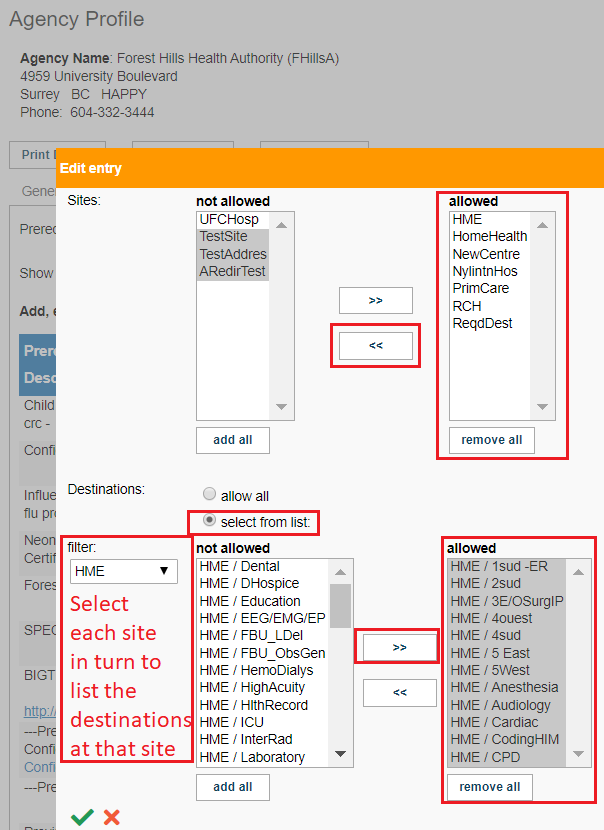
If the prerequisite is entered on the Agency profile, the edit entry screen will list all of the sites under that agency and all of the destinations.
If the prerequisite is entered on the Site profile, only the destinations will appear on the edit entry screen.
Prerequisites entered at the destination level are specific only to that destination and cannot be applied elsewhere.
Initially this set up takes some time, but it does allow you to change/update the actual prerequisite (document/web link) without having to reapply it next time. |
|
|
The Prerequisite that was entered at the Agency level, is now applied in the Site Profile for all applied sites and is also applied in the destination profiles (if applied to them).
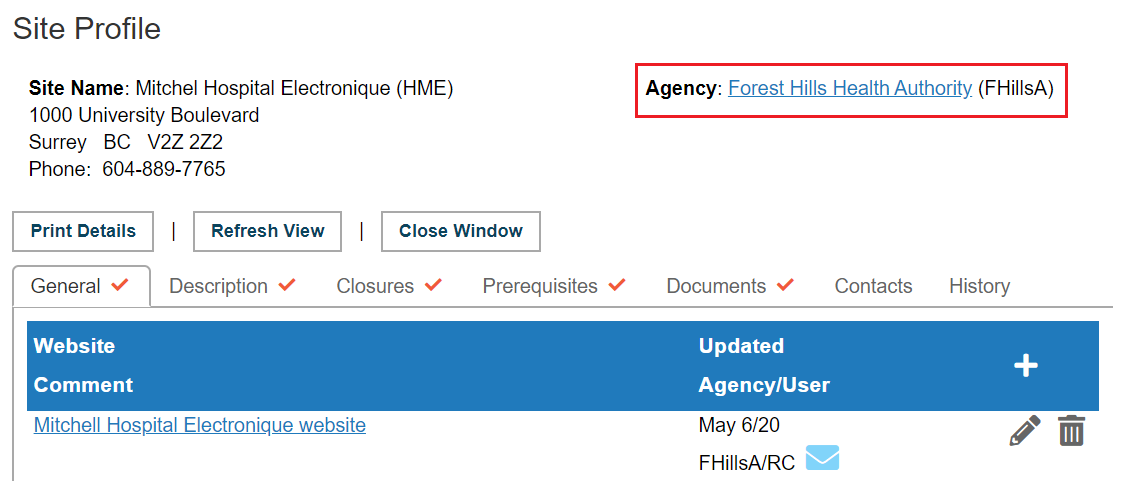
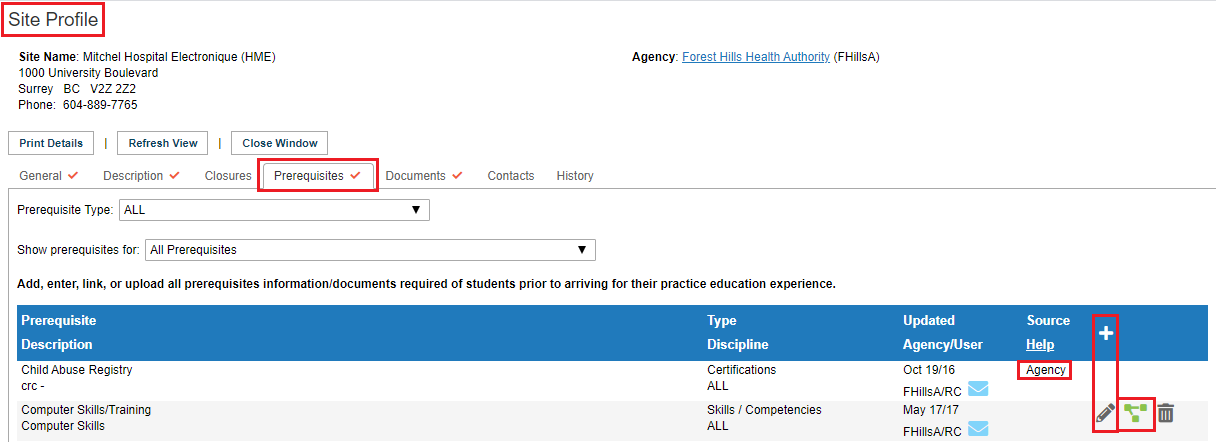
At the site level, information entered at the agency level will say agency; information entered at the site level is added with the add icon and edited with the pencil icon.
Information entered at the site level can be edited with the application tool to specify specific destinations.
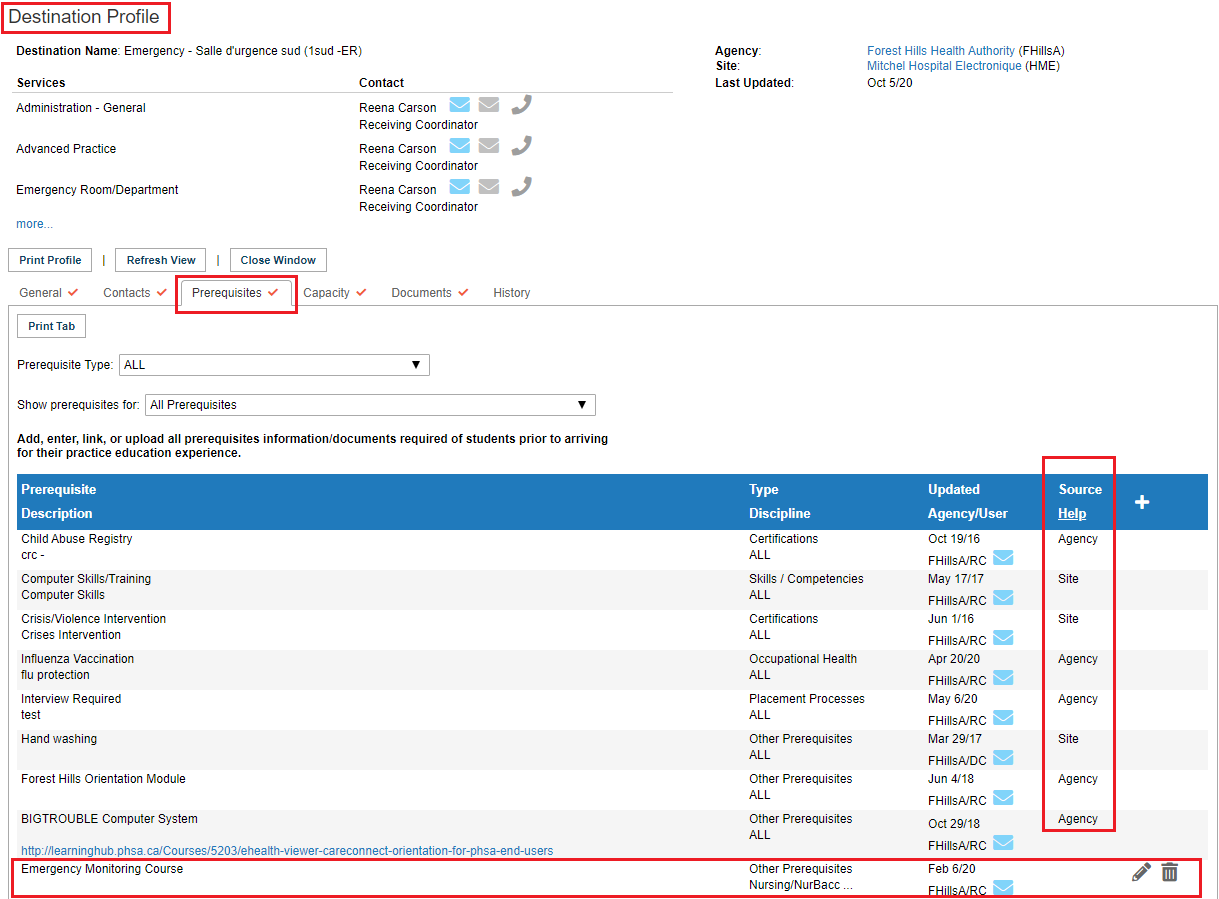
At the destination profile level, the source will be displayed as Agency or Site for applied documents. Only Receiving Coordinators can edit the Agency or Site Profiles, but destination coordinators can edit prerequisites specific to their destination access.
In this example, a destination coordinator may edit only the Emergency Monitoring Course requirement. This is evident as the DC has the edit icons for that prerequisite only.
|
|
|
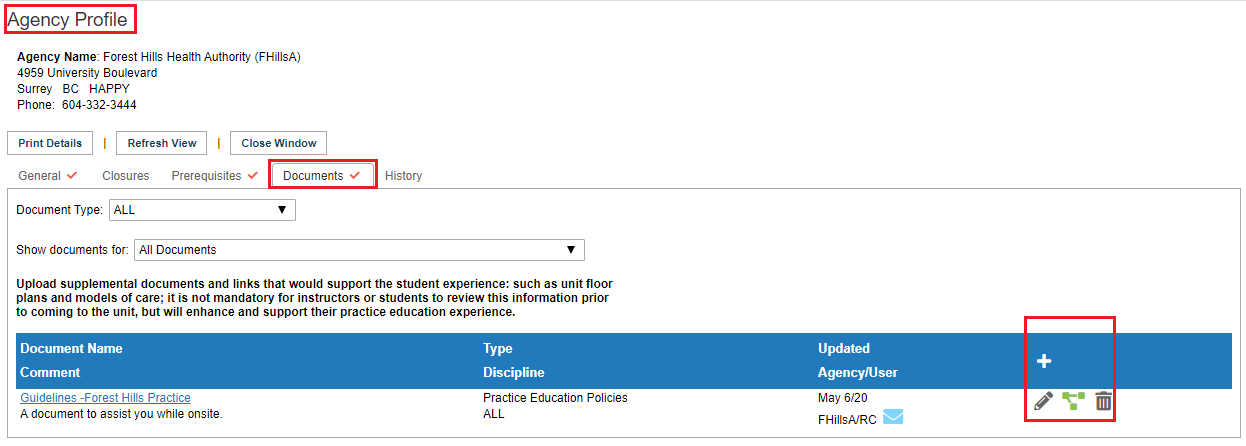
Documents Tab
Please see the Destination Profile guide for more detailed information on filling out the General and placement capacity tabs. |
|