Student Admin - Covid-19 Automated Student Immunization Uploads, Individual Manual Editing and Reporting Options
Placing Agency Related Guide (PARG)
Summary:
This step by step guide explains how to perform an upload or mass update of Covid-19 immunization for Students by direct upload of an Excel file to HSPnet. This data may also be entered directly into a student profile, or via the enrollment screen. Please see below for more information about those two methods.
Background:
The upload of student student Covid-19 immunization immunization requires the student record to already exist in the system. A separate enrollment upload may be performed for adding student records, as explained in in Automated Student Uploads reference guide.
For faculty covid reporting, it is the same as the student process once you have the consent of the staff member. See this page regarding instructions: Staff/Users - Instructor/Faculty Prerequisites (FPRE)
Important - When preparing your excel lists they need to be per Program (eg; BScN) as you will need to acknowledge which program the students are in before the upload.
Detailed instructions are below the video.
Covid-19 Automated Student Immunization Uploads Video - Step by Step Instructions (7 min)
|
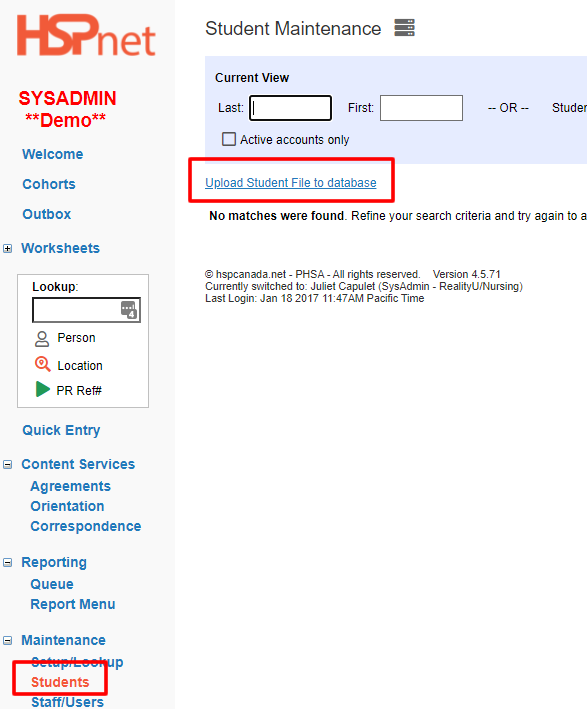
Go to Student link in the navigation bar to get to the Student Maintenance screen or if using cohorts, go to the Enrollment Worksheet for a course.
Click the Upload Student File to database link to get to the upload area.
|
|
|
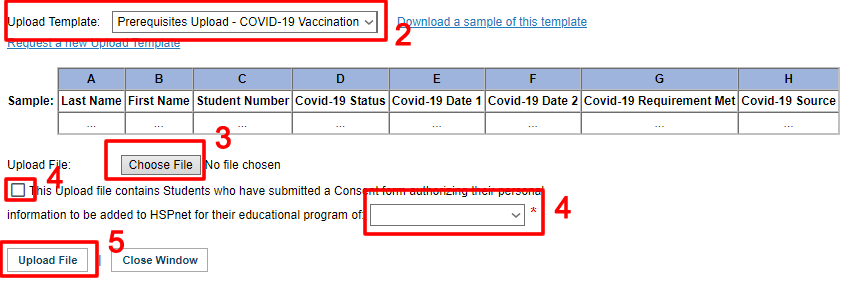
Prepare your Excel Spreadsheet.
Use the Prerequisites Upload Upload template for for Covid-19 immunization only. You can not request a custom template for for prerequisites, only use the one listed.
You can download a sample of the template by clicking the blue link on the right.
|

|
Important for BC users - For Covid reporting:only the Covid-19 Status (column D) and and Covid-19 Requirement Met (column G) fields need to be filled out, other than than Last Name Name (column A), First Name Name (column B) and and Student Number Number (Column C). All other fields are optional if you want to track your data.
For the upload template, column headers indicate the value required for upload. You will need to enter these values in the corresponding column. In each case, columns A, B, and C are mandatory to identify the student record.
Things to remember:
- When preparing your excel lists they need to be per Program (eg; BScN) as you will need to
acknowledge acknowledge which program the students are in before the upload.
- Do not change row 1 or add additional rows above it.
- If you leave a field blank, that will NOT erase data (overwrite) current data in the database for that student.
- eg: You are changing
the the Status /Test Results Results field but you do not want to change the Source field. You can leave the the Status /Test Results Results blank and it will not be overwritten.
- If
you you DO want a field to be erased to blank, place the word NULL in the field. When you do the upload, the system will recognize NULL and erase that field.
NULL does work on the database code fields, Status /Test Results and Source listed next.
Important - Certain fields for each field type need to be identified by a database code:
-
Covid-19 Status Status * Required
| NULL |
To show Blank spot |
|
| Immune |
Immunized |
- Has had at least one shot.
- Pick this code to add dates.
- This does not mean they have met the provincial requirements. Mark in the Requirements Met field if they have met the requirements
|
| Waiver |
Waiver Signed |
Waiver from a doctor doctor and/or allergy specialist |
| NotRequired |
Not Required |
- Student is only in virtual placements
- Student in group placements who cannot be unassigned but no longer is required to complete the Covid reporting due to withdrawal or finishing their placement hours.
|
| Deferred |
Deferred - Medical Reason |
Awaiting recommendation for further vaccination by MHO |
| Refused |
Refused - no Waiver |
Has refused vaccination |
-
Covid-19 Requirement Met Met * Required
| YES |
Yes / True (This means the check box is checked) |
Meets provincial requirements for being immunized |
| NO |
No / False False (This means the check box is not checked) |
Does not meet provincial requirements for being immunized |
-
Covid-19 Dates Dates (Not required) You need to pick Immune in the Covid-19 status in order to add a date.
| 10/26/21 |
Make sure it is a Text format not Date for that cell |
| Oct 21/21 |
Make sure it is a Text format not Date for that cell |
-
Covid-19 Source Source (Not required)
| NULL |
To show Blank spot |
|
| DocOrig |
Document - Original |
Vaccination Card or Vaccination Passport |
| DocCopy |
Document - Copy |
Digital/Paper copy of above |
| StuHist |
Individual History |
A school may track the student vaccine data in a different system and so have history of it |
|

|
|
Upload the spreadsheet
- Click
the the **Upload Student File File **link in the Student Maintenance screen
- Select the template from
the the Upload Template drop-down list
- The top line of the Excel spreadsheet should match the template you choose
- In this sample the Excel spreadsheet needs to have the “header row” in row 1 (Last Name, First Name, etc.) and student data starting in row 2
- Column A on the Excel spreadsheet is Last Name; Column B is first name; Column C is Student Number, etc.
Do not have blank lines above or below the header row: Student data should start on line 2 of the spreadsheet.
3. Click Click Choose File to select the Excel file from your computer
4. Mark the the This upload Files contains Students who have submitted a Consent form authorizing their personal information to be added to HSPnet for their education program of xxxx check-box
5. Click Click Upload file
|
|
|
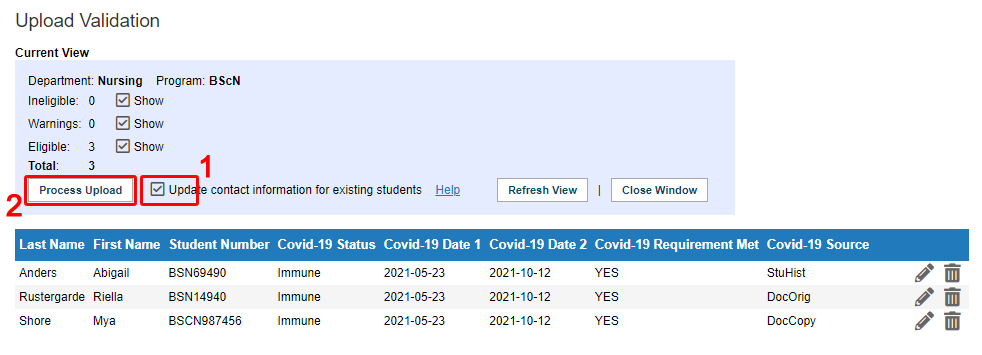
The Upload Validation Screen opens
If all is well, and you see the the **Process Upload Upload **button, make sure that you do the following:
- Click the Update contact information for existing students
- Then
click click Process Upload
If the the Process Upload button does not appear the upload cannot proceed until corrections are made. See the Automated Student upload video for instructions on corrections to the validation screen.
The student records will be updated with with Covid-19 immunization information.
|
|
Manual input or editing of of Covid-19 immunization record:
There are two ways to enter this data in HSPnet. In the student profile for that student or in the Enrollment Worksheet for the cohort that the student is enrolled in.
| Entering or editing data in the student profile: |
|
|
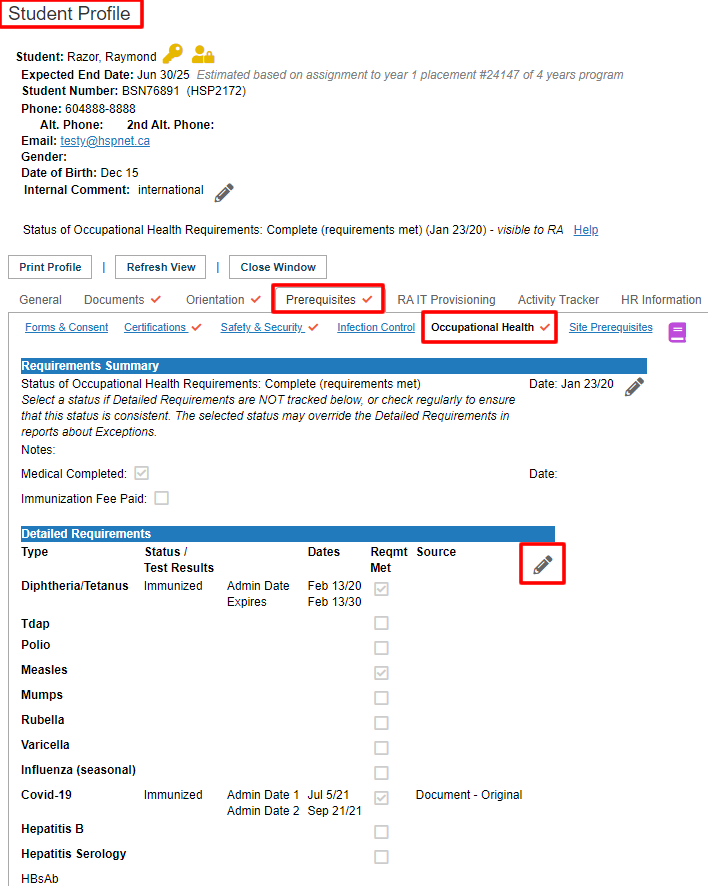
Updating an individual Student Profile
Updating OH&S Prerequisites
-
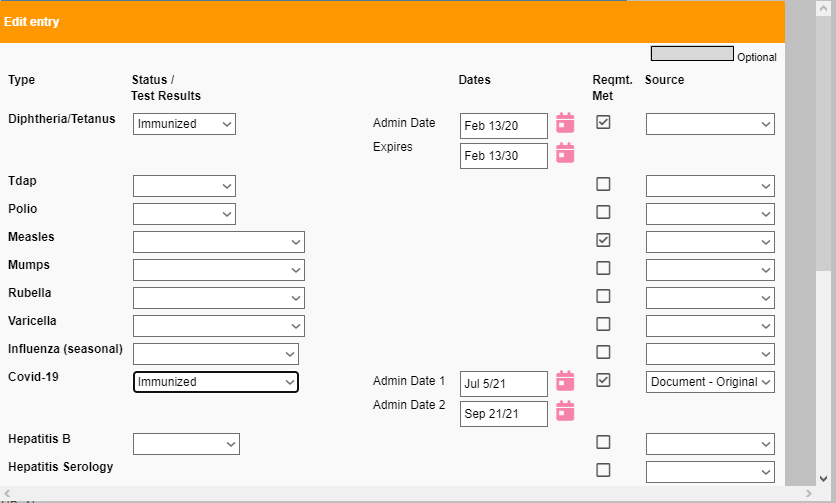
Open a student profile, go to the Prerequisites tab and then then Occupational Health.
-
Click the edit icon to complete to complete
to get to the edit screen.
- This will open the online form screen (shown below). Go to the Covid-19 section and use the drop downs to choose the correct data to enter for the Status/Test Results.
- For vaccination dates, choose either Admin 1 for the first dose 1 or Admin for dose 2 and then choose dates.
- For Req Met, check/uncheck the box if the student has met the requirements of immunization.
- You can add the Source data drop down if applicable.
- Scroll to the bottom and click the green check mark
 icon to save the data entry icon to save the data entry
|
|
| Review/Monitor Information already entered, or enter a specific field for all students from the Enrollment Worksheet. |
|
|
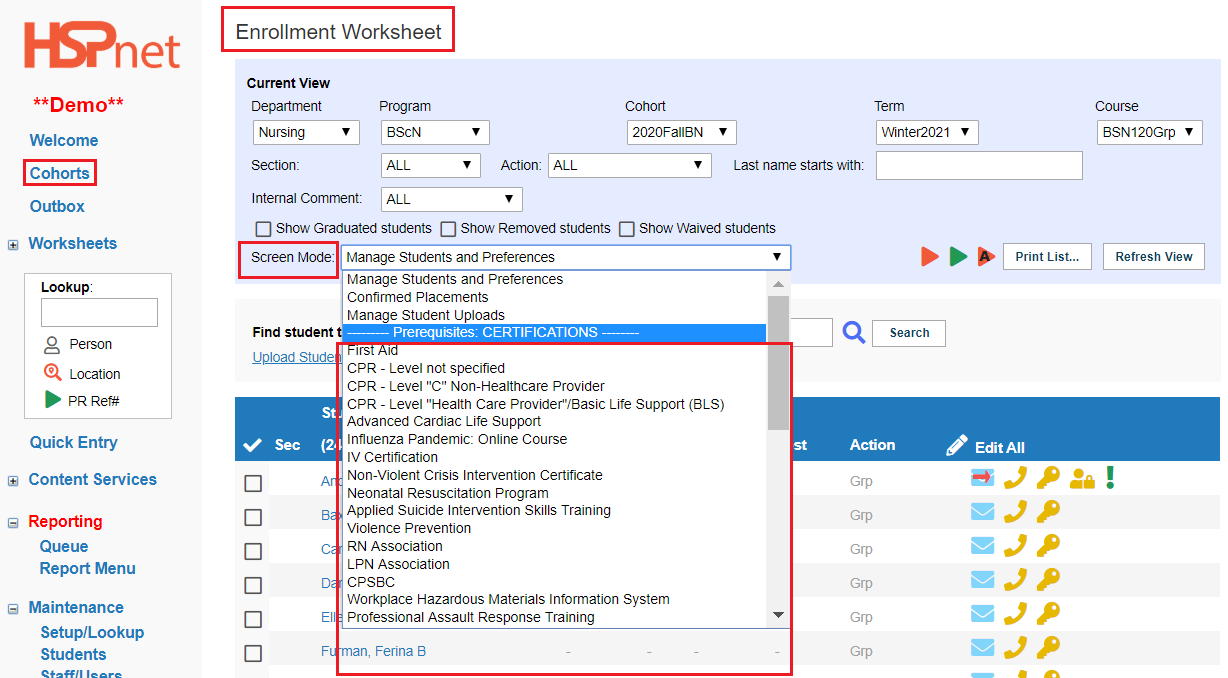
On the Enrollment worksheet:
- At screen mode select a specific field from the drop down list under the heading of Prerequisites: OCC HEALTH and then Covid-19
The The Enrollment screen provides several "view modes" that allow allow mass entry for multiple students at a time for the Cohort.
These view modes can also be used to to monitor the status of all students in the Cohort so you can check compliance and identify gaps or "exceptions".
|
|
|
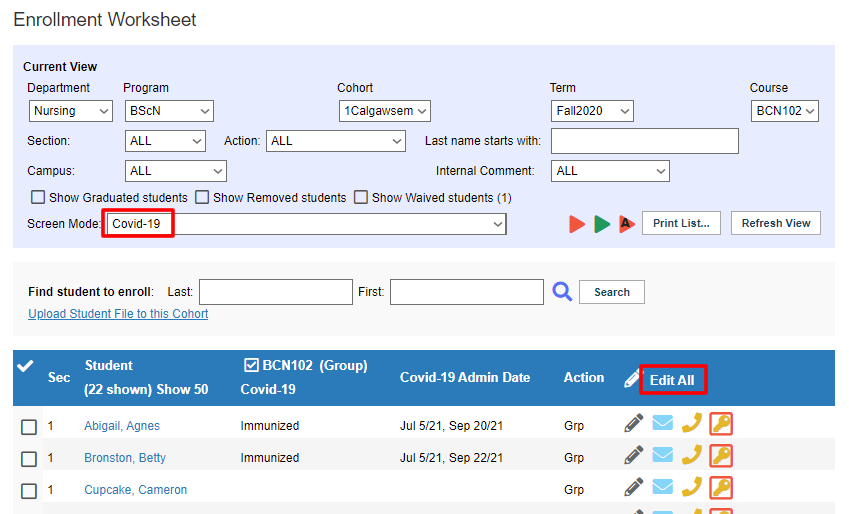
When Covid-19 is selected (for all students on the enrollment worksheet) is displayed.
In this example we can see the two students at the top of the list have Covid-19 entries. We may have come to this screen to perform an update or check these statuses. You can select and e-mail individual students to advise them of expired certifications and advise when you need the updated information by a certain date. (See the document document Student Administrator Guide and click the link in the contents: send e-mails to students).
To enter data, two options are available:
- Click the pencil icon to update a single student.
Click Click Edit All to be able to update several or all students and then save the changes all at once.
|
|
|
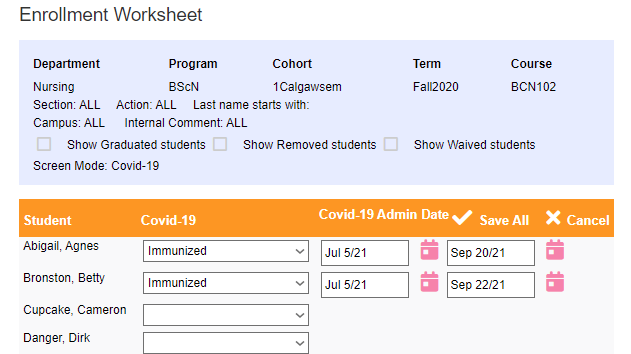
Review/Monitor Information already entered, or enter a specific field for all students from the Enrollment Worksheet. (Continued)
- With
the the screen mode set on on Covid-19 and and Edit All selected, you can update information on Covid-19 for all students and then click click save all.
|
|
Reporting options - When you require a report on Covid-19 data entered into HSPnet for your students follow this section:
|
This guide assumes that you have run a Report Wizard before. If you have not, please see this knowledge base page: Reporting - Report Wizards
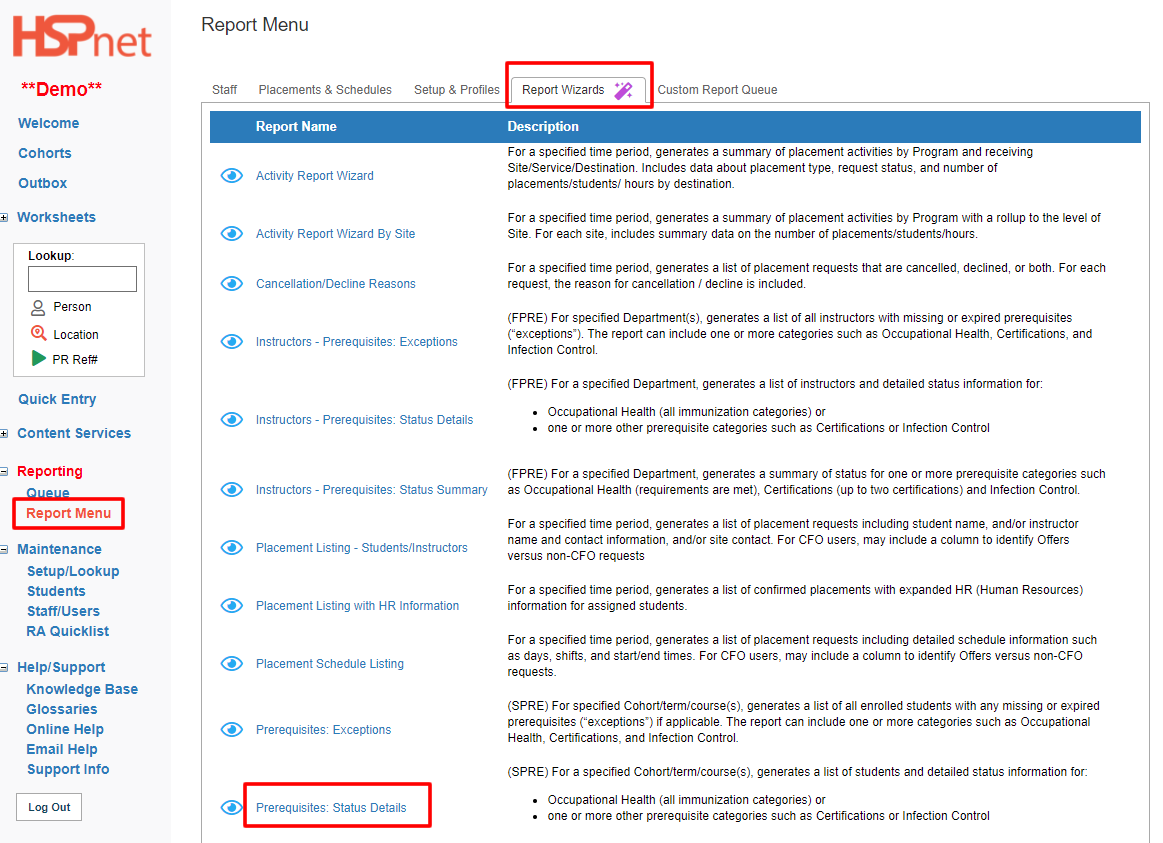
Go to Report Menu and then Report Wizards and choose the the Prerequisites: Status Details report.
This report is for:
(SPRE) For a specified Cohort/term/course(s), generates a list of students and detailed status information for:
- Occupational Health (all immunization categories) or
- one or more other prerequisite categories such as Certifications or Infection Control
|
|
|
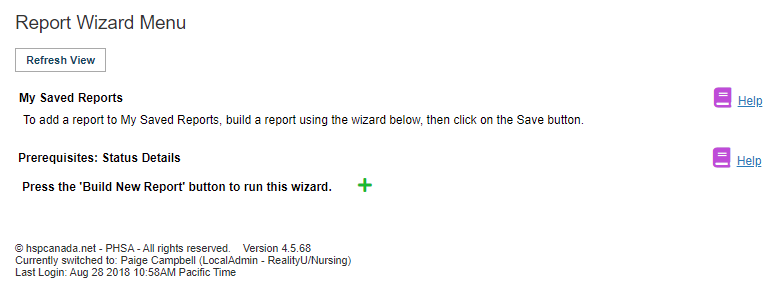
Click the green plus sign  to start the wizard as normal. to start the wizard as normal.
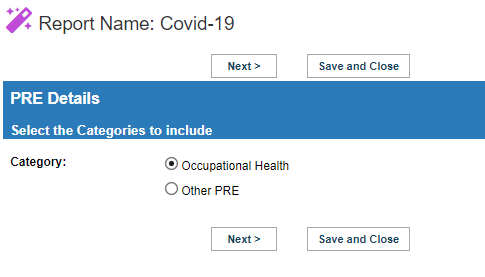
Fill out the information like any other report, clicking next to get to the next section. See the following for two things that will be required.
|
|
| Make sure on this page of the wizard to choose Occupational Health and then Next. |
|
|
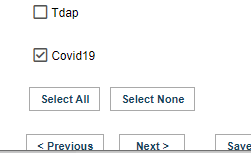
Make sure on this page of the wizard to choose Covid19 at the very bottom and then Next.
Go through the rest with the options that you can choose and then either run the report right away, or Save and Exit to save this report if you will be running it more than once.
|
|


